
Instruction manual


7510/7512
MECHANIC'S MAINTENANCE
Every year a mechanic or service technician should perform the following inspection and carry out the respective
maintenance as required:
FOR SAFETY, TURN OFF SLICER AND DISCONNECT ELECTRICAL CORD.
1.
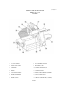
BELT DRIVE: This drive features a multi-ribbed high performance belt for long trouble-free service. Inspect
belt for proper tension. If glazed or excessively worn, replace. A tensioning device automatically allows for
normal belt wear-in and stretching. However, if addi
tional tension is required, it may be obtained by turning
adjustment nuts (Figure 9/10 [18]) clockwise on take up rod (Figure 9/10 [24]) which will further compress
the tensioning spring. As a guideline, the compressed length of the spring should be approximately 7/8".
2.
MOTOR:
Motor is pre
-
lubricated and requires no periodic maintenance or relubrication in normal kitchen
usage. Provision for re-lubrication in extreme duty applications is provided by means of oiling orifices at
both shaft end and opposite ends of motor. A light weight electric motor oil or #10 non-
detergent oil may be
used.
3.
SLICE ADJUSTMENT: Check, by turning the slice adjustment knob (Figure 3 (271) to make sure that the
fence is closing completely (below "0" on knob) and that knife edge is not exposed. If fence is not closing all
the way such that the edge of the knife is exposed, proceed to loosening the lock nut (Figure 7 [29])
and turn
the slice adjustment stop screw (Figure 7 [28]) so the knob can be turned further enough to allow the knife
edge to not be exposed. Now re-tighten the lock nut (Figure 7 [29]). Loosen the two set screws in the slice
adjustment knob (Figure 3 [26]) and re-
adjust its zero position, then tighten the two set screws. Actually, the
closed or zero set position on the knob should be in the red colored zone of the knob's dial.
4.
CARRIAGE: Check for free smooth operation of auxiliary fence, last slice device and for smooth travel of
carnage arm (Figure 6 [19]) Check for excess backlash between slice bearing (Figure 6 [ 14]) and carriage
slide (Figure 6 [7]). The correct lash (clearance) required for smooth carriage operation is obtained when a
very slight lash or movement can be detected. Too much lash can result in the carriage striking and damaging
t
he knife edge. Too little lash results in binding and a loss of smoothness in carriage travel. Lash is adjusted
by loosening locknut (Figure 6 [10]) and turning brass rubbing screw (Figure 6 [11])
clockwise to reduce lash
and counterclockwise to increase lash. Tighten locknut while holding rubbing screw stationary with a
screwdriver so it does not move. Grease only the side of the carriage slide (Figure 6 [7]) on which this brass
rubbing screw slides.
5.
LUBRICATION & FUNCTION CHECK: General lubrication should be performed in accordance with the
lubrication instructions in Figure 2.
during this lubrication sequence, be sure to check for free operation and
movement of related parts as well as for excessive wear and looseness of various parts. Be sure to check all
handles and knobs for tightness.
6.
KNIFE: Check knife edge to see that it has been properly sharpened. If there is any evidence of incorrect
sharpening procedure, such as excessive honing, alert owner and operator.
PAGE 9