
Instruction manual
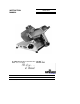


7510/7512
OPERATION INSTRUCTIONS
The Univex slicer is designed to meet the Cook's demand for an efficient, sturdy slicer. The Univex
slicer will give unfailing performance over a period of years, when operated and maintained
according to instructions contained herein.
START/STOP SWITCH
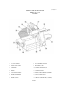
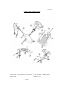
The slicer is started by pushing the start/stop toggle switch (Figure 1 [ 1 ])
upward to the ON position.
A pilot light (Figure 1 [2]) is provided to indicate when the slicer is turned on.
SLICE ADJUSTMENT
WARNING:
Dial type knob adjustment (Figure 1 [13])
allows for slice thicknesses ranging from
paper thin up to 5/8".
Dial graduations allow you to precisely set up specific slice
thickness for various needs. When not in use, always return knob back to its fully
closed position (beyond "0") so that the knife edge is not exposed.
POSITIVE HOLD CARRIAGE
CAUTION:
A last slice gravity feed grip (Figure 1 [5])
is provided which can be locked out of the
way when not required. Do not use this last slice device to work the carr
iage back and
forth. Use only the carriage arm handle (Figure 1 [11]).
Always make sure the carriage is positively secured to the slicer by checking to see that the carriage
arm knob (Figure 1 [10]) is fully tightened. Failure to do this could result in t
he carriage striking and
damaging the knife edge.
KNIFE GUARD
WARNING:
The knife guard (Figure 1 [7])
covers the knife edge completely except under the
sharpener cover and the forward edge where slicing will be performed. This forward
edge is covered by the edge of the fence, but only when the slice adjustment is
completely closed.
The knife guard (Figure 1 [7])
can be removed for cleaning by unscrewing the knife
guard knob (Figure 3 [2]).
For safety, keep the knife guard on at all times except when
cleaning. Never operate the slicer with the knife guard removed.
SHARPENING INSTRUCTIONS
This slicer is equipped with a knife having a concave or hollowed rear surface for superior slicing
quality. Of course, any knife however superior must be sharpened re
gularly and properly in order to
produce not only the highest quality slices, but also to allow it to maintain its productivity. The knife
sharpener (Figure 1 [6]) on this machine is a top mounted built-
in design for simplicity and ease of
use. It even has an automatic aligning feature.
WARNING:
The following sharpening procedure will provide high quality sharpening results and
should also be followed for safety considerations:
(1) WARNING: Keep away from the knife edge.
(2) Completely close the slice adjustment (beyond "0") so that the knife edge is not exposed.
(3)
The knife's cutting area should be clean and free from food, especially grease. Grease will ruin the
ability of a grinding stone to sharpen an edge. The stone simply will not cut. If cleaning is
PAGE 4