
Instruction manual


7510/7512
necessary, follow the procedure outlined on Page 5-6. Remember to unplug the electrical supply cord.
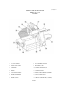
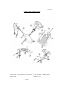
(4) Loosen sharpener lock pin (Figure 3 [4]) which bears against sharpener post, then lift sharpener assembly
(Figure 1 [6]) and rotate it 1/2 turn (180 degrees). Then seat it down over knife.
(5) Tighten sharpener lock pin (Figure 3 [4]). As the lock is tightened, it bears on the sharpener post and
automatically aligns the grinding and debumng stones to the precise orientations which are preset at our
factory.
(6) Turn slicer ON. Depress the sharpener button and hold in which will start the grinding wheel rotating. Run
until the beveled cutting surface cleans up. This can take from 30 seconds to several minutes depending on
how dull the blade was allowed to become. Release sharpener button.
(7) Turn slicer OFF and check for the formation of a very slight burr on the side of knife opposite the bevel
which indicates complete grinding of the bevel. This slight burr can be detected either visually of by picking
with a small piece of stiff paper.
(8) Turn slicer ON. Lightly press deburring (honing) button and hold for 1 to 2 seconds while you turn OFF the
slicer. Blade should now be completely sharpened and honed.
CAUTION: It is very important for best slicing results not to deburr the knife too lone or the keen edge will
be destroyed due to the formation of an undesirable second bevel on the opposite side. This condition tends to
be the primary cause of unsatisfactory slicing results.
(9) Turn slicer OFF. Loosen lock pin, ( Figure 3 [4]) then lift and return sharpener to its storage position. Tighten
lock pin.
(10)
Clean slicer and knife according to the cleaning procedure on Page 5-6 in order to thoroughly remove
grinding debris.
OPERATOR'S CARE OF SLICER
CLEANING
WARNING:
1. Never touch the knife. Always keep your hands, fingers and arms clear of knife.
2. Turn off slicer and DISCONNECT ELECTRICAL CORD (Figure 1 [9]) before cleaning.
Leave protective guard in place.
3. Turn slice adjustment knob (Figure 1 [13]) to the fully closed position (beyond "0") so that the
knife edge is not exposed.
WARNING:
4. Remove carriage assembly (Figure 1 [11]) which may be washed in a sink. Use care in
washing the sharply pointed prongs on the last slice feed grip. (Figure 1 [5]) Wash this area
thoroughly. A small bristle brush is recommended. Use only warm water and mild soap. Rinse
carriage assembly with warm water and dry thoroughly using a clean soft cloth.
Never use detergents nor wash the slicer or any of its parts in a dishwashing machine or the
clear protective finish will be damaged.
PAGE 5