General Mobile Radio Service (GMRS) Model : GMRS-1535 Owner’s Manual A EMG AUDIO OX Customer Service 1-800-290-6650
CAUTIONS NEVER ATTEMPT TO CHARGE ALKALINE OR DRY CELL BATTERIES. WHEN RECHARGING, USE ONLY AUDIOVOX APPROVED RECHARGEABLE BATTERIES AND CHARGER. USE OF THE CHARGER WITH OTHER BATTERIES WILL CAUSE DAMAGE TO YOUR GMRS-1535 RADIO TRANSCEIVER. OTHER TYPES OF BATTERIES MAY BURST CAUSING PERSONAL INJURY. AVOID PLACING THE GMRS-1535 RADIO TRANSCEIVER FOR PROLONGED PERIODS OF TIME IN DIRECT SUNLIGHT OR TEMPERATURES BELOW -4° F (-20° C) OR ABOVE 140 ° F (60° C). KEEP THE ANTENNA AT 1 INCH (2.
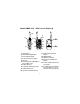
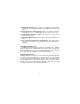
Model GMRS-1535 (FCC License Required) 5 6 3 16 8 4 14 15 9 A 10 EMG 2 1 3 (REF) 11 13 12 AUDIO 1 (REF) OX 7 1. 2. 3. 4. 5. 6. Battery Door Monitor/Backlight Button Detachable Belt Clip Push-To-Talk (PTT) Button Antenna External Speaker(SPK)/Microphone (MIC) Jacks 7. Built-in Speaker 8. Liquid Crystal Display (LCD) 9. Built-in Microphone 10. Up Channel/Volume Button 3 11. Down Channel/Volume Button 12. MODE Button 13. SCAN/Lock Button 14. Emergency (EMG) Call Button 15.
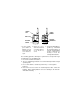
Model GMRS-1535 DISPLAY 8 9 1 2 3 10 11 12 4 5 13 14 6 7 15 1. Beep Tone Indicator: Icon appears when beep button confirmation tone is selected; icon disappears when tone is off. 2. Key Lock Indicator: Icon appears when the keypad is locked. This function disables keys such as channel up/down and MODE. 3. Monitor Indicator: Icon appears when the Monitor (M) button is pressed and the channel monitor function is activated. 4 . Signal Strength Indicator: Icon appears when a signal is being received.
11. Weather Mode Indicator: Icon will be on steady when in the weather band mode. The icon will blink when in the GMRS mode with the alert active. 12.RogerBeep Tone On/Off Indicator: This icon appears when the Roger Beep tone is on, and disappears when tone is not in use. 13.Small Segment Display: Displays the CTCSS tone option in the channel from (00-38). 14.Dual Watch Mode Indicator: Icon appears when dual watch mode is active. 15.
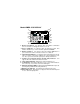
SPRING CLIP COVER ARROW BELT CLIP + POSITIVE TERMINALS BATTERY COVER 1. Using thumb, press down on battery cover at arrow and slide cover down to open. + + 2. Slide the cover down and then lift cover at bottom to open.Remove cover. + 3. Insert four AAA batteries (positive (+) end toward the bottom begining at left side and alternating positive terminals as shown),or insert the rechargeable batteries.
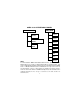
GMRS-1535 OPERATIONAL MODES GMRS BAND WEATHER BAND CHANNEL SELECT CHANNEL SELECT CTCSS SELECT WEATHER BAND ALERT BUTTON BEEP POWER SELECT VOX SELECT DUAL WATCH BUTTON BEEP ROGER BEEP CALL SELECT NOTE: To switch between GMRS and Weather Band modes, press and hold the Mode button for 2 seconds. To differentiate between operating modes, look for HI or LO indication below the battery power level indicator when in GMRS mode. In Weather Band mode, these indications are not present.
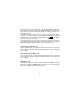
Controls: Power On/Off (15) Button ) for at least 2 seconds. You will Press and hold the power on/off button ( hear a confirming melody to indicate the unit is on. To turn the unit off, press and hold the button for at least 2 seconds. Adjusting the Volume With the unit powered on, press the Up Channel/Volume button ( ) to increase volume and the Down Channel/Volume button ( ) to decrease volume. The display will indicate the current volume level by the small number in the icon ( ).
transmit and receive at the same time. The Transmit/Monitor LED at the upper right corner of the LCD Panel (8) will light red while the PTT Button is pressed and the signal indicator will display the relative strength of the transmitted signal. Releasing the button allows the unit to revert to standby mode. When receiving an incoming signal, the Transmit/Monitor LED indicator will light green and the received signal strength indicator ( ) will display the relative strenth of the signal.
Emergency (EMG) Call Button Button (14) This radio has a quick access button (EMG) to the Emergency and Assistance Channel. This channel is not monitored by local authorities. When using this channel, EMG appears on the display. Pressing this button will set the transceiver to the channel 10, 462.6750 MHz). External Speaker (SPK)/Microphone (MIC) Jacks (6) This set of jacks accepts an Audiovox headset/microphone connector.
Channel Selection In order to communicate with other GMRS units, both transmitting and receiving party must be on the same frequency. The GMRS-1535 has 15 channels (frequencies) (1-15) indicated by the large digits on the LCD display panel. Channels 1 through 7 are the same frequency as FRS channels 1 through 7. Communication with Audiovox FRS and compatible units is possible on these seven channels.
- Then press the Up or Down button to select the desired sub-channel for use. - Press the Power On/Off button momentarily to confirm selection. The CTCSS mode can be turned off by selecting the oF icon as the setting. NOTE: To communicate with other GMRS units, they must be switched to the same channel and CTCSS subcode. To communicate with other GMRS units that do not have subcodes, switch your unit to the same channel with the subcode set to oF.
Channel Scan Operation This feature allows you to monitor all channels automatically for valid signals. While scanning, you can transmit and receive. When a signal is received, the scan is interrupted and will return to scan mode 5 seconds after reception is terminated. NOTE: While the scan function is active, the MODE button will be inoperative. The scan mode will reduce the overall battery life due to the battery save function is overridden.
- Press the SCAN button; the radio will begin scanning for all tone codes (00–38) relative to the current main channel selection. - To disable the tone code scan, press the SCAN button again, and the radio will return to normal operation. Dual Watch Mode This feature allows you to monitor two channels at the same time. While in dual watch mode, the unit will continuously monitor both the primary and dual watch channel.
Key Tone This feature allows the transceiver to sound a confirmation tone whenever the following keys are pressed: Monitor (M) Button, Up/Down Buttons, MODE Button, SCAN Button, or the EMG Button. To turn the key tones on or off, - From GMRS standby mode, press the MODE Button six times until bp, the Bell ( ) icon, and On or oF flash on the LCD display. - Press the Up or Down Button to toggle the key tone feature On or Off. - Press the Power On/Off button momentarily to confirm selection.
To enable and disable the Roger Beep tone: - From GMRS standby mode, press the MODE Button 7 times until rb appears on the display with the flashing Roger Beep icon ( ) and On or oF. - Press the Up or Down Button to select the tone on or off as desired. - When enabled, the tone icon ( ) appears steady on the display. - Press the Power On/Off button momentarily to confirm selection. Call Ringer Selection Mode The transceiver provides 5 user-selectable call ringer melodies to alert you to an incoming call.
Emergency and Assistance Channel Mode This radio has a quick access button (EMG) to the Emergency and Assistance Channel. This channel is not monitored by local authorities. When using this channel, EMG appears on the display. Pressing this button will set the transceiver to the channel 10, 462.6750 MHz). The Emergency Channel can be used transmit and receive on a special frequency (CH10: 462.6750 MHz). The Emergency Channel can be selected quickly from any user mode.
Weather Alert Mode The weather alert mode notifies the user of unusual weather situations. To access the weather alert function: - From Weather Band standby mode, press the MODE button once to access the weather channels and use the Up or Down Button to select the desired channel. - Press the MODE button again to access the weather alert function; weather icon ( ) and AL On or oF appear flashing on the display. - Use the Up or Down buttons to enable (On)/disable (oF) the alert function.
Battery Alert When the battery icon ( ) blinks on the LCD panel, recharge unit or install fresh batteries. If the batteries are not replaced the ( ) icon will appear and an audio tone will sound to warn the user that the batteries must be replaced. Batteries There are two methods of powering the GMRS-1535: 1. Alkaline Batteries - (4 x AAA size) 2. Rechargeable Ni-MH Batteries - (Rechargeable Ni-MH batteries and Charging Stand not included). Use only Audiovox approved rechargable batteries.
Warning • Do not operate the transceiver unless you are licensed to do so. • Remove the batteries from the transceiver if it is not expected to be used for long periods. This will eliminate the possibility of chemicals leaking from the batteries and corroding the transceiver. • Avoid exposing the transceiver to water or extremes of temperature. • Do not use this device in or near a mining facility, which uses remotely triggered explosives or in areas labeled “Blasting Area”.
Troubleshooting (Cont.
Technical Specifications: General Frequency Range GMRS (15 Channels) Channel Spacing Weather Band (7 Channels) Canadian Maritime (3 Channels) Privacy Codes Dimensions (W x H x D) (Without Antenna) 462.5500 - 462.7250 MHz 12.5 KHz 162.4000 - 162.5500 MHz 161.6500, 161.7750, 163.2750 MHz 38 for each main channel 2.10 in x 3.86 in x 1.10 in 53.
This transceiver complies with FCC regulations for use in the United States of America. Use in other countries may be prohibited or restricted by local regulation. Please check with the local regulating agency before using this device outside the United States of America. Weather Channel Frequencies: Channel Freq. MHz 1 2 3 4 5 162.550 162.400 162.475 162.425 162.450 Channel 6 7 8 9 10 Freq. MHz 162.500 162.525 161.650 161.775 163.275 Main Channel Frequencies: Channel 1 2 3 4 5 6 7 8 Freq.
Continuous Tone Coded Squelch System Tone Frequencies (in Hz) CTCSS Freq. Hz CTCSS 1 2 3 4 5 6 7 8 9 10 11 12 13 14 15 16 17 18 19 67.0 71.9 74.4 77.0 79.7 82.5 85.4 88.5 91.5 94.8 97.4 100.0 103.5 107.2 110.9 114.8 118.8 123.0 127.3 20 21 22 23 24 25 26 27 28 29 30 31 32 33 34 35 36 37 38 * oF = No Tone 24 Freq. Hz 131.8 136.5 141.3 146.2 151.4 156.7 162.2 167.9 173.8 179.9 186.2 192.8 203.5 210.7 218.1 225.7 233.6 241.8 250.
90 DAY LIMITED WARRANTY Applies to Audiovox Family Radio and General Mobile Service Products. AUDIOVOX CORPORATION (the Company) warrants to the original retail purchaser of this product that should this product or any part thereof, under normal use and conditions, be proven defective in material or workmanship within 90 days from the date of original purchase, such defect(s) will be repaired or replaced with new or reconditioned product (at the Company's option) without charge for parts and repair labor.
© 2001 Audiovox Electronics Corp.