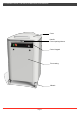
USE AND MAINTENANCE MANUAL AUTOMATIC DIVIDER
Page 2
CONTENT 1 - GENERAL 2 - PRODUCT INFORMATION 2.1 VOLTAGES 2.2 POSSIBLE VERSIONS 2.3 MATERIALS USED 3 - PRODUCT CONCEPTS 3.1 WARNINGS 3.2 DESCRIPTION OF THE PARTS COMPOSING THE MACHINE 3.3 ERROR SIGNALLING 4 - SAFETY 4.1 DANGER DUE TO MECHANICAL COMPONENTS 4.2 DANGER DUE TO ELECTRICAL COMPONENTS 4.3 DANGER DUE TO HYDRAULIC COMPONENTS 4.4 DANGER DUE TO LACK OF HYGIENE 4.5 DANGER DUE TO NOISE 5 - TRANSPORT AND UNPACKING THE MACHINE 5.1 TRANSPORT 5.2 UNPACKING 6 - INSTALLATION 6.
1 - GENERAL It is important to read this manual and comply with the suggestions and/or rules for unpacking, installation, use and maintenance of the machine. If the machine is sold, the manual must be given to the new owner. Only operators trained for use and having read the manual can operate the machine. The manufacturer's warranty obligations only apply to defects arising from correct use of the machine, as described in this manual.
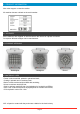
2 - PRODUCT INFORMATION After sales support: contact the retailer. All machine data are outlined on the serial number: 2.1 VOLTAGES All the machines are supplied as standard with a 400 Volt 50 Hz 3 phase connection. On request: different voltages can be manufactured. 2.2 POSSIBLE VERSIONS Rectangular Hexagonal 2.3 MATERIALS USED .Frame in electro-welded, painted or galvanised steel; .Coating in painted steel or stainless steel. .Basins in Anticorodal aluminium MG5 with anodising; .
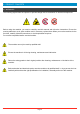
3 - PRODUCT CONCEPTS 3.1 WARNINGS The following signals warn the operator of possible danger due to mechanical or electrical components. Before using the machine, you need to carefully read this manual and follow the instructions. Ensure the warning adhesives are in good condition and, if necessary, replace them. When you use the machine for the first time, carefully follow the instructions, to avoid unpleasant surprises. Do not allow unqualified staff to use the machine.
3.
4 - SAFETY . Remove the plug from the electrical power supply during machine maintenance. . Only qualified and well-instructed staff can carry out mechanical or electrical operations. . The machine must be used by one person at a time. . Do not remove the guards when the machine is on. 4.1 DANGER DUE TO MECHANICAL COMPONENTS . The safety guards protect all the parts. Keep them on during normal operations. All the guards are controlled by a micro.
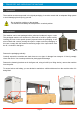
5 - TRANSPORT AND UNPACKING THE MACHINE 5.1 TRANSPORT The machine must be transported in its original packaging. It must be moved with an adequate lifting system to avoid damaging it and injuring yourself. . Do not position anything on the package. . The machine must always be transported in a vertical position. 5.2 UNPACKING The machine can be sent packaged with a pallet and cardboard, cage or crate.
6 - INSTALLATION 6.1 POSITIONING AND MAINTENANCE The machine must only be installed by qualified and authorised staff. The machine must only be used for the purpose of dividing dough (rounding for rounding dividers). The warranty is not valid if changes are made without the manufacturer's authorisation and/or if non-original spare parts are used. Use of non-original spare parts can damage the machine and/or harm the operator. The machine must be positioned on a solid and regular floor.
7 - PRODUCT DESCRIPTION 7.1 SCOPE OF THE MACHINE The dividers are machines that enable cutting pieces of raw dough, in various parts, even large in size, of equal shape and weight according to the model. N.B.: all parts in contact with the product are suitable for the food industry 7.2 UNPERMITED USE OF THE MACHINE The divider can only be used for the activities described in chapter 8. The machine can only be cleaned using products suitable for the food industry. Ensure the machine is on a flat surface.
7.4 HOW THE COMMAND KEYPAD WORKS 7.4.1 WORK PROGRAM SELECTION To select the program to work with, turn the knob to the right or left or increase or decrease the program number. 7.4.2 CHANGING THE WORKING TIMES e To change the working times of the program selected, press knob "e" once. The screens appear in sequence as in the figures below. t 1 (pressing time) The relevant display is highlighted. Turn the knob to the right or left to increase or decrease the value.
7.4.3 CHANGING THE NUMBER OF DIVISIONS (only on double cut models) On models with a double cut, use the selector to set two types of division. pos. + the machine is cutting with the highest number of divisions (e.g. mod. 10/20 divides in 20 pieces) pos. - the machine is cutting with the least number of divisions (e.g. mod. 10/20 divides in 10 pieces) 7.
8 - HOW TO WORK WITH THE MACHINE 8.1 WORKING CYCLE The phases follow for correct use of the divider 1. Position the main switch in the ON position 2. Insert the weighed dough in the basin 4. Close the cover using the specific handle. 5. Press the green Start key Page 14 3. Set the pre-selected program for the working cycle 6. Wait for the green button to flash; Open the cover and remove the cut product.
8.2 USEFUL ADVICE To obtain a good product, proceed as follows: . Put flour inside the basin; . Insert the dough; . Put flour over the dough. Using this method, you avoid the dough sticking to the basin and the cover during the pressing and cutting phase. 9 - JUDGING THE RESULTS The following information will help you obtain the best possible results. The pieces of dough are not the same weight? . Ensure the piece of dough is positioned at the centre of the basin and is slightly pressed by hand. .
10 - MAINTENANCE 10.1 DAILY MAINTENANCE To select the cleaning cycle program, turn the knob until the CL program appears on the display, as in the figure below. a Press the Start button “a”: the machine will automatically position the knives in the highest position (fig.2). Once the knives are cleared, press the Start key again and the machine will lift the surface (fig.3) to conclude the cleaning operation. fig.1 fig.2 Page 16 fig.
10.2 PERIODIC MAINTENANCE To ensure the machine works properly and, in particular to ensure a long life, you are advised to periodically clean it, inside and out (see use manual). The stainless steel parts, the painted covers, the polyethylene PE500 and the plates in PETG can be easily cleaned with water and soap or a neutral detergent, then you need to rinse them with plenty of water and dry them with a soft cloth. 1. Position the main switch in the O OFF position 2.
TECHNICAL DATA RECTANGULAR BASIN no.
Page 19
Reproduction forbidden. The illustrations and technical data in this catalogue are for indication purposes only and are non-binding. The manufacturer reserves the right to make changes, without prior warning, to the technical data and the characteristics of the products at any time for the sole purpose of improving their characteristics.