
Manual


5
5.0) SAFETY WARNINGS: Area around the machine must be properly light
ed, free of
obstructions, and clean. Operators must wear appropriate clothes for operating the machines,
antislip shoes (if necessary protected on toe), sleeves properly buttoned up on wrists,
appropriate head gear to restrain long hair, no dangling clothes such as ties, napkins,
ripped clothes, open jackets, etc, to avoid any risk of getting tangled.
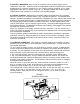
6.0) INITIAL STARTUP: Make sure the protection grids are lowered before any operation
when the current is on. Just press button 1 (Fig. 3) to start the machine. The indicator lamp
will light.
Operate foot pedal (3) or foot pedal (2), if equipped, (Fig. 3) to verify the belt moves in the
direction of the arrow shown in figure 3. Raising the lever 2 (or stepping on the foot pedal on
the opposite side) should reverse the operation of the belts. Test the adjusting lever of the
roller by moving lever 4 (Fig. 3) from the right to the left. The spring loaded trigger will catch
in the toothed selector. To release the thickness control setting, press trigger 5 (Fig. 3)which
will allow free movement of the lever.
When the thickness of the pastry mixture has been achieved, it can be stored in the
memory by means of ratchet 6 (Fig. 3); this prevents the adjusting lever from moving forward
from the thickness established.
Test the protection grids to ensure that the safety microswitches controlling the protection
grids work correctly by lifting the grids one at a time as the machine is operating. When
you lift them the machine must stop. If the machine does not stop, consult the factory. The
machine is operational.
7.0) SHEETER OPERATION: This machine is normally used for the production of pastry
products but can be used for other applications using rolled dough. Consult factory for
your specific application.
To “fine” down the pastry mixture, you must place on the belt, a “block” of pastry/dough
mixture composed of alternate layers of butter or margarine and outside the flour dough. If
necessary, it is also important to dust some flour on the areas in contact with the blocks,
belts, and rollers; in the central area of the crown there’s a special housing (Item
3, Fig. 4) for this purpose. Adjust the rollers using the Thickness Control Handle (Item
4, Fig. 3) to reduce thickness by 10-15%, initially, and start the machine. The “block” will
be sheeted towards the rollers and reduced by them as the dough mixture passes from
one side of the sheeter to the other. The thickness is reduced and the “block” is enlarged
and lengthened with each pass.
When the “block” is out of the rollers, the motion must be reversed by means of Lever 2
(Fig. 3) or Pedal 3 (Fig. 3) and, at the same time, the rollers must be adjusted via the
Thickness Control Handle 4 (Fig. 3) to carry out another “fining” OR “thinning”.
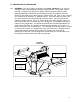
The pastry/dough mixture becomes wider and wider as the process goes on; for this
reason, at the end of any belt there are two trays (Item 1, Fig. 4) to carry the
finished product. When they are full, the rolling pins (Item 2, Fig. 4) must be used to
roll up the product.
FIGURE 4
SHEETER OPERATION