
Troubleshooting guide
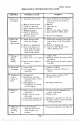

SRM2O - SRMF2O
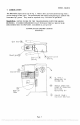
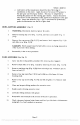
SPEED CONTROL ASSY. (Fig. 10)
.jumbly
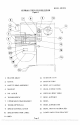
Remove housing cover (Fig. 12 [16]) and rear access panel (Fig. 12 [23]).
Loosen screw on collar (Fig. 10 [17]). Remove collar rod end (16) and
o'ring (Fig II [8]) from cam assembly (lI). Loosen set screws (10) in cam
assembly (Il).
Drive roll pin (4) from hub (3) and pull hub (3), lever (2), and handle (1)
from cam assembly shaft (Il). Remove washer (5) from cam assembly
(Il)
Unscrew hub (3) and handle (1) from lever (2).
Remove nut (8) and washer (7) from studs holding speed control bearing (6)
to housing (Fig. 12 [3]).
6,
Withdraw bearing (6) and remaining assembly from housing (Fig. 12 [31).
Pull cam assembly (11) from bearing (6).
Remove screws (20), lock washers (21), strap (22), and spring (19) from
bearing (6).
Remove screws (13) and detent disk (12).
Rc&ssernik
10
Reassemble in reverse of above procedure. Grease cam assembly shaft (Il)
and detent disk (12) during assembly with MolyKote BR2 Plus or general
purpose bearing grease. Adjust belt as described in Mechanics Maintenance
1 paragraph a,d-f.
11
1f speed control handle (I) moves while the mixer is running, tighten set
screws (10) against spring washer (9) until movement stops.
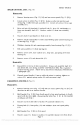
YARI-SPED ASSEMBLY (Fig Il)
PisisseJllWy
Remove housing cover (Fig. 12 [16]) and rear access panel (Fig. 12 [23]) as
described in the cover removal section.
Shift handle (Fig. 10 [I]) from fourth speed to first speed and back to fourth
speed with the mixer OFF. (Squeezing the belts (Fig. Il [Il & 21]) together
at midspan will help.)
Unscrew nut (13) and remove washer (14) and belt retainer (15).
Unwrap belt (Il) from pulley (12) and withdraw from van-speed pulley
(10).
Shift handle (Fig. 10 [1]) to first speed.
Unscrew nuts (13). Remove washers (14) and belt retainer (22) from mixer.
Page 9
PDF compression, OCR, web optimization using a watermarked evaluation copy of CVISION PDFCompressor