
Troubleshooting guide
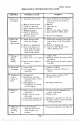

SRM2O - SRIvÍF2O
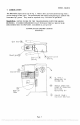
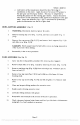
3. Input Assembly (Fig. 6)
Remove two cap screws (Fig. 6 [10]) and withdraw assembly from
transmission.
Remove retaining ring (I), gear (2), keys (5, 7), retaining rings (1) and
press shaft (6) and bearing (4) from housing (8).
e. Remove retaining rings (3) and press bearing (5) from housing (6).
d. Remove retaining ring (1) and press shaft (6) from bearing (4).
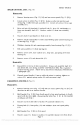
4.
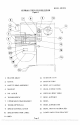
Vertical Shaft Assembly (Fig. 7)
Remove key (4).
Invert housing on suitable support and press shaft (2) from
transmission housing (Fig. 3 El]).
Remove lower bearing (8) with puller and remove spacer (7).
Remove retaining ring (6) and pull or press upper bearing (5) from
transmission housing (Fig. 3 [1]).
Remove pin (3) and press shaft (2) from gear (1).
REASSEMBLE
Clean all components except bearings with safety approved cleaning
solvent. Inspect components for defects and replace those found to be
defective.
NOTE: All gears should be replaced as sets.
If shafts have become slightly scored during the disassembly process,
polish the shafts with fine machinist's crocus cloth. Use care to avoid
excessive removal of shaft surface or proper fit of components will be
lost.
e.
Reassembly should be carried out in the reverse of the disassembly
procedures stated above. Successful reassembly is very dependent on
the cleanliness of all surfaces particularly the bores of housings, gears
and bearings as well as the outer surface of shafts.
It is well to
recheck each component for cleanliness as it is picked up for
reassembly. New keys and roll pins should be used on reassembly.
d. Transmission should be progressively checked for smooth operation
while on the workbench by hand turning each assembly as it is
installed.
Page 7
PDF compression, OCR, web optimization using a watermarked evaluation copy of CVISION PDFCompressor