
Instructions / Assembly


Mounting the Solar Panel
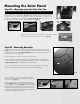
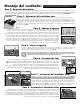
Step 9A – Mounting onto the Solar Attic Fan
Loosen and remove screw A on the solar panel (both sides) to allow the panel to swing away
from the base. Set the screws aside. (fig. 10) Pull the wire from the top of the fan housing
through the hole in the center of the panel base and lay the panel down so the bolts come
through the adjusting slots in the panel base. (fig. 11 and fig. 12) Tighten the bolts on the
panel base at the desired angle for optimal panel direction.(fig. 13)
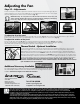
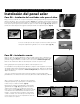
Step 9B – Mounting Remotely
Use the Quick Connector cable coming through the top of the solar attic fan shroud
(fig. 15) and connect the wire extension directly to this cable (included in some models
or order as an accessory from www.ussunlight.com). Use the other end of the exten-
sion wire to attach to the solar panel.
Use roofing staples to secure the extension cable to the roof.
Fans including 20 watt panels and larger come equipped with 15 feet of additional
wire to remotely mount the solar panel. Additional wire extensions can be purchased
at www.ussunlight.com for installations up to 90 feet away.
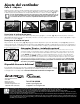
Choose a location for the solar panel that will receive optimal afternoon sun, prefer-
ably southwest facing, and free of shade from trees or other buildings.
Loosen and remove screw A on the solar panel (both
sides) to allow the panel to swing away from the base. Set
the screws aside. (fig. 18)
Mount the solar panel base using four 3” galvanized
screws, (fig. 19) making sure to seal the screw holes with
a roof tile adhesive as shown (fig. 20). Tilt the panel away
from the base while installing the screws. If the panel is
to remain flat against the base when installed, it is recom-
mended that you allow the roof tile adhesive to completely
dry before contacting with the panel.
fig. 10
fig. 18
fig. 11 fig. 12 fig. 13
fig. 14
fig. 15
screw A
screw A
fig. 19
fig. 20
Attach the cable coming from the junction box to the cable coming
from the top of the fan with the quick connector. (fig. 14)
We recommend remote mounting solar panels 30 watts and larger, refer to Step 9B.