
Installation Guide


Page 2 of 7
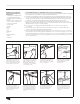
Install Your Ceiling, Step by Step
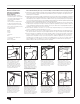
1. Choose the ceiling height — Install
your ceiling at any level, as long as you
maintain enough clearance (3 in. or 75
mm is recommended) below the lowest air
duct, pipe, or beam to install panels. Mark
the desired height at each room corner.
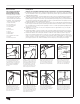
5. Locate main tees — Stretch a string
across the room at ceiling height to
locate each main tee. To do this, pull the
string taut around nails that are inserted
between the wall and the wall angle at
opposite wall locations.
6. Locate cross tees — Stretch a string
perpendicular to the main tee strings
where you want to locate the first row of
cross tees. You only need to do this once,
since prepunched slots in the main tees
ensure spacing of subsequent rows of
cross tees.
7. Install hanger wires — Install screw
eyes, with hanger wires attached, every
4 ft. (1220 mm) along main tee string
lines. The wires should extend 6 in.
(150 mm) below the string line.
8. Bend hanger wires — Use pliers to
bend a 90° angle in all hanger wires at
a point 3/4 in. (19 mm) above the string.
If the nearest hanger hole is not directly
below the screw eye, adjust the hanger
accordingly.
2. Mark a perimeter chalk line — Snap a
chalk line around the entire room perimeter,
3/4 in. (19 mm) above your desired ceiling
height. Check it with a carpenter’s level.
Measuring alone, either down from joists
or up from the floor, is not recommended,
since either might not be level.
3. Install wall angles — Align the top edge
of the wall angle with the chalk line and
nail wall angles around the entire room.
Nail at each stud location or at a minimum
of 2-ft. (610 mm) intervals.
4. Cut off the corners — At inside corners,
cut wall angles straight (90°) and butt them
together. At outside corners, miter them
(45°) and fit snugly together,
or use corner caps.
Tools and Materials Plan Your Ceiling
Before installation, plan the process by drawing the room to scale on a sheet of graph paper:
1. Locate room center line: Determine the room center line (preferably perpendicular to the ceiling joists) and draw it on the graph
paper� Aligning main tees perpendicular to the ceiling joists will make installation easier�
2. Locate main tees: On the graph paper, mark off 4-ft� (1220 mm) intervals across the room width, beginning at the center line and
going to each side wall� If more than 2 ft� (610 mm) remain between the last mark and the side wall, locate main tees at these marks�
If less than 2 ft� (610 mm) locate main tees at 4-ft� (1220 mm) intervals beginning 2 ft� (610 mm) either side of the center line� This
procedure helps ensure symmetrical border panels of the largest possible size and the most efficient use of material�
3. Locate cross tees: To locate cross tees, draw lines at 2-ft� (610 mm) intervals perpendicular to main tees� For economy,
appearance, and equal border panels, begin at the center of the room, using the same procedure as in #2 above� This completes
planning for the basic 2 x 4-ft� (610 x 1220 mm) ceiling grid�
4. For a 2 x 2-ft. (610 x 610 mm) grid pattern: Simply indicate additional 2-ft. (610 mm) cross tees bisecting each
2 x 4-ft. module.
5. Check your pattern: If upon completing your plan, your border panels are less than 1/2 of a full panel, adjust your tee
locations to ensure symmetry with the largest border panels possible.
6. Check your materials: From the diagram, determine the number of pieces of wall angle, main tees, cross tees, and ceiling
panels required to be sure that you have purchased enough. Main tees come in 12-ft. (3660 mm) lengths, cross tees in 4-ft.
[1220 mm] lengths (additional 2-ft. [610 mm] cross tees are required if 2 x 2-ft. [610 x 610 mm] panels are used) and wall
angles in 10-ft. lengths (sometimes 12-ft. [3660 mm] lengths). Also, you will need one hanger wire and screw eye for every
4 ft. (1220 mm) of main tees.
In addition to USG C
eilings materials,
you’ll need some other supplies and
a few hand tools:
– Screw Eyes, Anchors, or Hanger Wire Hooks—
For suspending ceiling from joists at 4-ft�
(1220 mm) intervals� Determine quantity from
your plan�
– Hanger Wire—Buy one 18-ga� wire for each
screw eye� (12-ga� for commercial projects�)
– 6d (six-penny) Common Nails
– Carpenter’s Square
– Utility Knife
– Hammer
– Pliers
– String
– Tape Measure
– Level
– Hacksaw or Metal Snips
– Chalk Line
– Safety Glasses