
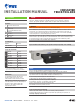
Installation Guide

UWSTA.COM
•
NEED ASSISTANCE?
•
87 7. 2 87.8 6 3 4
•
RA
•
PAGE 2
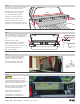
Step 1
Place the tool box in the truck bed, as shown.
Check the clearance with the lid open.
Attach the adhesive side of the rail pad
to the underside of the tool box ends.
Place the tool box with the rail pads
adhered on top of the truck bed rails.
Using a tape measure, make sure the
tool box is centered in the truck bed.
Open the tool box lid. Ensure there is clearance
between the open lid, top and back of the cab.
Step 4
CAUTIO N
Ensure all knobs, bolts, screws, straps and
locks are firmly secured before every trip.
Periodically re-tighten and inspect all components
for signs of wear, corrosion and fatigue.
With the crossover tool box installed, periodic
inspections should be performed to ensure
all mounting hardware remains tight.
To protect your investment, see the
'Maintenance' section on page 1.
Congratulations on the installation of
your new UWS crossover truck tool box.
Rail pad
Center
Rail pad
Step 2
Place a J-hook under the lip of the bed rail and
insert the threaded end up through the slot.
Only use one hole and J-hook assembly on each
side.
Attach with a washer and nut.
Snug the hardware, but do not fully tighten.
Repeat on the other side of the vehicle.
Re-measure to ensure the tool box is centered
and allows lid clearance when open.
Fully tighten all hardware.
Step 3
Tool boxes come with adjustable strikers.
If the strikers are ever out of alignment,
simply loosen, adjust and re-tighten.
Periodically lubricate the strikers and
locks to ensure optimum performance.
Rail pad
Nut
Washer
J-hook