
Installation Guide

UWSTA .COM
•
NEED ASSISTANCE?
•
87 7. 2 87.8 6 3 4
•
RA
•
PAGE 2
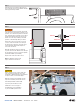
Step 1
Park the truck on level ground. Place the tool
box on the bed rail of the truck with the handles
and logo plate facing outward.
Step 2
WARNING
Before drilling into your truck bed, check under
your vehicle to ensure the drill location does not
puncture, cut or obstruct any brake or fuel fluid
lines, electrical wires, fuel tanks, etc. Precaution
must be taken that all fasteners near the fuel
tank do not create the possibility of fuel tank
puncture or other damage during a collision.
Ensure the tool box is level. Place one leg on
a corner of the tool box that is not resting on
the bed rail. Use a square to ensure the leg is
vertical and at the appropriate height so it
rests on the truck bed.
Mark two mounting locations to attach the
leg to the box as shown. Drill two holes through
the leg and tool box corner. Secure the leg with
purchased hardware (not included).
Repeat on the other end of the tool box.
Note: For added security, the legs
may be bolted to the truck bed.
Step 3
CAUTIO N
Ensure all knobs, bolts, screws, straps and
locks are firmly secured before every trip.
Periodically re-tighten and inspect all components
for signs of wear, corrosion and fatigue.
With the topside tool box installed, periodic
inspections should be performed to ensure
all mounting hardware remains tight.
To protect your investment, see the
'Maintenance' section on page 1.
Congratulations on the installation
of your new UWS topside tool box.
Nylock nutHex bolt
Flat washerFlat washer