
Installation Guide

UWSTA.COM
•
NEED ASSISTANCE?
•
87 7. 2 87.8 6 3 4
•
RA
•
PAGE 2
Step 1
Carefully place the trailer tongue box in the location where you expect to mount it. Ensure the box is centered left to right on the tongue, and the lid
will not contact anything when opened. Ensure the leveling crank on the trailer (if present) will not hit the box when the crank handle is rotated.
Mark the locations on the bottom of the box for mounting, using proper spacing for the U-bolts (not included).
Step 2
WARNING
The trailer box is designed to install on the
tongue of a trailer. Before drilling into the box,
ensure that your approximate drill locations will
not puncture, cut or obstruct any brake or fluid
lines, electrical wires, fuel tanks, etc.
Drill holes in the front and rear of the box
spaced properly for the U-bolts (not included).
Holes must be drilled through the aluminum
angle in the bottom of the box for added strength.
Position the U-bolt around the trailer tongue
and up through the bottom of the box. Secure
with washers and nuts (not included).
Step 3
CAUTIO N
Ensure all knobs, bolts, screws, straps and
locks are firmly secured before every trip.
Periodically re-tighten and inspect all components
for signs of wear, corrosion and fatigue.
With the trailer tongue box installed, periodic
inspections should be performed to ensure
all mounting hardware remains tight.
To protect your investment, see the
'Maintenance' section on page 1.
Congratulations on the installation
of your new UWS trailer tongue box.
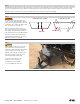
Single-tube tongue, top view Y-style yoke, top view
Drill marks
Drill marks