BRATT PAN FUTURA PE FUTURA PES FUTURA PED TYPE: 60, 85, 110 Accessories HEIGHT ADJUSTMENT Installation and Operation Manual S/N: 095441/01 Valid from: 13.10.2009 Rev.: 3.
26.10.2009 Rev. 1. General .......................................................................................................... 1 1.1 Symbols used in the manual .......................................................................................... 1 1.2 Symbols used on the appliance ...................................................................................... 1 1.3 Checking the relationship of the appliance and the manual .......................................... 1 2. Safety .........
26.10.2009 Rev. 7. Spare parts .................................................................................................. 13 7.1 Voltage codes .............................................................................................................. 15 7.2 Product codes ............................................................................................................... 15 8. Technical specifications ..............................................................................
26.10.2009 Rev. 3.6 General 1. General Carefully read the instructions in this manual as they contain important information regarding proper, efficient and safe installation, use and maintenance of the appliance. Keep this manual in a safe place for eventual use by other operators of the appliance. The installation of this appliance must be carried out in accordance with the manufacturer’s instructions and following local regulations.
26.10.2009 Rev. 3.6 Safety 2. Safety 2.1 Safe use of the appliance Because the bratt pan is a heated appliance that has hot surfaces during normal use, the following warnings and instructions must be followed to avoid burns. • • • • 2.2 During long-time operation even the sides of the frying surfaces, the pouring lip and the lid get hot. For safe frying, always use heat protective gloves and appropriate accessories.
26.10.2009 Rev. 3.6 Functional description 3. Functional description 3.1 Intended use of the appliance The Futura PE bratt pan is intended for heating and frying of food. 3.1.1 Use for other purposes Use of the appliance for other purposes than stated above is prohibited. The manufacturer of the appliance takes no responsibility for situations that may occur if warnings and instructions in this manual are neglected. 3.
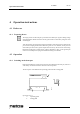
26.10.2009 Rev. 3.6 Operation instructions 4. Operation instructions 4.1 4.1.1 Before use Preparing the use The frying surface of the bratt pan is protected with a thin layer of grease during storage and transportation. Before first-time use the grease must be removed by using hot water and detergent. After the cleaning, the frying surface must be burned in with salt-free grease. Heat up the pan to 200°C keeping the lid closed.
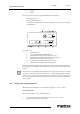
26.10.2009 Rev. 3.6 Operation instructions 3. 4. Tilting Return The pan is switched on by pressing the ON/OFF button, whereafter • • • the heating-up starts the green pilot light goes on the temperature displays show the preset temperature of 180°C (only one display in model PE 60). 2 7 3 4 5 1 6 Operating panel 1. ON/OFF button 2. Green pilot light PAN SWITCHED ON 3. Red temperature display (PE 60, PE 85, PE 110) 4. Setting buttons for temperature (PE 60, PE 85, PE 110) 5.
26.10.2009 Rev. 3.6 Operation instructions • The heating-up of the other zone can be switched off by setting the temperature to 0°C. The preset frying temperature 180°C remains in memory and is activated for use by switching off the pan with the ON/OFF button and then turning it on again. During long-time use, heat is transferred from one zone to the other. Although one zone would be switched off, it gets gradually warm, reaching a temperature that is about half of the temperature of the heated zone.
26.10.2009 Rev. 3.6 Operation instructions 4.2.5 Adjusting the working height Before adjusting the working height of the bratt pan, check that nothing is in the movement area or leaning against the moving part of the bratt pan. Adjustment of the working height is possible in bratt pan models with letter H included in the model marking. These models have two push buttons on the operating panel for the option (Figure “Operating panel” in Section “Switching on the bratt pan”).
26.10.2009 Rev. 3.6 Operation instructions The frying surface of the pan is rinsed with hot water, dried by heating up and greased with salt-free grease. All other surfaces are rinsed and wiped dry. Water usage on the control panel and the electric box must be avoided. Use of a water hose or pressure cleaning jet is strictly forbidden.
26.10.2009 Rev. 3.6 Installation 5. Installation 5.1 Transporting and unpacking the bratt pan The best way to move the bratt pan is to keep it in its own package as long as possible while it also protects the pan from outer damage. If it is necessary to unpack the pan, possible lifting must thereafter be done from the bottom frame of the base by using suitable spacers of wood. In order to avoid damage, it is not allowed to use the lid as a workbench during installation.
26.10.2009 Rev. 3.6 Installation 5.4 Test-run Besides the live electrical parts also look out for possible moving mechanisms in the lower part of the appliance, if there is a need for testing the appliance during installation while the guards or cover plates are detached. Make sure that the protective grease has been removed from the frying surface before taking the pan into use. See “Preparing the use”.
26.10.2009 Rev. 3.6 Troubleshooting 6. Troubleshooting If the appliance does not function, check the following: • • • Has the appliance been used according to the instructions? Are all possibly removable parts refitted? Are the mains switch on the appliance or nearby - often on the wall - in the ON position? If even this does not help, figure out in advance how to briefly describe the break-down and contact an authorized service person. The appliance does not include any user serviceable parts inside.
26.10.2009 Troubleshooting 12 Rev. 3.
26.10.2009 Rev. 3.6 Spare parts 7. Spare parts General parts PE .................................. 17 General parts PE .................................. 19 Tilting device PE................................... 21 Height adjustment device PE .............. 23 Electrical components PE.................... 25 Electrical components PE....................
26.10.2009 Spare parts 14 Rev. 3.
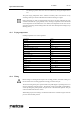
26.10.2009 Rev. 3.6 Spare parts Voltage Voltage code A 3/N/PE∼400/230V 50Hz B ∼250V 16A 50Hz C 3/N/PE∼380/220V 50Hz D 3/PE∼200V 50-60Hz F 2/PE 220−240V 50Hz G 3/N/PE∼415/240V 50Hz H 3/PE∼230V 50Hz I 3/PE∼220V 60Hz J 3/PE∼380 50Hz K 3/PE∼400V 50Hz L 3/PE∼415V 50Hz M 3/PE∼440V 60Hz N 3/PE∼460V 60Hz O 3/PE∼480V 60Hz P 1/N/PE~220-240V 50Hz R 2/PE~220-230V 60Hz S 3/N/PE∼400/230V 50Hz T 3/PE∼230V 60Hz U 1/N/PE~100V 50-60Hz Product code 7.1 Voltage codes 7.
26.10.2009 Spare parts 520 540 490 500 510 430 440 450 530 540 550, 560, 570, 580, 590, 600 610, 620, 630 730, 740, 750 720 700, 710 460 470 480 16 910 920 925 930 935 940 950 960 Rev. 3.
26.10.2009 Rev. 3.
26.10.2009 Spare parts 520 540 490 500 510 430 440 450 530 540 550, 560, 570, 580, 590, 600 610, 620, 630 730, 740, 750 720 700, 710 460 470 480 18 910 920 925 930 935 940 950 960 Rev. 3.
26.10.2009 Rev. 3.
26.10.2009 Spare parts 990 980 970 970 1010 990 1000 20 Rev. 3.
26.10.2009 Rev. 3.
.10.2009 Spare parts 22 Rev. 3.
26.10.2009 Rev. 3.
26.10.2009 Rev. 3.
26.10.2009 Rev. 3.
26.10.2009 Rev. 3.
26.10.2009 Rev. 3.
26.10.2009 Spare parts 28 Rev. 3.
26.10.2009 Rev. 3.6 Technical specifications 8.
Heating control, circuit board connections [PE; 60]
1. Lämmityselementit Värme-element Heating elements 5. Säätökortti, vasen (1) Styrkort, vänster Regulation card 2. Lämmityselementtien kaapelit Värme-elementens kablar Cables to heating elements 6. Säätökortti, oikea (2) Styrkort, höger Regulation card, right 3. Termolangat (tuntoelin) Termoelement (givare) Thermocouple (sensor) 7. Vasemman vyöhykkeen ohjaus (1) Vänstra zonens styrning Left zone control 4. Relekortti Reläkort Relay card 8.
Heating control, circuit board connections [PE; 85, 110]
$ /,6b77< (0& 9$$7,086 26$7 = = /,6b77< 0,.52.<7. 6 0XXWRV Wiring diagram T00558B4 [PE 60] 3( / / / . . [ : 9 9 9 9 9 1 9 1 3( 30 ( ( 5/ . . . 1 . ( ( ( ( +($7,1* (/(0(17 &211(&7,21 / / / 3( ( . . . . 5/ . 1 9 9 9 9 ) $ ) $ $ $ ) ) ( . . .
Wiring diagram T00185A3 [PE 60] ( . 9 a 9 a 5/ . 9 9 a 1 . . 9 1a 9 1a 3( 30 3( / / / [ : 9 / / / 3( / / / 1 3( . . . ( 1 5/ . . . ( . . . 1 ( 5/ . ( ( ( ( . . 9 a ( . . . ) ) ( . .
$ /,6b77< (0& 9$$7,086 26$7 = = /,6b77< 0,.52.<7. 6 0XXWRV Wiring diagram T00184C3 [PE 85, 110] 3( 3(+ 3( / / / 3( 3(+ 9 6$5-$.<7.(17b 6(5,(6 &211(&7,21 3( 3(+ 3( 3(+ 3( 3(+ / / / 3( 9 9 6$5-$.<7.(17b 6(5,(6 &211(&7,21 3( 3(+ 9 6$5-$.<7.(17b 6(5,(6 &211(&7,21 . . ( N: 9 N: 9 ( ( N: 9 N: 9 N: 9 N: 9 ( ( .
Wiring diagram T00942 C3
Main and control circuit 82947N83 [PE; 85, 110]
Heating element connection 81591-83 [PM, PE]
Installation drawing 80800-63C [PE]
26.10.2009 Rev. 3.