Wet/Dry Vacuum Operator’s Manual 10 Gallon Model No. VBVA1010PF FOR YOUR SAFETY Read and understand this manual before use. Keep this manual for future reference. Distributed By Cleva North America, Inc. 601 Regent Park Court Greenville, SC 29607 Replacement Filters & Accessories available at: Vacmaster.
TABLE OF CONTENTS SECTION PAGE Warranty........................................................................................................................................ Safety Instructions & Warnings..................................................................................................... Double Insulation Instructions....................................................................................................... Extension Cords.....................................................
SAFETY INSTRUCTIONS & WARNINGS IMPORTANT SAFETY INSTRUCTIONS READ AND UNDERSTAND ALL INSTRUCTIONS BEFORE USING THIS VACUUM. Read and understand this operator's manual and all labels on the Wet/Dry Vacuum cleaner before operating. Safety is a combination of common sense, staying alert, and knowing how your vacuum works. Use this Wet/Dry Vac only as described in this manual. To reduce the risk of personal injury or damage to your Wet/Dry Vac, use only Vacmaster® recommended accessories.
DOUBLE INSULATION INSTRUCTIONS This Wet/Dry Vac is double-insulated, eliminating the need for a separate grounding system. Use only identical replacement parts. Read the instructions for Servicing Double-Insulated Wet/Dry Vacs before servicing. Use this Wet/Dry Vac as described in this manual. Observe the following warnings that appear on the motor housing of your Wet/Dry Vac. DOUBLE INSULATED - GROUNDING NOT REQUIRED - WHEN SERVICING USE ONLY IDENTICAL REPLACEMENT PARTS.
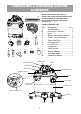
UNPACKING & CHECKING CARTON CONTENTS A Remove all contents from the box. Remove the power head and take out any contents inside the collection tank. Check each item against the carton contents list. B Carton Contents List Key Description........................... Q t y. A Vac Assembly...........................1 B Extension Wands.............2 C Hose.........................................1 D Blower Concentrator Nozzle......1 E Caster Foot Assembly............4 F Foam Wet Filter........................
GENERAL ASSEMBLY INSTRUCTIONS A Philips head screw driver is required. 1 2 3 4 5 6 7 8 9 10 11 WARNING: TO REDUCE THE RISK OF ELECTRIC SHOCK, DO NOT EXPOSE TO RAIN. MAKE SURE PLUG IS DISCONNECTED BEFORE ASSEMBLING THE WET/DRY VAC. UNPACKING YOUR WET/DRY VACUUM & GENERAL ASSEMBLY 1. Verify that the power cord is disconnected from the outlet. (Fig. 1) 2. Undo the latches. (Fig. 2) 3. Lift the power head off the collection tank. (Fig. 3) 4.
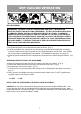
DRY VACUUM OPERATION 1 2 3 4 5 6 DRY VACUUMING WARNING: BE SURE TO READ, UNDERSTAND, AND APPLY, INFORMATION ENTITLED ‘SAFETY INSTRUCTIONS & WARNINGS’. DO NOT VACUUM IN AREAS WITH FLAMMABLE GASES, VAPORS, OR EXPLOSIVE DUSTS IN THE AIR. FLAMMABLE GASES OR VAPORS INCLUDE BUT ARE NOT LIMITED TO: LIGHTER FLUID, SOLVENT TYPE CLEANERS, OIL-BASED PAINTS, GASOLINE, ALCOHOL, OR AEROSOL SPRAYS. EXPLOSIVE DUSTS INCLUDE BUT ARE NOT LIMITED TO: COAL, MAGNESIUM, GRAIN, OR GUN POWDER.
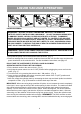
LIQUID VACUUM OPERATION 1 2 4 3 5 LIQUID VACUUMING WARNING: BE SURE TO READ, UNDERSTAND, AND APPLY, INFORMATION ENTITLED ‘SAFETY INSTRUCTIONS & WARNINGS’. DO NOT VACUUM IN AREAS WITH FLAMMABLE GASES, VAPORS, OR EXPLOSIVE DUSTS IN THE AIR. FLAMMABLE GASES OR VAPORS INCLUDE BUT ARE NOT LIMITED TO: LIGHTER FLUID, SOLVENT TYPE CLEANERS, OIL-BASED PAINTS, GASOLINE, ALCOHOL, OR AEROSOL SPRAYS. EXPLOSIVE DUSTS INCLUDE BUT ARE NOT LIMITED TO: COAL, MAGNESIUM, GRAIN, OR GUN POWDER.
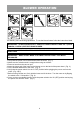
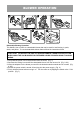
BLOWER OPERATION 1 2 6 7 4 3 5 This Wet/Dry Vac has blowing capabilities. To use the blower feature follow the instructions listed. WARNING: ALWAYS WEAR SAFETY GOGGLES COMPLYING WITH ANSI Z87.1 (OR IN CANADA, CSAZ94.3) BEFORE USING BLOWER. CAUTION: WARNING: BE INHALED. KEEP BYSTANDERS CLEAR FROM BLOWING DEBRIS. WEAR A DUST MASK IF BLOWING CREATES DUST THAT MIGHT 1. Verify that the power cord is disconnected from the outlet. (Fig. 1) 2.
BLOWER OPERATION 3 2 5 4 6 7 Detachable Blowing Operation This Wet/Dry Vac converts to a detachable blower that can be used for leaf blowing in yards, decks, and patios. To use the detachable blower feature follow the instructions listed. CAUTION: TO REDUCE THE RISK OF HEARING DAMAGE, WEAR EAR PROTECTION WHEN USING THE VAC/BLOWER FOR EXTENDED HOURS OR WHEN USING IT IN NOISY AREAS. 1. Verify that the power cord is disconnected from the outlet. (Fig. 1) 2.
MAINTENANCE EMPTYING THE COLLECTION TANK 2 1 4 3 1. Verify that the power cord is disconnected from the outlet. (Fig. 1) 2. Disconnect the hose from the vacuum. (Fig. 2) 3. Undo the latches and remove the power head from the collection tank. (Fig. 3) Place power head on a soft, clean surface upside down. 4. Clear all dirt or debris from the collection tank and hose into a proper waste container. (Fig. 4) 5. Clean or replace the filters. 6.
1. Verify that the power cord is disconnected from the outlet. (Fig. 1) 2. Remove the four screws holding the intake shield and lift off the shield. (Fig. 2) 3. Remove the foam pad from the blower and clean the foam pad with soapy water and allow to dry. (Fig. 3) 4. Replace the foam pad on to the blower aligning the wholes to the screw tabs. (Fig. 4) 5. Reinstall the intake shield and the four screws. (Fig.
INSTALLING & CLEANING CARTRIDGE FILTER INSTALLING & CLEANING THE SUPPLIED CARTRIDGE FILTER 1 2 3 4 5 Installing Cartridge Filter 1. Verify that the power cord is disconnected from the outlet. (Fig. 1) 2. Undo the latches and remove the power head from the collection tank. 3. Place power head on a clean surface in upside down position. 4. Slide the cartridge filter over the filter cage. (Fig. 2) Carefully push filter down until it stops against the power head. (Fig. 3) 5.
INSTALLING & CLEANING FOAM WET FILTER 1 2 3 4 5 Installing Foam Wet Filter 1. Verify that the power cord is disconnected from the outlet. (Fig. 1) 2. Remove power head and place in upside down position. Follow instructions to remove cartridge filter. 3. Carefully slide foam wet filter down over the filter cage making sure the cage is completely covered. (Fig. 2 & 3) 4. Place the power head onto the collection tank. Cleaning Foam Wet Filter 1.
EXPLODED VIEW 15
PARTS LIST Part 1 2 3 4 5 6 7 8 9 10 11 12 13 14 15 16 17 18 19 Part Number 551132102 551005103 551290106 551011106 551002110 551006109 551002121 V2CT 551002115 V2CC V2UN V2H7 V2EW VFF51 VCFS 551004104 551305103 Description Power Head Assembly Collection Tank Lid Assembly Float Filter Cage Collection Tank Vacuum Port Assembly Drain Cap Assembly Caster Foot Assembly Blower Adapter Crevice Tool Blower Concentrator Nozzle Car Nozzle Utility Nozzle 2-1/2" x 7' Hose Extension Wand Foam Wet Filter Cartridge Fil
Aspiradoras Mojado/Seco MANUAL DEL USUARIO 10 Galones N° de Modelo VBVA1010PF PARA SU SEGURIDAD Lea y entienda este manual antes de usar. Guarde este manual para futura referencia. Cleva North America, Inc. 601 Regent Park Court Greenville, SC 29607 Filtros y Accesorios de repuesto disponibles en: Vacmaster.
INDICE Sección Página Garantía........................................................................................................................................ Instrucciones de seguridad y advertencias................................................................................... Instrucciones del aislamiento doble.............................................................................................. Cordón de extensión.....................................................................
INSTRUCCIONES DE SEGURIDAD Y ADVERTENCIAS INSTRUCCIONES DE SEGURIDAD IMPORTANTES Lea y entienda todas las instrucciones antes de usar esta aspiradora. Lea y entienda el manual del usuario y todas las etiquetas en la aspiradora mojado/seco antes de utilizar. La seguridad es una combinación de sentido común, hay que permanecer alerta y saber como su aspiradora trabaja. Utilizar esta aspiradora mojado/seco solamente según lo descrito en este manual.
INSTRUCCIONES DEL AISLAMIENTO DOBLE Esta aspiradora mojado/seco tiene aislamiento doble, eliminando la necesidad de un sistema de conexión a tierra separado. Utilice solamente piezas de repuesto idénticas. Lea las instrucciones para mantenimiento de su aspiradora mojado/seco con doble-aislamiento antes de realizar ajustes y reparaciones. Utilice esta aspiradora según lo descrito en este manual. Observe las siguientes advertencias que aparecen en la cubierta del motor de su aspiradora.
DESEMPAQUETADO Y CONTENIDO A Retire todo el contenido de la caja. Retire el motor y saque cualquier contenido del envase. Compruebe cada artículo contra la lista de contenido. B Lista de contenido CLAVE DESCRIPCIÓN....................Cant. A Ensamblaje de la Aspiradora.....1 B Tubos Extensores......................2 C Manguera...................................1 D Boquilla Concentradora.............1 E Ruedecilla..................................4 F Filtro de Esponja........................
INSTRUCCIONES DE ENSAMBLAJE Se requiere un destornillador de estrella. 1 2 3 4 5 6 7 8 9 10 11 ADVERTENCIA: NO ENCHUFE EL CABLE ELÉCTRICO AL TOMACORRIENTE, ASEGURESE DE QUE EL ENCHUFE ESTE DESCONECTADO ANTES DE ENSAMBLAR SU ASPIRADORA. DESEMPAQUE DE SU ASPIRADORA Y ENSAMBLAJE 1. Verifique que el cordón eléctrico esté desconectado del enchufe. (Fig. 1) 2. Abra las cerraduras. (Fig. 2) 3. Levante el motor del envase. (Fig. 3) 4.
RECOGIDA DE MATERIALES SECOS 1 2 3 4 5 6 ASPIRAR MATERIALES EN SECO ADVERTENCIA: ASEGURESE DE LEER, ENTENDER, Y APLICAR LA INFORMACIÓN, DADA SOBRE LAS “INSTRUCCIONES DE SEGURIDAD Y ADVERTENCIAS”. NO LIMPIE CON LA ASPIRADORA EN ÁREAS CON GASES INFLAMABLES, VAPORES, O POLVOS EXPLOSIVOS EN EL AIRE. LOS GASES O LOS VAPORES INFLAMABLES INCLUYEN PERO NO SE LIMITAN A: LÍQUIDO DE BUTANO, SOLVENTES EN FORMA DE AEROSOL PARA LIMPIAR, PINTURAS A BASE DE ACEITE, GASOLINA, ALCOHOL O AEROSOL.
RECOGIDA DE LÍQUIDOS 1 2 3 4 5 ASPIRACION DE LÍQUIDOS ADVERTENCIA: ASEGURESE DE LEER, ENTENDER, Y APLICAR LA INFORMACIÓN, DADA SOBRE LAS “INSTRUCCIONES DE SEGURIDAD Y ADVERTENCIAS”. NO LIMPIE CON LA ASPIRADORA EN ÁREAS CON GASES INFLAMABLES, VAPORES, O POLVOS EXPLOSIVOS EN EL AIRE. LOS GASES O LOS VAPORES INFLAMABLES INCLUYEN PERO NO SE LIMITAN A: LÍQUIDO DE BUTANO, SOLVENTES EN FORMA DE AEROSOL PARA LIMPIAR, PINTURAS A BASE DE ACEITE, GASOLINA, ALCOHOL O AEROSOL.
SOPLADOR 1 2 6 7 4 3 5 Esta aspiradora tiene capacidad para ser soplador. Para utilizar como soplador siga las instrucciones enumeradas. ADVERTENCIA: SIEMPRE UTILIZE ANTEOJOS DE SEGURIDAD QUE CONFORMEN CON ANSI Z87.1 (O EN CANADA, CSAZ94.3) ANTES DE USAR EL SOPLADOR. ADVERTENCIA: SOPLADOS DEBRIS. MANTENGA A LAS PERSONAS ALEJADAS DEL LOS RESIDUOS ADVERTENCIA: UTILIZE UNA MASCARA ANTIPOLVO SI AL SOPLAR SE CREA POLVO QUE PUEDA SER INHALADO. 1.
SOPLADOR 3 2 5 4 6 7 OPERACIÓN DEL SOPLADOR DESMONTABLE Esta aspiradora de material húmedo/seco se convierte en un soplador desmontable que puede usarse para soplar hojas secas en jardines, pórticos y patios. Para usar la función de soplador desmontable, siga las instrucciones que se enumeran a continuación. PRECAUCIÓN: PARA REDUCIR EL RIESGO DE DAÑO AUDITIVO, USE PROTECCIÓN DE OÍDOS CUANDO UTILICE LA ASPIRADORA/SOPLADOR POR TIEMPO PROLONGADO O CUANDO LA UTILICE EN ÁREAS RUIDOSAS. 1.
MANTENIMIENTO CÓMO VACIAR EL TANQUE DE RECOLECCIÓN 2 1 4 3 1. Verifique que el cable de corriente esté desconectado del tomacorriente. (Fig. 1) 2. Desconecte la manguera de la aspiradora. (Fig. 2) 3. Abra los pasadores y retire la cabeza motriz del tanque de recolección. (Fig. 3) Coloque la cabeza motriz en una superficie suave y limpia en posición invertida. 4. Limpie toda la suciedad o desechos del tanque de recolección y la manguera en un recipiente de desperdicio adecuado. (Fig. 4) 5.
1. Verifique que el cable de corriente esté desconectado del tomacorriente. (Fig. 1) 2. Retire los cuatro tornillos que sostienen el escudo de la entrada y levante el escudo. (Fig. 2) 3. Retire la almohadilla de espuma del soplador y límpiela con agua jabonosa, luego déjela secar. (Fig. 3) 4. Reemplace la almohadilla de espuma en el soplador alineando los orificios con las lengüetas de los tornillos. (Fig. 4) 5. Vuelva a instalar el escudo de la entrada y los cuatro tornillos. (Fig.
INSTALACIÓN Y LIMPIEZA DEL FILTRO DE CARTUCHO INSTALACIÓN Y LIMPIEZA DEL FILTRO DE CARTUCHO 1 2 3 4 5 Instalación Y Limpieza Del Filtro De Cartucho 1. Verifique que el cable de corriente esté desconectado del tomacorriente. (Fig. 1) 2. Quite la tapa del envase y colóquela con el filtro hacia arriba. 3. Instale el filtro de cartucho con el lado plano sobre la jaula de filtro. Cuidadosamente empuje el filtro hacia adentro hasta que pare contra el cabezal. (Fig. 2 y 3) 4.
INSTALACIÓN Y LIMPIEZA DEL FILTRO DE ESPONJA 1 2 3 4 5 Instalación Del Filtro De Esponja 1. Verifique que el enchufe esté desconectado del tomacorriente. (Fig. 1) 2. Quite la tapa y colóquela con el filtro hacia arriba. Siga las instrucciones para quitar el filtro de polvo. 3. Cuidadosamente resbale el filtro hacia abajo, sobre la jaula del filtro y empuje el filtro hacia adentro hasta que cubra la jaula completamente. (Fig.2 y 3) 4. Ponga la tapa de vuelta a su lugar en el envase.
DIAGRAMA DE REPUESTO 15
PARTES DE REPUESTO Numero Clave 1 2 3 4 5 6 7 8 9 10 11 12 13 14 15 16 17 18 19 Numero del Dibujo 551132102 551005103 551290106 551011106 551002110 551006109 551002121 V2CT 551002115 V2CC V2UN V2H7 V2EW VFF51 VCFS 551004104 551305103 Descripción Montaje del Motor Tapa del Envase Copa del Flotador Canasta del Filtro Envase Montaje del Portal de Vacío Ensamblaje de la Tapa de Drenaje Montaje de la Ruedecilla Adaptador 2-1/2" Herramienta para Ranuras Boquilla Concentradora Boquilla para Carros 2-1/2" Boquill