
Warranty


1 0
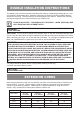
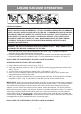
Before storing yo ur va c, the collection tank should b e emp tied and cleaned. The cord should b e
wrapped and hung on the hook of the handle. The hose and accessories should be stored as
illustrated above (Fig. 1-3) so they can be readily available when needed. Store vac indoors.
W A R N I N G : A L W A Y S D I S C O N N E C T T H E P L U G F R O M T H E P O W E R O U T L E T B E F O R E
R E M O V I N G T H E P O W E R H E A D F R O M C O L L E C T I O N T A N K .
S t o r a g e
1
2
3
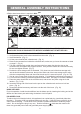
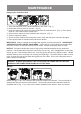
MAINTENANCE
1. Verify that the power cord is disconnected from the outlet. (Fig. 1)
2. Disconnect the hose from the vacuum. (Fig. 2)
3. Undo the latches and remove the power head from the collection tank. (Fig. 3) Place power
head on a soft, clean surface upside down.
4. Clear all dirt or debris from the collection tank and hose. (Fig. 4)
5. Clean or replace the lters.
6. Check the hose, attachments, and power cord to verify that they have not been damaged.
7. Place power head on collection tank and secure latches.
I M P O R T A N T ! Clean or change the cartridge lter regularly for best performance. A L W A Y S U S E
C A R T R I D G E F I L T E R F O R D R Y V A C U U M I N G . If the machine is used without the cartridge lter,
the motor will burn out and the warranty will be voided. Always keep spare lters on hand.
N O T I C E ! The lters included are made of high quality materials designed to stop small dust
particles. The cartridge lter should be used for dry pick-up only. A dry cartridge lter is necessary
to pick up dust. If the cartridge lter is wet, it will clog quickly and be very difcult to clean. Handle
the lter carefully when removing it for cleaning and replacing it. Check the lters for tears or small
holes, a small hole can let dust pass through and out of the lter. Do not use a lter with holes or
tears; rep lace it immediately .
2
4
1
3
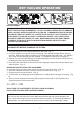
E m p t y i n g t h e C o l l e c t i o n T a n k