
Warranty


7
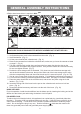
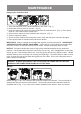
1. Verify that the power cord is disconnected from the outlet. (Fig. 1)
2. In order to prepare your vacuum for dry vacuuming, verify that the cartridge lter is securely
mounted. Make sure the lter is pushed in until it stops against the power head. Your Wet/Dry
Vac comes with the cartridge lter pre-installed. For installation instructions, see page 11.
3. Optional: For improved dust ltering, t collection bag ange onto the inlet port, taking care not
to damage the b ag. Dust b ag sold sep arately .
4. Place the power head back on the collection tank, aligning the top section with the latches, and
snap into place. (Fig. 2)
O P E R A T I N G I N S T R U C T I O N S : D R Y V A C U U M I N G
5. Insert the locking end of the hose into the vacuum port and lock in place. (Fig. 3).
6. Choose the desired accessory and insert onto the end of the hose. (Fig. 4)
7. Plug the power cord into the outlet. (Fig. 5)
8. Turn the motor on by ipping the power switch to the ‘I’ (ON) position and begin vacuuming. (Fig.
6)
9. Once you have completed vacuuming, ip the power switch to the ‘O’ (OFF) position and
unplug the power cord from the outlet.
O = OFF I = ON
D O N O T U S E T H E C A R T R I D G E F I L T E R F O R L I Q U I D V A C U U M I N G .
D O N O T U S E D U S T B A G F O R L I Q U I D V A C U U M I N G .
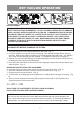
DRY VACUUM OPERATION
W A R N I N G : B E S U R E T O R E A D , U N D E R S T A N D , A N D A P P L Y , I N F O R M A T I O N E N T I T L E D
‘ S A F E T Y I N S T R U C T I O N S & W A R N I N G S ’ . D O N O T V A C U U M I N A R E A S W I T H F L A M M A B L E
G A S E S , V A P O R S , O R E X P L O S I V E D U S T S I N T H E A I R . F L A M M A B L E G A S E S O R V A P O R S
I N C L U D E B U T A R E N O T L I M I T E D T O : L I G H T E R F L U I D , S O L V E N T T Y P E C L E A N E R S , O I L -
B A S E D P A I N T S , G A S O L I N E , A L C O H O L , O R A E R O S O L S P R A Y S . E X P L O S I V E D U S T S
I N C L U D E B U T A R E N O T L I M I T E D T O : C O A L , M A G N E S I U M , G R A I N , O R G U N P O W D E R .
T O R E D U C E T H E R I S K O F H E A L T H H A Z A R D S F R O M V A P O R S O R D U S T , D O N O T
V A C U U M T O X I C M A T E R I A L S .
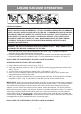
W A R N I N G : D O N O T P L U G P O W E R C O R D I N T O P O W E R O U T L E T . M A K E S U R E P L U G I S
D I S C O N N E C T E D B E F O R E C H A N G I N G T H E F I L T E R S .
C A U T I O N : Do not vacuum drywall dust, replace soot, or ash with a standard Wet/Dry lter.
This is a very ne dust which will not be captured by the lter and may cause damage to the
motor. When vacuuming ne dust, use a ne dust lter (included). To purchase the additional
ne dust lters, call 1-866-384-8432 or get them at your local or online Vacmaster
®
retailer.
D R Y V A C U U M I N G
4
43
6
1
5
2