
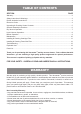
Warranty


9
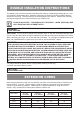
BLOWER OPERATION
W A R N I N G : A L W A Y S W E A R S A F E T Y G O G G L E S C O M P L Y I N G W I T H A N S I Z 8 7 . 1 ( O R I N
C A N A D A , C S A Z 9 4. 3) B E F O R E U S I N G B L O W E R .
W A R N I N G : K E E P B Y S T A N D E R S C L E A R F R O M B L O W I N G D E B R I S .
W A R N I N G : W E A R A D U S T M A S K I F B L O W I N G C R E A T E S D U S T T H A T M I G H T B E
I N H A L E D .
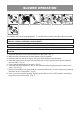
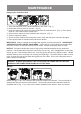
This Wet/Dry Vac has blowing capabilities. To use the blower feature follow the instructions listed.
1. Verify that the power cord is disconnected from the outlet. (Fig. 1)
2. Make sure the collection tank is empty before using as a blower.
3. Remove hose from the vacuum port. Remove noise diffuser from blower port.
4. Insert the larger end of the hose into the blower port on the back side of the power head and
lock into place. (Fig. 2)
5. Fit the desired attachment to the hose. (Fig. 3)
6. Verify that the power switch is in the ‘O’ OFF position before plugging the power cord into the
outlet. (Fig. 4 & 5)
7. Before turning ON the vac, rmly hold the loose end of the hose. Turn the motor on by pressing
the switch to the ‘I’ ON position. (Fig. 6)
8. Once you have completed blowing, ip the power switch to the 'O' (OFF) position and unplug
the power cord from the outlet. (Fig. 7)
2
4
3
5
1
7
6