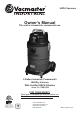
® HEPA Vacuums Owner’s Manual This unit is intended for commercial use. 8 Gallon Industrial (Commercial) Wet/Dry Vacuum With Certified HEPA Filtration Model No. VK811PH FOR YOUR SAFETY Read and understand this manual before use. Keep this manual for future reference. Conforms to UL Standard UL1017 Certified to CSA STD C22.2 No.243-10 www.vacmaster.com Cleva North America, Inc.
TABLE OF CONTENTS SECTION Page Limited Warranty…………………………………………………………………...................................... 2 Safety Instructions and Warnings………………………………………………………………................ 3 Double Insulation Instructions………………………………………………………………..................... 4 Extension Cord………………………………………………………....................................................... 5 Unpacking and Checking Carton Contents………….………………….........……….…....................... 6 General Assembly Instructions…………………………………………………………….…………......
SAFETY INSTRUCTIONS & WARNINGS IMPORTANT SAFETY INSTRUCTIONS READ AND UNDERSTAND ALL INSTRUCTIONS BEFORE USING THIS VACUUM Read and understand this owner’s manual and all labels on the Wet/Dry Vacuum cleaner before operating. Safety is a combination of common sense, staying alert and knowing how your vacuum works. Use this HEPA Vac only as described in this manual. To reduce the risk of personal injury or damage to your HEPA Vac, use only Vacmaster® recommended accessories.
DOUBLE INSULATION INSTRUCTIONS This HEPA Vac is double-insulated, eliminating the need for a separate grounding system. Use only identical replacements parts. Read the instructions for Servicing Double-Insulated Wet/Dry Vacs before servicing. Use this Wet/Dry Vac as described in this manual. Observe the following warnings that appear on the motor housing of your Wet/Dry Vac. DOUBLE INSULATED - GROUNDING NOT REQUIRED - WHEN SERVICING USE ONLY IDENTICAL REPLACEMENT PARTS.
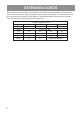
EXTENSION CORDS When using an extension cord with your Wet/Dry Vac refer to the following table to determine the required A.W.G. wire size. Before using the cleaner make sure the power cord and extension cord are in good working conditions. Make repairs or replacements before using the vacuum cleaner. Only use extension cords that are rated for outdoor use. Length of Extension Cord 25 Feet 50 Feet 100 Feet 7.5 Meter 15.25 Meters 30.
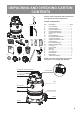
UNPACKING AND CHECKING CARTON CONTENTS A Remove entire contents of carton. Check each item against the carton contents list. B Carton contents lists C D F G Q I J K N M L P H E R S O T U Key Description ...................................... QTY. A B C D E F G H I G K L M N O P Q R S T U Vac Assembly......................................1 Crevice Nozzle ....................................1 Extension Wands (1) ...........................1 Extension Wands (2) .........................
GENERAL ASSEMBLY INSTRUCTIONS A Philips head screw driver is required. 1 2 6 R OP R N 10 Q N N 11 3 4 5 7 8 9 12 13 14 R O N 15 WARNING: DO NOT PLUG IN POWER CORD TO POWER OUTLET, MAKE SURE PLUG IS DISCONNECTED BEFORE ASSEMBLING THE WET/DRY VAC. The hepa vacuum is supplied with a certified hepa filter that Has been lot tested by independent lab to IEST-RP-CC001 that meet the epa definition of a hepa vacuum (100% leak tested to 99.97% @ 0.3 micron Efficiency).
UNPACKING YOUR WET/DRY VACUUM & GENERAL ASSEMBL 1. Verify that the power cord is disconnected from the outlet. (fig. 1) 2. Undo the latches. (fig. 2) 3. Lift the power head off the tank. (fig. 3) 4. Remove the contents from inside the tank, make sure you have all contents as listed on page 6. (fig. 4) 5. Turn the tank upside down and insert the two caster feet into the front slots on the base. Apply downward pressure to each caster. Casters will "snap" into place when installed properly.
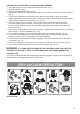
WARNING: BE SURE TO READ, UNDERSTAND, AND APPLY INFORMATION, ENTITLED ‘SAFETY INSTRUCTIONS & WARNINGS’. DO NOT VACUUM IN AREAS WITH FLAMMABLE GASES, VAPORS, OR EXPLOSIVE DUSTS IN THE AIR. FLAMMABLE GASES OR VAPORS INCLUDE BUT ARE NOT LIMITED TO; LIGHTER FLUID, SOLVENT TYPE CLEANERS, OIL-BASE PAINTS, GASOLINE, ALCOHOL OR AEROSOL SPRAYS. EXPLOSIVE DUSTS INCLUDE BUT ARE NOT LIMITED TO; COAL, MAGNESIUM, GRAIN OR GUN POWDER. TO REDUCE THE RISK OF HEALTH HAZARDS FROM VAPORS OR DUST, DO NOT VACUUM TOXIC MATERIALS.
LIQUID VACUUM OPERATION 1 2 3 4 5 6 LIQUID VACUUMING WARNING: BE SURE TO READ, UNDERSTAND, AND APPLY INFORMATION, ENTITLED ‘SAFETY INSTRUCTIONS & WARNINGS’. DO NOT VACUUM IN AREAS WITH FLAMMABLE GASES, VAPORS, OR EXPLOSIVE DUSTS IN THE AIR. FLAMMABLE GASES OR VAPORS INCLUDE BUT ARE NOT LIMITED TO; LIGHTER FLUID, SOLVENT TYPE CLEANERS, OIL-BASE PAINTS, GASOLINE, ALCOHOL OR AEROSOL SPRAYS. EXPLOSIVE DUSTS INCLUDE BUT ARE NOT LIMITED TO; COAL, MAGNESIUM, GRAIN OR GUN POWDER.
is fitted with a float valve that stops the suction action when the container reaches its maximum capacity. You will notice an increase in motor speed. When this happens, turn off the machine, disconnect from power supply, and drain the liquid into a suitable receptacle or drain. To continue vacuuming, refit the container with the drain cap. After wet vacuuming, turn the machine off and remove plug from power supply. Empty the container, clean and dry the inside and outside before storage.
Installing HEPA Filter and Pre-Filter 1. Verify that the power cord is disconnected from the outlet. (fig. 1) 2. Remove power head and place in upside down position. 3. Install the HEPA filter over the filter cage with the flat end of the filter towards the vacuum power head. Carefully push filter in until it stops against the power head. (fig. 2 ) 4. Place filter retainer on top of cartridge filter over the raise lip and tighten down by turning retainer Clockwise, do not over tighten. (fig. 3) 5.
WHEN TO CHANGE FILTERS Change the collection bag When the collection bag is 3/4 full, it MUST be replaced. Excessive over filling of this bag makes it difficult to remove from the vacuum tank and can result in breakage and spills. The collection bag comes equipped with a quick closing flap. When collection bag becomes 3/4 full, turn off vacuum and slowly remove the collection bag from the tank until the opening in the collection bag is clear of the tank.
PARTS -EXPLODED VIEW 1 18 2 3 4 28 19 15 16 29 20 31 30 17 5 32 6 21 7 8 9 33 22 23 34 10 35 24 25 36 11 12 13 14 37 26 27 38 Key Number 1 2 3 4 5 6 7 8 9 10 11 12 13 14 15 16 17 18 19 VK811PH Manual Parts List Quantity Key Number Description Drawing Number 1 Handle Assembly VK01SR.A0.01 20 1 Top Cover VK21SR.A0.04 21 1 Switch W0DQ10.01.12 22 1 Filter Sponge VK21SR.10.06 23 1 Mid Cover Assembly VK30SR.A0.01 24 1 Motor Assembly TM9456.00.00 25 1 Foam VI02SR.10.
NOTES 15