
Use and Care Manual


6
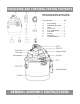
UNPACKING YOUR WET/DRY VACUUM & GENERAL ASSEMBLY
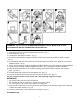
1. Verify that the power cord is disconnected from the outlet. (fig. 1)
2. Undo the latches. (fig. 2)
3. Lift the power head off the container. (fig. 3)
4. Remove the contents from inside the container, make sure you have all contents as listed on page 5.
(fig. 4)
5. Find the handle and insert the ends into the handle opening on the power head. Apply force to lock the
handle into place. (fig. 5)
6. For dry vacuum cleaning, install the supplied reusable cloth filter. (fig. 6) See page 10 for filter installation.
7. For wet vacuum cleaning, install the supplied foam filter. (fig. 7) See page 10 for filter installation.
8. Place the power head back on the container, aligning the top section with the latches, and snap into
place. (fig. 8 & 9)
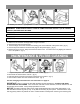
9. Insert the larger end of the hose into the desired port. (fig. 10)
10. Choose the desired accessories and insert onto the end of the hose. (fig. 11)
For your convenience this vacuum comes with a wall mounting support for storage.
IMPORTANT!
• Do not mount the rack over 5 feet from the floor.
• Do not screw the rack to drywall only. Secure the screws to a stud.
• Do not hang from or sit on the vacuum when on mounting rack.
11. Align the two screw holes so that they are over a stud and secure the mounting support to the wall stud
with the two screws provided. (fig. 12)
12. Place the wet and dry vacuum cleaner into the support. (fig. 13)
POLARIZED PLUG
WARNING: DO NOT PLUG IN POWER CORD TO POWER OUTLET, MAKE SURE PLUG IS
DISCONNECTED BEFORE ASSEMBLING THE WET/DRY VAC.