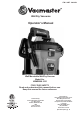
ITM. / ART. 1043254 Wet/Dry Vacuums Operator’s Manual Wall Mountable Wet/Dry Vacuum Model No. VWMB508 0101 FOR YOUR SAFETY Read and understand this manual before use. Keep this manual for future reference. Distributed by: Costco Wholesale Corporation P.O. Box 34535 Seattle, WA 98124-1535 USA 1-800-774-2678 www.costco.com Importado por: Importadora Primex S.A. de C.V. Blvd. Magnocentro No.4 San Fernando La Herradura Huixquilucan, Estado de México C.P. 52765 RFC: IPR-930907-S70 (55)-5246-5500 www.costco.
TABLE OF CONTENTS SECTION Warranty ........................................................................................................................................ 2 Safety Instructions and Warnings .................................................................................................. 4 Double Insulation Instructions ....................................................................................................... 5 Extension Cords...................................................
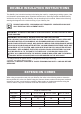
Changes or modifications not expressly approved by the party responsible for compliance could void the user's authority to operate the equipment This device complies with part 15 of the FCC Rules. Operation is subject to the following two conditions: (1) This device may not cause harmful interference, and (2) this device must accept any interference received, including interference that may cause undesired operation.
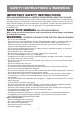
SAFETY INSTRUCTIONS & WARNINGS IMPORTANT SAFETY INSTRUCTIONS READ AND UNDERSTAND ALL INSTRUCTIONS BEFORE USING THIS VACUUM Read and understand this operator's manual and all labels on the Wet/Dry Vacuum cleaner before operating. Safety is a combination of common sense, staying alert, and knowing how your vacuum works. Use this Wet/Dry Vac only as described in this manual. To reduce the risk of personal injury or damage to your Wet/Dry Vac, use only Vacmaster ® recommended accessories.
DOUBLE INSULATION INSTRUCTIONS This Wet/Dry Vac is double-insulated, eliminating the need for a separate grounding system. Use only identical replacements parts. Read the instructions for Servicing Double-Insulated Wet/Dry Vacs before servicing. Use this Wet/Dry Vac as described in this manual. Observe the following warnings that appear on the motor housing of your Wet/Dry Vac. DOUBLE INSULATED - GROUNDING NOT REQUIRED - WHEN SERVICING USE ONLY IDENTICAL REPLACEMENT PARTS.
PACKAGE CONTENTS Remove entire contents of carton. Check each item against the carton contents list. Carton Contents List: Key Description ..………………….…....... Qty. A B C D E F G H I J K L M N O P Q Hose Storage Rack …………........... Hose Storage Support ……...…....... Wall Mount Rack ..……..…...…......... Wire Accessory Rack …….……....... Vac Assembly ….….......................... Standard Hose ………….…….......... Flex Hose ……………...................... Extension Wands …………….......... Car Nozzle ……................
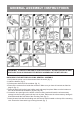
GENERAL ASSEMBLY INSTRUCTIONS WARNING: TO REDUCE THE RISK OF ELECTRIC SHOCK - DO NOT EXPOSE TO RAIN. MAKE SURE PLUG IS DISCONNECTED BEFORE ASSEMBLING THE WET/DRY VAC. UNPACKING YOUR WET/DRY VACUUM & GENERAL ASSEMBLY 1. Verify that the power cord is disconnected from the outlet. (fig. 1) 2. Undo the latches. (fig. 2) 3. Lift the power head off of the container. (fig. 3) 4. Remove the contents from inside the container. Make sure you have all contents as listed on page 6. (fig. 4) 5.
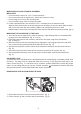
MOUNTING RACK AND STORAGE ASSEMBLY IMPORTANT! • Do not mount the rack over 1.5 m / 5 ft from the floor. • Do not screw the rack to drywall only. Secure the screws to a stud. • Do not hang from or sit on the mounting rack. • Do not exceed 18 kg / 40 lb of maximum weight. 8. Locate a wall stud that is not more than 5.5 m / 18 ft away from an electrical outlet. Align the three screw holes on the mounting rack so that they are over the stud. Make sure the rack is level and mark the hole locations.
DRY-VACUUM OPERATION DRY VACUUMING WARNING: BE SURE TO READ, UNDERSTAND, AND APPLY INFORMATION, ENTITLED ‘SAFETY INSTRUCTIONS & WARNINGS’. DO NOT VACUUM IN AREAS WITH FLAMMABLE GASES, VAPORS, OR EXPLOSIVE DUSTS IN THE AIR. FLAMMABLE GASES OR VAPORS INCLUDE BUT ARE NOT LIMITED TO: LIGHTER FLUID, SOLVENT TYPE CLEANERS, OIL-BASE PAINTS, GASOLINE, ALCOHOL OR AEROSOL SPRAYS. EXPLOSIVE DUSTS INCLUDE BUT ARE NOT LIMITED TO: COAL, MAGNESIUM, GRAIN OR GUN POWDER.
OPERATING INSTRUCTIONS: DRY VACUUMING 5. Insert the locking end of the hose into the vacuum port and lock in place. Push the required attachment onto the free end of the hose or extension. (fig. 5) 6. Verify that the switch is in the 'O' (OFF) position before plugging the power cord into the outlet (fig. 6). Hang the vacuum onto the rack or use off the rack. 7. Turn the motor on by flipping the switch to the ‘I’ ON position. (fig.
DO NOT USE THE CARTRIDGE FILTER FOR LIQUID VACUUMING. 1. Verify that the power cord is disconnected from the outlet (fig. 1). Verify that the container is clean and free of dust and dirt. 2. Remove the cartridge filter, then carefully install the foam sleeve filter over the filter cage (fig. 2) and place the power head back on the container. See filter installation instructions on page 14. 3. Fit the desired nozzle to the vacuum hose. (fig. 3) 4.
BLOWER OPERATION This Wet/Dry Vac has blowing capabilities. To use the blower feature follow the instructions listed. WARNING: ALWAYS WEAR SAFETY GOGGLES COMPLYING WITH ANSI Z87.1 (or in Canada, CSAZ94.3) BEFORE USING BLOWER. CAUTION: WARNING: BE INHALED. KEEP BYSTANDERS CLEAR FROM BLOWING DEBRIS. WEAR A DUST MASK IF BLOWING CREATES DUST THAT MIGHT 1. Verify that the switch is in the '0' (OFF) position. (fig. 1) 2. Make sure the container is empty before using as a blower. 3.
CARE AND MAINTENANCE WARNING: ALWAYS DISCONNECT THE PLUG FROM THE POWER OUTLET BEFORE REMOVING THE POWER HEAD FROM THE CONTAINER. 1. Verify that the power cord is disconnected from the outlet. (fig. 1) 2. Disconnect the hose from the vacuum. (fig. 2) 3. Remove the vacuum from the mounting rack. 4. Undo the latches and remove the power head from the container. (fig. 3) 5. Clear all dirt or debris from the container and hose. (fig. 4) 6.
INSTALLING & CLEANING CARTRIDGE FILTER Installing Cartridge Filter 1. Verify that the power cord is disconnected from the outlet. (fig. 1) 2. Remove power head and place in upside down position. 3. Install the cartridge filter over the filter cage with the flat end of the filter towards the vacuum power head. Carefully push filter in until it stops against the power head. (fig. 2 & 3) 4.
RESETTING THE REMOTE CONTROL 1. Have the remote control accessible. Set the power switch on the vacuum to the remote control position “ ”. (fig. 1) 2. Press the RESET button on the side of the power head with pointed object such as paper clip or a pen tip until the indicator lights up. (fig. 2) 3. Release the RESET button once the red indicator light lights up and immediately press and hold the “ON” button on the remote control handle until the vacuum powers on. (fig. 3) 4.
TROUBLESHOOTING WARNING: TO REDUCE THE RISK OF ELECTRIC SHOCK - UNPLUG BEFORE TROUBLESHOOTING. Symptom Vacuum will not operate Dust comes out from motor cover. Reduced efficiency and motor/speed vibration. Remote will not operate Possible Causes Corrective Action 1) No power supply. 1) Check power supply – cord, breakers, fuses. 2) Faulty power cord. 2) Unplug and check the power cord. If damaged, have it repaired by a professional. 3) Container full. 3) Empty container.
EXPLODED VIEW 17
PARTS LIST Key Description 1 2 3 4 5 6 7 8 9 10 11 12 Power Head Assembly Tank Latch Assembly Vacuum Port Assembly Bumper Foot Hose Storage Rack Hose Storage Support Wall Mount Rack Accessory Storage Rack Foam Filter Cartridge Filter 47.6 mm / 1-7/8 in Concentrator Nozzle 47.6 mm / 1-7/8 in Utility Nozzle 47.6 mm / 1-7/8 in Extension Wand 47.6 mm x 3.0 m / 1-7/8 in x 10 ft Flex Hose 47.6 mm x 3.0 m / 1-7/8 in x 10 ft Standard Hose 47.6 mm / 1-7/8 in Car Claw 47.6 mm / 1-7/8 in Crevice Tool 47.