
Product Manual B


9
DRY-VACUUM OPERATION
DRY VACUUMING
WARNING:
BE SURE TO READ, UNDERSTAND, AND APPLY INFORMATION,
ENTITLED ‘SAFETY INSTRUCTIONS & WARNINGS’. DO NOT VACUUM IN AREAS WITH
FLAMMABLE GASES, VAPORS, OR EXPLOSIVE DUSTS IN THE AIR. FLAMMABLE
GASES OR VAPORS INCLUDE BUT ARE NOT LIMITED TO: LIGHTER FLUID, SOLVENT
TYPE CLEANERS, OIL-BASE PAINTS, GASOLINE, ALCOHOL OR AEROSOL SPRAYS.
EXPLOSIVE DUSTS INCLUDE BUT ARE NOT LIMITED TO: COAL, MAGNESIUM, GRAIN
OR GUN POWDER. TO REDUCE THE RISK OF HEALTH HAZARDS FROM VAPORS OR
DUST, DO NOT VACUUM TOXIC MATERIALS.
WARNING:
DO NOT PLUG IN POWER CORD TO POWER OUTLET. MAKE SURE PLUG
IS DISCONNECTED BEFORE CHANGING OR CLEANING FILTERS.
NOTICE
Do not vacuum drywall dust or replace soot or ash with standard Wet/Dry lter. This is a very ne
dust which will not be captured by the lter and may cause damage to motor. When vacuuming
ne dust use a ne dust lter (sold separately).
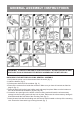
1. Verify that the power cord is disconnected from the outlet. (g. 1)
2. In order to prepare your vacuum for dry vacuuming, verify that the cartridge lter is securely
mounted. With the power head removed and in the upside down position, make sure the lter is
pushed in until it stops against the power head. (g. 2) Your Wet/Dry Vac comes with the
cartridge lter pre-installed, if not see page 14 for installation instructions.
3. Place lter retainer on top of cartridge lter and tighten down by turning the retainer handle
clockwise. (g. 3)
4. Place the power head back on the container, aligning the top section with the latches, and lock
into place. (g. 4)