
Installation Sheet
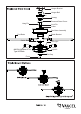
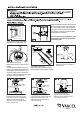


Note: To install the fan light, skip this step and proceed to Fig.16.
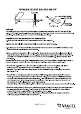
Decorative Screw
Remove the plug from the switch box.
Remove the nut and lock washer from fan
light. Attach the fan light to the switch box
by threading the fan light wires (black and
white) and remove threaded pipe through
the hole of switch box and then secure
them onto the switch box with hex nut
& washer. Be sure it is tight enough to
prevent light kit from vibrating loose.
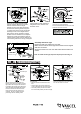
Connect wires:
--- Remove screws from switch box cover
first.
--- The blue (hot) wire from the switch box
cover to the black (hot) wire from fan light.
--- The white (neutral) wire from the switch
box to the white (neutral) wire from fan light.
Secure the switch box cover onto switch
box with the switch box screws.
Switch Box Cover
Threaded Pipe
Switch Box
Cover
Cover
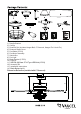
There are four hanger bracket screws
and lock washers. Remove two screws
and lock washers from the hanger
bracket (one from each side) and loosen
the other two remaining screws. Align the
“L shaped” slots of the canopy with the two
remaining screws on the hanger bracket
and push the canopy upwards to engage
the slots and turn clockwise to lock in place.
Tighten the screws and install the other two
hanger bracket screws and lock washers into
the remaining holes of the canopy and tighten.
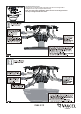
Tighten blades to blade brackets by
using blade screws, washers and
decorative screw.
Assembly without fan light
Remove screws from switch box cover first .
Make sure the wires of the fan light in the switch box are capped
with wire connectors.
Secure the switch box cover onto switch box with the switch box
screws.
210329
Remove the motor screws and washers
from the fan motor assembly.
Secure blade brackets to the motor with
washers and motor screws.