VM130V2SET
Full Manual VM130V2SET Contents In the Box ................................................................................................................................................ 2 Warnings ................................................................................................................................................. 2 Overview .................................................................................................................................................
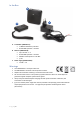
In the Box B A C A. Transmitter (VM130V2-T) • 1x 8LR932 12V battery included • RF 433 MHz operation < 10 dBm B. Receiver (VM130V2-R) • Input 12 VDC – 1 A • RF 433 MHz operation < 10 dBm • WLAN 2.4 GHz operation < 20 dBm • µ T35 C. Power supply (PSS6E1210C1) • 12 VDC – 1 A Warnings • • • • • • This VM130V2SET is suited for indoor use. The VM130V2SET cannot be used to operate machines. Replace the transmitter’s battery if transmission becomes weak.
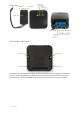
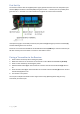
Overview (2) CH1 Button (3) CH2 Button (4) Indicator LED (5) Power LED (6) TUYA LED not used (7) CH1 LED (8) CH2 LED (1) LED Button (9) SETUP Button (10) CH1 RELAY (11) CH2 RELAY (12) POWER INPUT TERMINAL Mounting the Receiver Mounting hole Phillips screw Mounting hole Phillips screw The receiver can easily be mounted against a wall or ceiling with the 2 mounting holes in the back of the case. The mounting holes have a diameter of 6,3 mm and the centre points are 62,9 mm apart from each other.
First Set-Up Connect the receiver with the supplied power supply: position the bare wires into the power input terminal (12) on the board. The black (GND) wire goes into the “-“ terminal, the red (+12VDC) wire goes into the “+” terminal. Use a flat screwdriver to tighten the screws of the terminals. If the power supply is successfully connected, the power LED (5) will light up and the TUYA LED (6) will start flashing after a few seconds.
Connecting the Receiver to the TUYA IoT Cloud (optional) 1. Install the TUYA app or SmartLife app on your smartphone and create a TUYA account. 2. Make sure there is a stable Wi-Fi connection with internet access present where the receiver is installed. You will need the Wi-Fi password in step 8, so start looking for it now. 3. 4. 5. 6. Power off the receiver by disconnecting the power. Make sure there are no connections to the receiver on CH1 RELAY and CH2 RELAY (10 & 11).
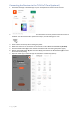
8. Select the network you wish to use for the VM130V2SET and enter the password for the W-Fi network. Attention: Make sure it is a 2.4 GHz network! The VM130V2SET does not work on a 5 GHz network. 9. If the app asks to press the “reset” button, use the SETUP button (9). The TUYA LED (6) should start blinking rapidly when in pairing mode. Confirm with “Confirm the indicator is blinking rapidly”.
10. The device is now added to your TUYA account. You will immediately see the interface with both channels of the VM130V2SET. Press these buttons to make the corresponding channels on the receiver switch. If the device is successfully paired with the TUYA IoT cloud, the TUYA LED (6) be turned on permanently (see page 3). From now on, this TUYA LED (6) will display if there is an active cloud connection. 11. Please disconnect the power to the receiver, wait 3 seconds and reconnect the power.
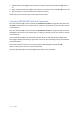
Connecting a Device to the Relays Connect your device to the receiver by using the NO (normal open) & COM (common) terminals of each channel (10 & 11) for standard off-mode. If you prefer standard on-mode, please use the NC (normal closed) & COM (common) terminals (10 & 11). Please note that the relays are suited for max. 48 VDC operation on 5A (resistive load) each. Both channels are dry contacts (power needs to be supplied by another source).
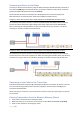
4. Hold the SETUP button (9) on the receiver for at least 3 seconds until the CH2 LED (8) will turn on. 5. Again, hold the SETUP button (9) on the receiver for 3 seconds until the CH2 LED (8) will turn off. 6. All transmitters are now cleared from the receiver’s memory. Please note you will need to re-pair a transmitter to the receiver. Using the VM130V2SET with the Transmitter Press the CH1 button (2) on the transmitter for minimum 2 seconds to change the state of the CH1 relay (10) on the receiver.
Using the VM130V2SET with the TUYA App This requires an internet connection on your smartphone and a good Wi-Fi connection to the receiver. 1. Open the TUYA app or SmartLife app on your smartphone and select the “Power Strip” device. 2. You will see the state of both channels. Press a channel to change its state (ON/OFF – OFF/ON). 3. Use the ‘CountDown function’ to use a countdown timer for a specific channel (you can select a time that you want the channel to turn off or on).
4. Use the ‘Schedule function’ to add multiple times during the day or week when you want each individual channel to turn on or off. Determine when it must be repeated with the “Repeat” option.
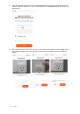
5. Add every channel onto you wish to switch a channel with the “Add Schedule” button. 6. By using the “Smart” tab in the app, you can specify several actions that will control the channels. Example 1: Switching a channel based on the sunrise In this example, we will create a smart action based on “When weather changes”. We choose the input “Sunset/Sunrise”.
P a g e | 13
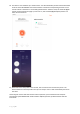
In the next step, we select our location and the specific moment when we wish to switch. After choosing the input, we then select the “Run the device” action and choose for the VM130V2. Now, we select the desired channel we wish to switch at sunrise, in this case channel 1 (Switch 1). Select the ‘ON’ option. Finally, we have an overview of the selected parameters. Click on 'Save'. From now on, channel 1 will switch at sunrise. You can always activate/deactivate this smart action via the ‘Smart’ tab.
P a g e | 15
Example 2: Making a channel ‘pulse’ In this example we want channel 1 to act as a ‘pulse’ contact. In other words, when the channel switches, it will switch back automatically after a set time. This function is interesting to switch a garage door, which only needs a short ‘on’ signal. We create a new smart action via the ‘Smart’ tab, with “When device status changes” as condition. We select the VM130V2 and channel 1 (Switch 1). Select the on option (ON).
We select channel 1 (Switch 1) and the “OFF” situation. Finally, we have an overview of the set ‘smart’ action: When channel 1 is activated, it will switch off after a delay of 2 seconds.
We save the smart action and start using it. The overview window of the smart action shows us that the action has been added and is activated. From now on, channel 1 will act as a ‘pulse’ contact: every time it is activated, it will deactivate after 2 seconds, regardless which input the channel activates (transmitter and TUYA app). You can add more smart actions to the VM130V2 and couple to other smart devices which you have added to your app.
Troubleshooting LEDs and their meaning LED Power LED (5) CH1 LED (7) Switched on The module is switched on There is a connection with the TUYA IoT cloud Channel 1 is activated CH2 LED (8) Channel 2 is activated TUYA LED (6) Switched off The module is switched off There is no connection with the Blinking / Channel 1 is deactivated Channel 1 is deactivated / Pairing mode activated / Poor reception between transmitter and receiver The VM130V2SET has an operational range of 30 m (open-field range) b
FAQ Can I use the VM130V2SET with a previous version? No, the VM130V2SET is not compatible with previous versions (VM130N, VM130) as the wireless modules use the 433 MHz band. The TUYA function does not work when I move the receiver. Check if the receiver has good Wi-Fi reception on its location. If you changed the name of your Wi-Fi network or your password, you will have to re-pair the receiver to the TUYA IoT cloud. I can hear a click every time the channel switches. This is perfectly normal.
RED Declaration of Conformity Hereby, Velleman Group nv declares that the radio equipment type VM130V2SET is in compliance with Directive 2014/53/EU. The full text of the EU declaration of conformity is available at the following internet address: www.velleman.eu. www.velleman.eu.