
User manual


- 8 -
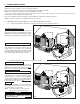
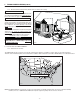
3.3 LOCATING THE UNIT
Choose an appropriate location for the unit.
• Within an area of the house where the ambient temperature is between 10°C (50°F) and 65°C (149°F) (basement, furnace room,
closet, etc.).
• So as to provide easy access to the interior of the unit, for filter maintenance.
• Close to an exterior wall, so as to limit the length of the insulated flexible duct to and from the unit.
• Away from hot chimneys and other fire hazards.
• Allow for a power source (standard 3-prong grounding outlet).
• Close to a drain. If no drain is close by, use a pail to collect run-off.
(For HRV 2600, HV 2.6, HEPA 3100 and HF 3.1 units only.)
3. BEFORE STARTING
3
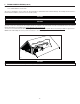
.1 INSPECT THE CONTENTS OF THE BOX
• Inspect the exterior of the unit for shipping damage. Ensure that there is no damage to the door, door latches, main switch, etc.
• Inspect the interior of the unit for damage. Ensure that blower assembly, heat recovery core, insulation, dampers, MERV8 filter
(HRV 2600 or HR 2.6 units only) prefilter and HEPA filter (HEPA 3100, HF 3.1 or HEPA 4100 units only), etc. are all intact.
3
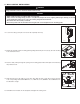
.2 TOOLS, MATERIALS AND INSTALLATION KITS
Here are the tools and materials needed to perform the installation:
- Phillips screwdriver no. 2 or Robertson no. 1
- Hammer and flat blade screwdriver (for plenum connection installation only, to make holes in existing metal duct)
- Scissors or utility knife (to cut duct tape)
- Duct tape
- Tin snips or metal shear (for plenum connection installation only, to cut ductwork)
- Aluminum duct tape (for plenum connection installation only)
- Jig saw
- Caulking gun and caulking
For HRV 2600 and HR 2.6 units, the installation kit is no. 15273.
For HEPA 3100, HF 3.1 and HEPA 4100 units, the installation kit is no. 13932.
WARNING
To avoid risk of suffocation, discard the plastic bag wrapping the unit and the wall control.
!