
Installation Guide

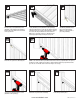

TIP: only insert 1-3/4" (minimum) screws
into the bottom end of the balusters part
way (hardeware sold separately). This
allows for easier alignment of
upcoming balusters.
Tighten all screws after each baluster is
secured to bottom rail.
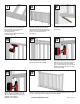
Predrill all holes with a 1/8" drill bit.
Remove the top rail and drill out the sub
rail holes with a 7/32” drill bit. Secure the
rail to assembly using four 1-3/4" screws
(hardware sold separately).
(NOTE: Do not over tighten.)
Install post trim.
Lower the assembly onto crush blocks
cut to the required length. A minimum of 2
crush blocks are needed and the installer
needs to cut crush blocks from an
extra baluster.
Secure the brackets to the posts with 2"
screws (hardware sold separately).
Align the top rail with the assembly.
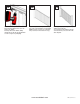
Finish the assembly by gluing the crush blocks between the 5th and 6th baluster
from each
end
& post caps in place using a quality exterior grade adhesive.
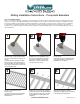
Use a pencil to mark the locations of the
screw holes for the bottom and sub rails
on both ends.
Predrill the sub rail & top rail before the
rst baluster and between the 5th and 6th
baluster
from each end
using a 1/8" drill
bit no deeper than 1-7/8" deep, making
sure to not penetrate the top of the top rail.
(NOTE: this will allow the fastener to snug
the top rail correctly).
www.verandadeck.com
7
10
13
8
11
14
9
12
VER-0057-LIT 7/13