
Instructions / Assembly


10
03-infinityEuro rev. 2017-05-17
©2013-2017 Jewett-Cameron Company • www.jewettcameron.com • Customer Service: 800-955-2879
Customer Service: 1-800-955-2879 Fax: 503-647-2272
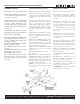
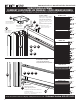
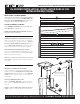
INFILL BOARDS and FINISH FRAMING
Insert boards according to desired design stacking
order (page 5). Insert the TOP BOARD FRAME CAP
(G2), tap down with RUBBER MALLET to secure. Insert
“L” bracket, secure with self-tapping screw.
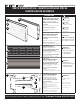
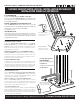
SECURE and FINISH POST INSTALL
Insert CHANNEL COVERS (H1) into unused slots. Place
POST CAP (H2) onto top of post.
REPEAT STEPS ABOVE FOR REST OF FENCE keeping in
mind the location of your gate.
INSÉREZ LES PANNEAUX et FINISSEZ LA STRUCTURE
Insérez les panneaux selon l’ordre de superposi-
tion du modèle voulu (page 5). Insérez la FINITION
DE STRUCTURE DU PANNEAU SUPÉRIEUR (G2), tapez
avec un MAILLET EN CAOUTCHOUC pour fixer. Insérez
l’équerre « L », fixez avec une vis autotaraudeuse.
FIXEZ ET FINISSEZ L’INSTALLATION DU POTEAU
Insérez les COUVERTURES DE CANAL (H1) dans les
fentes non utilisées. Placez le CAPUCHON DE POTEAU
(H2) dans le dessus du poteau.
RÉPÉTEZ LES ÉTAPES CI-DESSUS POUR LE RESTE DE
LA CLÔTURE, en gardant à l’esprit l’emplacement de
votre porte.
ENTABLADO y TERMINACIÓN DEL ENSABLE
Inserte las tablas en orden, según el diseño deseado
(página 5). Inserte la TERMINACIÓN DE ESTRUCTURA
SUPERIOR (G2) y afirme martillando con un MAZO DE
GOMA. Inserte el soporte “L”, fije con el tornillo au-
torroscante.
FIJACIÓN y TERMINACIÓN DE POSTES
Inserte las TAPAS DE CANAL (H1) en las ranuras no us-
adas. Coloque la TAPA DEL POSTE (H2) en el extremo
del poste.
REPITA LOS PASOS ANTERIORES CON EL RESTO DE LA
CERCA y tenga en cuenta la ubicación de la puerta.
H1
H2
G2
G1
G2
G3
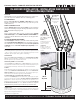
B
D
A C
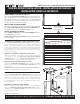
IN-GROUND INSTALLATION • INSTALLATION DANS LE SOL
INSTALACIÓN BAJO TIERRA
cut from extra (H1)
Pièce découpée (H1)
Cortar una pieza de (H1)