
Instructions / Assembly


©2013-2017 Jewett-Cameron Company • www.jewettcameron.com • Customer Service: 800-955-2879
03-infinityEuro rev. 2017-05-17
7
Customer Service: 1-800-955-2879 Fax: 503-647-2272
SURFACE MOUNT INSTALLATION • INSTALLATION EN SURFACE
INSTALACIÓN SOBRE LA SUPERFICIE
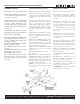
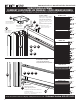
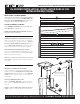
POST PREPARATION
Remove POST CAP (H2) and CHANNEL COVERS (H1)
from 2 posts. Attach BASE PLATE (J) to the bottom of the
posts using the 5 screws provided. Ensure screws are fas-
tened tightly, past flush.
ATTACH “L” BRACKET and SECURE FIRST POST
Slide “L” BRACKET (G1) down the back of the slot on the
post where the fence boards will go (long side sticking out)
until it touches the base plate. Attach with
self-tapping screw.
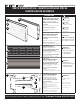
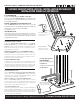
SECURE FIRST POST
Start with a corner or end post. Position post, pre-drill con-
crete or deck through base plate using 3/8 in. x 4 in. bit.
Secure with 3/8 in. x 4 in. anchor bolts or screws (not includ-
ed), tightly to base plate.
1 in. off the ground
2,4 cm au-dessus du sol
2,5 cm del suelo
F
I
Mounting /Anchoring Bolts
NOT INCLUDED
Boulon de montage/ancrage
NON INCLUS
Tornillos de anclaje/montaje
NO INCUIDOS
G3
G1
leveling adjusters
correcteurs de niveau
Reguladores de nivel
cut from extra (H1)
Pièce découpée (H1)
Cortar una pieza de (H1)
PRÉPARATION DES POTEAUX
Enlevez le CAPUCHON DE POTEAU (H2) et les COUVER-
TURES DE RAIL (H1) de 2 poteaux. Fixez la PLAQUE DE
BASE (J) au bas des deux poteaux en utilisant les 5 vis
fournies. Assurez-vous que les vis soient bien serrées,
plus qu’égales à la surface
FIXEZ LES ÉQUERRE « L » et LE PREMIER POTEAU
Glissez l’ÉQUERRE « L » (G1) dans l’arrière de la fente sur
le poteau où iront les panneaux de clôture (côté long
proéminent) jusqu’à ce qu’elle touche la plaque de base.
Fixez avec une vis autotaraudeuse.
FIXEZ LE PREMIER POTEAU
Commencez avec un poteau de coin ou d’extrémité. Placez
le poteau, prépercez le béton ou la terrasse au travers de
la plaque de base en utilisant une mèche de 1,57 cm x 10,16
cm. Fixez fermement à la plaque de base avec des boulons
ou des vis à ancrage de 1,57 cm x 10,16 cm (non inclus).
PREPARACIÓN DEL POSTE
Quite la TAPA DE POSTE (H2) y las TAPAS DE CANALES (H1)
de los 2 postes. Fije la PLACA BASE (J) a la parte inferior de
los postes con los 5 tornillos suministrados. Deben quedar
completamente ajustados e insertados.
FIJE EL SOPORTE “L” y COLOQUE EL PRIMER POSTE
Deslice el SOPORTE “L” (G1) por la parte inferior de la ran-
ura del poste donde se insertarán las tablas hasta que
toque la placa base (la lengüeta larga debe quedar hacia
afuera). Fije con el tornillo autorroscante.
COLOQUE EL PRIMER POSTE
Comience con un poste de esquina o terminal. Ubique el
poste, taladre previamente el concreto o el piso a
través de la placa base con una broca de 1,57 cm x 10,16 cm.
Fije firmemente a la placa base con tornillos de anclaje de
1,57 cm x 10,16 cm (no incluidos).