
Instructions / Assembly


©2013-2017 Jewett-Cameron Company • www.jewettcameron.com • Customer Service: 800-955-2879
03-infinityEuro rev. 2017-05-17
9
Customer Service: 1-800-955-2879 Fax: 503-647-2272
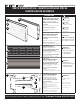
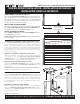
DIG HOLES
Starting with a corner post, dig the first 2 holes: 72-in. center to cen-
ter, 30-in. deep x 8-in. diameter. Add 6-in. of drainage gravel.
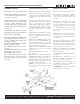
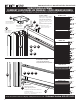
POST PREPARATION
Remove POST CAP (H2) and CHANNEL COVERS (H1) from 2 posts.
Measure and mark 70-in. down from the top. (6-ft. fence), 46-in.
down (4-ft. fence).
ATTACH “L” BRACKET TO POSTS
Slide “L” BRACKET (G1) down the BACK CHANNEL on the post where
the fence boards will go (long side sticking out) until it reaches your
mark. Attach with self-tapping screw.
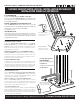
ALERT!
Prior to setting post(s) with concrete, you must ensure BOTTOM
SUPPORT RAIL (G3) is seated AGAINST THE BACK OF THE CHANNEL on
opposite posts. This will ensure your posts are correctly spaced for
installation.
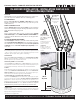
POSTS IN GROUND AND START FRAMING
Insert POSTS (H) into both holes, 72-in. (48-in. for 4-ft.) above ground.
Insert BOTTOM SUPPORT FRAME (G3) into post channels, resting on
the “L” Brackets. Level and straighten posts. Add 100 LBS. QUICK-SET
CONCRETE per hole. Level and straighten posts frequently as con-
crete dries.
CREUSEZ LES TOUS
En commençant avec le poteau de coin, creusez les 2 premiers trous
: 1,82 m. centre à centre, 76,20 cm de profondeur par 20,32 cm de
diamètre. Ajoutez 15,24 cm de gravier de drainage.
PRÉPARATION
Enlevez le capuchon de poteau (H2) et les COUVERTURES DE CANAL
(H1) De 2 poteaux. Mesurez et marquez 1,77 m à partir du haut (clô-
ture de 1,82 m) et 1,16 m (clôture de 1,22 m).
FIXEZ LES ÉQUERRES « L » AU POTEAU
Glissez l’équerre « L » (G1) dans le CANAL ARRIÈRE sur le poteau où
les panneaux de clôture iront (côté long proéminent) jusqu’à ce que
vous atteigniez la marque. Fixez avec une vis autotaraudeuse.
ALERTE!
Avant d’installer le(s) poteau(eaux) avec du béton, vous devez vous
assurer que LE RAIL DE SOUTIEN DU BAS (G3) soit assis CONTRE L’AR-
RIÈRE DU CANAL sur les poteaux opposés. Cela assurera que les po-
teaux soient correctement espacés pour l’installation.
POTEAUX DANS LE SOL ET DÉBUT DE STRUCTURE
Insérez les POTEAUX (H) dans les deux trous, 1,82 m (1,21 cm pour
1,21 m) au-dessus du sol. Insérez LA STRUCTURE DE SOUTIEN DU BAS
(G3) dans les canaux du poteau, reposant sur les équerres « L ».
Mettez au niveau et renforcez les poteaux. Ajoutez 100 LB DE BÉTON
À INSTALLATION RAPIDE par trou. Mettez au niveau et renforcez
fréquemment les poteaux au fur et à mesure que le béton sèche.
CAVAR POZOS
Comience con un poste de esquina y cabe los 2 primeros pozos: 1,83
m de un centro al otro, 76 cm de profundidad x 20 cm de diámetro.
Agregue 15 cm de grava de drenaje.
(Continúa en la página 19)
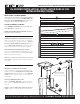
H
G3
70-in (46-in)
from top
1,77 m (1,16 m)
à partir du haut
desde la parte
superior
30-in
76,2 cm
6-in
15,2 cm
SAFETY ALERT!
Always check with
your utilities company
before digging
ALERTE!
Vérifiez toujours avec
la société Utilities
avant de creuser
¡ATENCIÓN!
Siempre consulte con
la empresa de servi-
cios públicos antes de
excavar
IN-GROUND INSTALLATION • INSTALLATION DANS LE SOL
INSTALACIÓN BAJO TIERRA