MediaStation Network Multimedia Hard Drive User Guide English 1
Contents Introduction 3 Specifications 3 Precautions 3 System Requirements 4 Package Content 4 Product Overview 4 1. Use as External USB HDD 4 1.1 Copy Data via USB 1.1.1 Windows 2000, XP, Vista 1.1.2 Linux 1.1.3 Mac 4 5 5 6 2. Access PC via Network 6 2.1 Connect LAN Cable 2.2 Set Network Configurations 2.2.1 Windows 2000 2.2.2 Windows XP 2.2.3 Windows Vista 6 6 6 9 11 3. Use as Multimedia Player 13 3.1 Connect to External AV Device 3.1.1 Connect Video Cable 3.1.2 Connect Audio Cable 3.
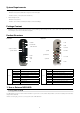
Introduction Verbatim MediaStation is brand-new digital multimedia player supporting dual data access mode via 3.5” HDD inside and 10/100Mbps Network. Easily enjoy Digital Movie, Digital Music, Digital Photo data of 3.5” HDD inside and Networking PC’s hard disk drive on your TV. • Dual Data Access Mode via 10/100Mbps LAN and 3.5” HDD inside • Digital Multimedia Player via Home TV or Car TV • USB 2.0 External Storage via PC (NTFS, FAT32) • Audio - Stereo, Digital Coaxial & Optical 5.1ch.
System Requirements • USB Requirements - Windows 2000, XP, Vista / MAC OS 9.0 higher / Linux 2.4.x higher - Available USB 2.0, 1.1 Port (Recommend USB 2.
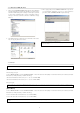
1.1.1 Windows 2000, XP, Vista 1. After connecting MEDIASTATION and plug power cable, Windows itself will install driver automatically. And then, check the driver installation at Windows [Start > Settings > Control panel > (switch to classic View on Windows XP) > system > Hardware > Device manager > Universal Serial Bus controllers > USB Mass Storage Device ]. 3. After copying data, remove MEDIASTATION with using remove icon at Windows right-down corner.
[How to stop using] Do [unmount] at Device Control. 1.1.3 Mac No need to install the installation driver at Mac OS 9.x version and the MEDIASTATION will be detected automatically. If the MEDIASTATION is detected correctly, an icon is appeared at a monitor. When removing MEDIASTATION safely, drag the icon to a trash and unplug MEDIASTATION. 2. Access PC via Network 2.
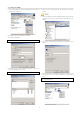
2.2.1 Windows 2000 1. Select a folder which you want to share. Right-click the folder and click ‘Sharing’ in pop menu. 4. After that, the shared folder will be displayed as following picture. 5. Move to [Settings>Control Panel>Administrative Tools>Computer management>Local Users and Groups>Users], and double click ‘Guest’. 2. Check ‘Share this folder’ and write ‘share name’. For example, “My Movie” ✓ Make sure to write ‘share name’ within 12 characters in English. 6.
. Double click ‘Internet Protocol (TCP/IP)’ that you want to use on your computer. 10. Set the network configurations of Mediastation. ✓ You have to connect MEDIASTATION to TV set for this setup. See “3.1.1 Connect Video Cable”. Press [SETUP] of remote control for moving to setup screen. On that screen, select ‘DHCP off’ and write IP address & Subnet mask. For example, IP Address: 192.168.1.2 Subnet mask: 255.255.255.0 After writing, press [SETUP] again for saving configurations.
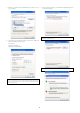
2.2.2 Windows XP 1. Select a folder which you want to share. Right-click the folder and click ‘Sharing and Security’ in pop menu. 5. Check ‘User cannot change password’ and ‘Password never expires’. 2. Check ‘Share this folder on the network’ and write ‘Share name’. For example, “My Movie” ✓ Make sure to write ‘Share name’ within 12 characters in English. 6. Move to [Control Panel>Network connections], and select ‘Local area connections’ properties by right click of mouse.
7. Double click ‘Internet Protocol(TCP/IP)’ that you want to use on your computer. 9. At above number 7) figure, click ‘Advanced’ Tab. Disable ‘Internet Connection Firewall’. ✓ If you use service pack 2, refer to the following figures. Click ‘Settings’ at ‘Windows Firewall’ 8. Check ‘Use the following IP address’, and write ‘IP address’ & ‘Subnet mask’ that you want to use. For example, IP address: 192.168.1.3 Subnet mask: 255.255.255.
10. Set the network configurations of MEDIASTATION. ✓ If you have already been provided dynamic IP address from DHCP Server or IP Router on your local area network, you don’t need to write static IP address absolutely. Use ‘DHCP on’ or write IP address & Subnet mask that DHCP Server or IP Router provide. ✓ You have to connect MEDIASTATION to TV set for this setup. See “3.1.1 Connect Video Cable”. Press [SETUP] of remote control for moving to setup screen.
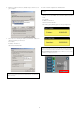
2. Disable “Firewall” c. make a folder you want to share. a. Click Start > Setting > Control Panel > Security > Windows Firewall on / off d. You will get a popup “Choose people to share with” then select “Everyone (All users in this list) and press “Add” button. b. Click at ‘Off (not recommended) e. After you register the user account, then click “Share” button. 3. Setup of Network and Sharing Center a. Click Start > Setting > Control Panel > Network and Internet > Network and Sharing Center b.
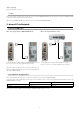
3. Use as Multimedia Player 3.1 Connect to External AV Device 3.1.1 Connect Video Cable MEDIASTATION supports 3 type of video output; “Composite, S-video, Component”. Use video connection that your TV supports. Normally, TV supports composite video connection, and this package is supplied with a composite video cable. ① Composite: Yellow RCA cable.
3.1.2 Connect Audio Cable MEDIASTATION supports 3 type of audio output; “Stereo, Coaxial, Optical”. Use audio connection that your TV or Audio set supports. Normally, TV supports stereo audio connection, and this package supplies stereo audio cable ① Stereo: Red & White RCA Cable (supplied) Red (STEREO-R) White (STEREO-L) Red (STEREO-R) Connect to Composite (CVBS) Jack of TV White (STEREO-L) Connect to Composite (CVBS) Jack of TV ② Optical ( ): Optical Cable for Digital 5.1 ch.
Setup Procedure ① Turn on MediaStation and press [SETUP] on Mode Selection screen. ② Move to ‘TV Out’ icon and press [ENTER]. Setup box will be displayed under icon menu. ③ Move to Video Output Mode that you want and press [ENTER]. ④ Finally, press [SETUP] again for saving configurations. 3.2.2 Audio Setup This is guide for setting audio output of MEDIASTATION. You can use Stereo or Digital 5.1 ch..
④ Move to ‘IP Addr’ and press [ENTER] IP address Input box will be displayed. Enter IP address with arrow and number button of remote control. And then, press [ENTER] again. ✓ Check ‘IP address obtained automatically’ When you use ‘DHCP On’, you can see the IP address in MENU screen after selecting ‘PC-Network] icon in Mode Selection screen. ⑤ Move to ‘Subnet’ and press [ENTER]. Subnet mask Input box will be displayed. Enter Subnet mask with arrow and number button of remote control.
3.2.4 Screen Setup This is guide for setting TV Type. You can use 4:3 Letter Box, 4:3 Pan Scan, and 16:9. Setup Procedure ② Move to ‘Screen’ icon and press [ENTER]. Setup box will be displayed under icon menu. ③ Move to 4:3 Letter box, 4:3 Pan scan or 16:9 that you want and press [ENTER]. ④ Finally, press [SETUP] again for saving configurations. ① Turn on MediaStation and press [SETUP] in Mode Selection Screen. 3.2.
3.3 Basic Screen Menu 3.3.1 Mode Selection, Media Type Selection After turning on MEDIASTATION, you can see Mode Selection screen. In this screen, you can select Built-in HDD or Networking Computers. Just press [ENTER] after moving to the icon with WX arrow button. ✓ If there is no HDD or networking PC, the icons are not activated. 1. Use Built-in HDD ① [Mode Selection] Move to ‘MediaStation’ icon and press [ENTER] for playing built-in HDD’s files.
3.3.2 File Selection After selecting a Media type, ‘File Selection’ screen will be displayed. Move to a file that you want to play and press [ENTER] or [PLAY/ PAUSE]. Icon Menu Tray ☞ [ENTER] button Play one file that you select. After finishing playback, return to ‘file selection screen’. ☞ [PLAY/PAUSE] button After playing the file that you select, play next all files continuously. ☞ WX button Move to files with pressing TS arrow buttons. ☞ W button Return to up directory with pressing W arrow button.
3.4 Play Video Files It is possible to play video files like AVI, MPG, MPEG, DAT, M2V, and VOB. Select ‘Movie’ icon in Media Type Selection screen. Video file list will be displayed. Just move to a file and press [ENTER] or [PLAY/PAUSE] button. Move to a file and press [ENTER] or [PLAY/PAUSE] button. Press [ENTER] for playing just the file or [PLAY/PAUSE] for playing all files from the selected file. Select ‘Movie’ icon in Media Type Selection screen.
Play a next file after a current playback file. If you used [ENTER] for playback, you cannot use this function. This is available in playing all files as using [PLAY/PAUSE] button or ‘ALLPLAY’ icon. NEXT XXI Playback Next File 0 Number button Screen Reset If a frame of a video file is broken, green colour runs on a overall screen. Press number [o “Zero”] for screen reset. Menu Icon Popup Popup menu will appear including ‘File Info, Time Search, Subtitle, Scr.Size’ functions.
3.6 Play Music Files It is possible to play music files like MP3, OGG, WAV, WMA. Select Music icon in Media Type Selection screen. Music file list will be displayed. Just move to a file and press [ENTER] or [PLAY/PAUSE] button. Select ‘Movie’ icon in Media Type Selection screen. Move to the folder including DVD backup files and select ‘video_ts.ifo’ file and press [ENTER] button.
3.7 Play Photo Files It is possible to play photo files like JPG(JPEG). Select Picture icon in Media Type Selection screen. The Photo file list (or folder list) will be displayed. Just move to a file and press [ENTER] or [PLAY/PAUSE] button. Move to a file and press [ENTER] or [PLAY/PAUSE] button. Press [ENTER] for playing just the file or [PLAY/PAUSE] for playing all files from the selected folder. Select Picture icon in Media Type Selection screen.
3.8 Make a Play-List User can register all media files such as video, music and photo to a play-list. ✓ It is not possible to play each registered files independently. Use 'Random, PLAY all' icon or [PLAY/PAUSE] button. Additionally, registered play-list will be deleted after rebooting. ① Select Play List icon in Media Type Selection screen. ② Move to a file and press [ENTER] for adding to Play-List. After adding, press [▶] for moving to 'Menu Icon tray'. Move to 'List' icon and press [ENTER].
3.9 Remote Controls This is guide for basic use of remote control. For more details see section ‘3.3 Basic Screen Menu’, ‘3.4 Play Video Files’, ‘3.5 Play DVD Files’, ‘3.6 Play Music Files’, ‘3.7 Play Photo Files’, ‘3.8 Make a Play-List’.
3.10.4 Firmware Upgrade Download an upgrade file from the support pages of www.verbatim-europe.com. After connecting TV display, select the upgrade file and press [ENTER]. Upgrade is progressed automatically. After finishing upgrade, you can check firmware version on Setup screen. Press [SETUP] button. Technical Support If you are experiencing difficulty installing or using your Verbatim product, please visit the main Verbatim Technical Support website at www. verbatim-europe.com.
CE Declaration EC DECLARATION OF CONFORMITY It is hereby declared that this product complied with the essential protection requirements of Council Directive 89/336/EEC and its amendments on the approximation of the laws of the Member States relating to electromagnetic compatibility. This declaration applies to all specimens manufactured identical to the model submitted for testing/evaluation.