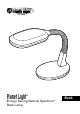
Planet Light ® Energy Saving Natural Spectrum Desk Lamp ® PL03
Dear Customer, Thank you for purchasing the Planet Light® Energy Saving Natural Spectrum® Desk Lamp. You have received a quality product, backed by a one-year limited warranty. As a Verilux customer, your satisfaction means everything to us. We look forward to serving you now and in the future. Many other healthy lighting products are available through our catalog and online. Visit us on the web at www.verilux.
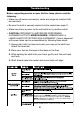
Important HEADER Safety Instructions SAVE THESE INSTRUCTIONS Thank you for purchasing the Planet Light® Energy Saving Natural Spectrum® Desk Lamp. Please read the following safety information before using. To reduce the risk of fire, electrical shock, or injury to persons: • Do NOT dismantle. • Do NOT alter power cord. • Turn off/unplug and allow to cool before replacing bulb or cleaning. Warnings and Precautions • For indoor use only. • The lamp is an electrical device. DO NOT USE NEAR WATER.
Avertissements et Précautions • Pour usage intérieur seulement. • La lampe est un dispositif électrique. NE PAS UTILISER PRÈS DE L’EAU. • Avant de brancher la lampe, vérifier que la tension de la prise murale ne dépasse pas 120 volts. • Ne pas utiliser avec des gradateurs de lumière, des minuteries, des détecteurs de mouvement ou des rallonges. • Ce produit peut causer des interférences avec des radios, des téléphones sans fil ou des appareils utilisant une télécommande sans fil, telle qu’une télévision.
Getting HEADER Started Main Parts & Controls A. B. C. D. E. Polarized Plug F. Bulb G.
Set-up Instructions To prevent damage during shipping, the Verilux® bulb is surrounded by protective padding. Carefully remove and dispose of the protective padding. Check to ensure that the bulb is fully seated and has not come loose from the socket during shipping. There should be no gap between the bulb and socket.
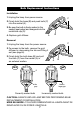
Bulb Replacement Instructions Installation 1. Unplug the lamp from power source. C 2. Firmly hold the base (B) and push bulb (C) into the socket (A). 3. Be sure the bulb is firmly seated in the socket (see below) and snapped into the metal bulb clip (D). B A 4. Replace grid diffuser. Removal C 1. Unplug the lamp from the power source. 2. To access to the bulb, remove the grid diffuser by depressing the tab and lifting it out (see page 6). 3.
Troubleshooting Before requesting service on your Verilux® lamp, please read the following: • Make sure all power connectors, cords and plugs are inserted fully and securely. • Be sure the bulb is securely seated into the socket (see page 7). • Make sure there is power to the wall outlet or try another outlet. • Caution: Disconnect lamp before performing alignment activity. MISE EN GARDE : DÉBRANCHER LA LAMPE AVANT D’EFFECTUER SON ALIGNEMENT.
Care & Cleaning Your lamp is made from high quality materials that will last for many years with minimum care. You may want to periodically clean the lamp, using a mild non-abrasive cleaner and soft cloth. When cleaning, make sure you have turned off and unplugged the unit, and allowed sufficient time for the unit to cool. All liquid should be properly wiped away and dried prior to restoring power. CAUTION: DO NOT USE SOLVENTS OR CLEANERS CONTAINING ABRASIVES, OR AMMONIA BASED CLEANERS.
One Year Limited Warranty ATTENTION! ONCE OPENED, PLEASE DO NOT RETURN THIS PRODUCT TO THE STORE WHERE IT WAS PURCHASED FOR REPAIR OR REPLACEMENT! Many questions may be answered by visiting www.verilux.com, or you may call our Customer Service Department at 800-786-6850 during normal business hours. This limited warranty is provided by: Verilux, Inc.
PL03-MAN-Rev7 Printed in China for Verilux, Inc. © Copyright 2011 Verilux, Inc. All rights reserved.