
User guide


Plan Your Network and Configure Wireless Settings
32
Verizon 4G LTE Broadband Router
Within two minutes, use the computer, smartphone or tablet’s WPS software to join the
network.
Note: If no WPS-capable client devices are located during the two-minute
time frame, the Wi-Fi network name does not change, and no
security is set up.
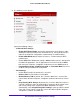
Add Wireless Devices That Do Not Support WPS
If you set up your network with WPS, and now want to add a non-WPS device, you must
manually change it.
Because WPA randomly creates the Wi-Fi network name and password, they might be
difficult to type or remember. That is one reason why the network is so secure. You can
change the wireless settings so that they are easier for you to remember. However, you must
set up the WPS-compatible computer, smartphone or tablet again.
Note: When you make changes like these, all wireless connections are
lost from the network and require setup with the new wireless
settings.
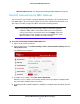
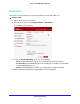
To change wireless settings for the network:
1. Connect a computer to the router using an Ethernet cable, preventing a disconnection
when changing the wireless settings.
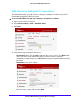
2. Sign in to the web user interface.
3. Select Router Settings > Wi-Fi > Wi-Fi Profile.
4. Make the following changes:
• Change the Wi-Fi network name.
• Specify a Wi-Fi password.
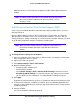
• Select Router Settings > Wi-Fi > Advanced Wi-Fi Settings and make sure that
Keep Existing Wi-Fi Settings is selected so that your new settings are not erased if
you use WPS. For more information, see Advanced Wi-Fi Settings on page
33.
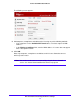
5. Click Apply.
All previously connected wireless devices are forgotten and disconnected from the router.
6. To connect any computers, smartphones or tablets, open the networking application and
enter the security settings that you selected in Step 4 (the network name, security method,
and Wi-Fi password).
7. Connect via WPS.
See Join Your Wireless Network on page 30.