
Installation Manual


EN
8
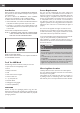
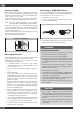
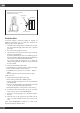
From power
supply
From the oven
Terminal Block
Square-wire springa
Important: Use twist-on connector
with square-wire spring
Or
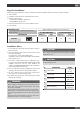
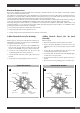
Final Checklist
To prevent improper connections leading to damage of
electrical components and so voiding the warranty, the
following steps must be performed:
1. Check the electrical requirements and make sure you have
the correct electrical supply and that the oven is properly
grounded.
2. Turn on the power supply to the oven.
3. Checkpoweratthejunctionboxwiresusingavoltmeter
havingarangeof0-250V.
Ifyouhaveinstalledtheovenforuseon240Vsupply,you
should nd that the voltage reading between the black and
redwires(LinetoLine)shouldbe220Vto240V.
If you have modied the oven(s) for use on 208V, the
voltage reading between the black and red wires should
be190to208V.
4. Settheclockbyfollowingthesesteps:
• Immediately turn [+/-] knob to set hours + [INC] or - [DEC].
• Press [+/-] knob again to change minutes.
• Immediately turn [+/-] knob to set minutes + [INC] or -
[DEC].
• Press [+/-] knob or wait for a few seconds to confirm.
Clock is now set.
5. Testthebakemodebyfollowingthisstep:
• Movecookingmodeknobto“BAKE”position.
• Cooling fan and oven lights will turn on, the preheat led
will start to blink.
• Abeepissoundedwhentheovenreachesthepreset350
°F(175°C)andthepreheatlightstoptoblink.
• Movetheknobbackto“OFF”positiontostopcooking.
6. Tochecktheotherovenfunctionsrefertothe“Usingthe
OvenControls”sectionoftheUSERMANUAL.
7. Iftheovenisworkingproperly,turnothepowersupplyto
the oven.
8. Placethecoveronthejunctionboxandmake surethe
cover is securely fastened and turn on the power to the
oven.
Leave these INSTALLATION instructions as well as the
Operating Instructions with the owner.