
Installation Manual


EN
6
Electrical Supply
Before installing the oven have a qualified electrician verify
that your home is provided with adequate electrical service
and that the addition of the oven will not overload the branch
circuit on which it is to be installed.
Aseparatethree-wireorfour-wiresinglephase,120V/240V,
60Hz,ora120V/208V,60Hzbranchcircuitisrequired.
NOTE: FOR USE WITH 120V/208V, 60 HZ SUPPLY
VOLTAGE,SEECONNECTINGTO208VCIRCUIT.
For hook-up of the oven you will need to have an approved
junction box installed where it will be easily reached through
the front of the cabinet where the oven will be located. The
ovenhas3feetofconduit.
Allow two to three feet of slack in the line so that the oven can
be moved if servicing is ever necessary.
DO NOT shorten the flexible conduit.
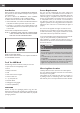
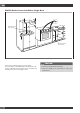
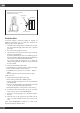
Location of rating plate
Wiring Requirements
When making the wire connections, use the entire length of the
conduitprovided(3feet).Theconduitmustnotbecut.
Before making connections make sure the power is off and
read and observe the following:
1. A separate three-wire or four-wire, single phase,
120V/240V,60Hzor120V/208V,60Hzbranchcircuit
is required for the oven.
2. The oven must be connected with Copper or Aluminum
wire.
3. IntheUnitedStates:
Wiring must conform to the National Electrical Code,
ANSI/NFPANo.70latestedition.Youcanobtainacopy
of the National Electrical Code by writing to: National
Fire Protection Association Batterymarch Park Quincy, MA
02269InCanada:
Wiring must conform to Canadian Electrical Code C22.1-
latest edition. You can obtain a copy of the Canadian
Electrical Code by writing to: Canadian Standards
Association 178 Rexdale Boulevard Rexdale (Toronto),
Ontario,CanadaM9W1R3
4. Wiresize(Copper or Aluminum wire) and connections
must be suitable for the rating of the appliance as per
the National Electrical Code requirements. The flexible
armoured cable extending from the oven should be
connected directly to the junction box.
5. Thejunctionboxshouldbelocatedsoastoallowasmuch
slack as possible between the junction box and the oven
so it can be moved if servicing is ever required.
6.AU.L.listedconduitconnectormustbeprovidedateach
end of the power supply cable.
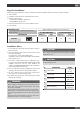
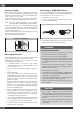
Connecting to 120V/208V Circuit
Thisoptionisprovidedforareaswherestandard240Vservice
is not available. The following steps must be completed prior
to connecting the oven to the power source.
1. Remove the upper front cover.
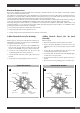
2. Connect the 208V Jumper provided into the female
connector as showed below.
3. Reassembletheupperfrontcover,connecttheoventothe
208Vpowersupplyandcheckfunctionality.
WARNING
ELECTRICAL SHOCK HAZARD
• The electrical power to the oven branch circuit must be
shut off while line connections are being made.
• Do not use an extension cord with this appliance.
• Electrical ground is required on this appliance. The free
endofthegreenwire(thegroundwire)mustbeconnected
to a suitable ground. This wire must remain grounded to
the oven.
• If cold water pipe is interrupted by plastic, non metallic
gaskets, union connections or other insulating materials,
DO NOT use for grounding.
• DO NOT ground to a gas pipe.
• DO NOT have a fuse in the NEUTRAL or GROUNDING
circuit. A fuse in the NEUTRAL or GROUNDING circuit
could result in an electrical shock.
• Check with a qualified electrician if you are in doubt as to
whether the appliance is properly grounded.
• Failure to follow these instructions could result in serious
injury or death.
CAUTION
• Do not repair or replace any part of the appliance
unless specifically recommended in the manual. All other
servicing should be done by a qualified technician. This
may reduce the risk of personal injury and damage to
the oven.
• Never modify or alter the construction of the appliance by
removing panels, wire covers, screws, or any other part
of the product.