
Owner's Manual

8
INSTALLATION
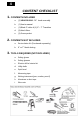
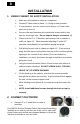
1. UNDER CABINET OR SOFFIT INSTALLATION
a. Make sure all preparation steps are completed.
b. Connect 6” black collar to hood. (1) Using screws provided
c. If using transition, connect transition with damper to 6” black collar,
wider part to front (2)
d. Secure collar and transition with sheetmetal screws and/or duct
tape for an air-tight seal. Do not impede damper movement. (3)
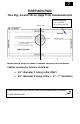
e. Cutout hole for 6” or 7” diameter duct exhaust hole in cabinet or
soffit, per figure 1C. Recommended attaching 6” collar & 7”
transition (with damper) to hood before setting into place.
f. Drill Wiring Access hole in cabinet per figure 1C. (If not using a
plug), feed the wires coming down into top of the hood through the
opening in the bottom of the cabinet. (For recirculation kit
installation, you must feed wires through recirculation vent before
going into hood)
g. Using the screws provided, fasten 4 hood screws into cabinet or
soffit at location identified. DO NOT SCREW IN ALL THE WAY,
LEAVE 1/8” OF SCREW SHOWING.
h. Lift the hood up to the cabinet, such that the screws protrude
through the key holes on hood top. Push hood back flush against
the wall, so that screws support hood.
i. While holding hood, tighten all 4 screws securely from under the
hood.
j. NOTE: Install additional screws through the back or top for
security.
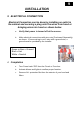
2. CONNECT DUCTWORK
a. Connect 6” or 7” metal duct to collar or
transition.
Your METAL Exterior Exhaust Outlet (Purchased Separately),
installed at the end of your duct run on the roof or outer wall
of your home must include an integrated damper to block the
intrusion of outside air into the home.
1.
2.
3.