
Product Manual


INSTALLING HORIZONTAL SHEET METAL ON THE CARPORT FRAME:
Different lengths, styles, and gauges of sheet metal panels can be installed on the Versatube frame. With the use of
optional roof purlins, you can also install vertical sheet metal panels. For the purpose of these assembly instructions, we
will be using sheet metal panels run horizontally. These instructions will cover the installation of roof and partial side
panel coverage only.
Note: Adding additional side panels will effect the wind load applied to your structure. If you intend to add additional
panels, you may require additional bracing or closer On Center spacing of the frame sections.
Carport frame sections will be on 4’, 4 1/2’, or 5’ On Center spacing. Check to see which frame spacing you have.
The length of the roof panels will be different for each frame spacing.
Panel lengths for:
4’ On Center frame sections: 8’-7”, 8’-2”, 4’-2”.
4 1/2’ On Center frame sections: 10’, 9’-2”, 4’-8”.
5’ on center frame sections: 10’-6”, 10’-2”, 5’-2”.
The panel lengths listed first above (8’-7”, 10’, and 10’-6”) will always go at the ends of the roof and create an overhang
(5” overhang on 4’ or 5’ On Center spacing— 11” overhang on 4 1/2’ On Center spacing). The other lengths are designed
to span ether 2 or 3 interior frame sections.
STEP 1: Installing Panel 1 (8’-7” for 4’ O.C.) (10’ for 4 1/2’ O.C.) 10’-6” for 5’ O.C.)
On the bottom of the panel, put a light pencil mark to indicate the overhang. (5” on 4’ & 5’ O.C. spacing) (11” on
4 1/2’ O.C. spacing) This line will help you keep the overhang square with the end of the frame.
THE FIRST PANEL SHOULD BE INSTALLED ON THE LOW END OF THE CARPORT FOR PROPER DRAINAGE.
Before you assembled the Roof/Wall sections, you should have put a mark on one side of each peak as a guide for the
under lap edge of the first run of panels down the peak of the carport. If you did not, refer to page 10 for the proper mark
location for your building width.
Note: The illustration below is for 10’, 12’, 16’, 18’, 24’ and 30’ wide carports. See next page for 14’ and 20’
carports.
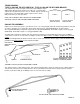
Place the first panel on the roof with the under lap edge of the panel lined up with the marks on the peaks and the end of
the panel overhanging the end of the building 5” or 11” (see notes above). You may want to clamp the panel in place
while installing the screws. With the panel lined up with all your marks, attach the panel to the first frame section with
painted #12 x 1” self-drilling screws with rubber washers about 1” above the major ribs. Do not install screws above the
edge ribs at this time. You will be sliding the lower panels under the edges of the panels above.
Before you install screws in the second frame section, check to see that it is square with the first section. Take a meas-
urement between the frame sections at the base rail and transfer that dimension up to the peaks. Now, install screws in
the second frame section. The other end of the panel should line up with the back of the third frame section. Do not install
screws into the third frame section at this time.
PAGE 14
BUTYL CAULK TAPE
1”
17 1/8” FROM
END OF PEAK
5” OR 11”
OVERHANG
NO SCREWS ABOVE
EDGE RIBS OR INTO
THIRD FRAME SECTION
UNDER LAP EDGE
PAINTED #12 X 1”
SCREW WITH RUBBER
WASHER