
Product Manual


INSTALLING PANEL TWO
If you have not removed the protective paper on the butyl tape that you applied to panel 1, do that at this time.
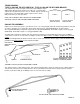
Now, position panel two as shown below with a 2” overlap on panel one. Press the panels together well to create a good
seal with the butyl caulk. The lower (under lap) edge of the panel should line up with the marks on the peaks. Before you
install screws, make sure that the third frame section is the same distance from the second frame section at the base rail
and at the peak. Attach the panel with screws on both sides of the major ribs at the lap joint and above the major ribs at
other locations. Do not install screws above the lower edge rib or at the end of panels that continue on down the roof.
NOTE: If your carport frames are on 4’ centers, the second panel will be 4’-2” long. If your carport frame is on 4 1/2’ cen-
ters, the second panel will be 10’ long. If your carport frame is on 5’ centers, the second panel will be 10’-6” long.
REMEMBER: On longer carports, the end panels are the same length, center panels are shorter.
ADDITIONAL PANELS DOWN CARPORT LENGTH: Install additional panels down the length of the carport as needed in
the same manner as you installed panel 2. See diagram below for panel guide.
NO SCREWS ABOVE
LOWER EDGE
SCREWS ON BOTH
SIDES OF RIB AT JOINT
5” OR 11”
OVERHANG
END PANEL 8’-7”, 10’ OR 10’-6”
PANEL LENGTHS FOR 4’, 4 1/2’, OR 5’ ON
CENTER FRAMES. Dimensions are listed in
order: 4’, 4 1/2’, 5’.
NOTE: On longer carports, you will have addi-
tional long center panels.
END PANEL 8’-7”, 10’ OR 10’-6”
END PANEL 8’-7”, 10’ OR 10’-6”
END PANEL 8’-7”, 10’ OR 10’-6”
END PANEL 8’-7”, 10’ OR 10’-6”
END PANEL 8’-7”, 10’ OR 10’-6”
SHORT PANEL
4’-2”, 4’-8” OR
5’-2”
SHORT PANEL
4’-2”, 4’-8” OR
5’-2”
LONG CENTER PANEL 8’-2”,
9’-2” OR 10’-2”
LONG CENTER PANEL 8’-2”,
9’-2” OR 10’-2”
PAGE 16