VX-820 OPERATING MANUAL VERTEX STANDARD CO., LTD. 4-8-8 Nakameguro, Meguro-Ku, Tokyo 153-8644, Japan VERTEX STANDARD US Headquarters 10900 Walker Street, Cypress, CA 90630, U.S.A. YAESU EUROPE B.V. P.O. Box 75525, 1118 ZN Schiphol, The Netherlands YAESU UK LTD. Unit 12, Sun Valley Business Park, Winnall Close Winchester, Hampshire, SO23 0LB, U.K. VERTEX STANDARD HK LTD. Unit 5, 20/F.
CONTENTS Warning! FCC RF Exposure Requirements ............... 1 Controls & Connectors ................................................. 2 Before You Begin ........................................................... 4 Operation ....................................................................... 5 Advanced Operation ..................................................... 8 Programmable Key Functions ......................................... 8 Descriptipon of Operating Functions ............................
WARNING! FCC RF EXPOSURE REQUIREMENTS FCC RF Exposure Compliance Requirements for Occupational Use Only: This Radio has been tested and complies with the Federal Communications Commission (FCC) RF exposure limits for Occupational Use/Controlled exposure environment. In addition, it complies with the following Standards and Guidelines: FCC 96-326, Guidelines for Evaluating the Environmental Effects of Radio-Frequency Radiation.
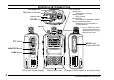
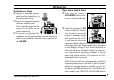
CONTROLS & CONNECTORS LED Indicator VOL/PWR Knob Steady Red: Transmitting in progress Blinking Green: Busy Channel Steady Green: Tone Squelch in defeated condition Dealer Programmed ColorÚ: Emergency, 5-Tone Decoded, or 2-Tone Decoded CH (Channel) Selector Antenna Jack TOP SEL Key Speaker Microphone Ú: one of “Flashing in white,” “Continuation changes in sequential colors,” or “toggling the two colors.
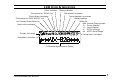
LCD ICONS & INDICATORS “CALL” Indicator This channel on “SCAN” List Priority Scan is activated Receiver Monitor “Talk-Around” is enabled “Voice Message” is received Battery Indicator This channel on “DUAL WATCH” List Low Transmit Power Mode On SUB-LCD 888: Channel Group Number -P-: Priority Channel -H-: Home Channel In: ARTS “In Range” out: ARTS “Out of Range” Option Unit is activated S-meter (four steps) “Group Scan” is enabled Encryption is activated 12 Character Alpha-numeric Display VX-820 OPER
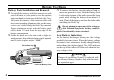
BEFORE YOU BEGIN Battery Pack Installation and Removal To install the battery, hold the transceiver with your left hand, so your palm is over the speaker and your thumb is on the top of the belt clip. Carefully mate the battery’s four insertion slots with their corresponding alignment tabs on the transceiver case, while tilting the Belt Clip outward. Proper alignment occurs with the battery pack offset about 1/2 inch from the top edge of the battery compartment.
OPERATION Preliminary Steps Install a charged battery pack onto the transceiver, as described previously. Screw the supplied antenna onto the Antenna jack. Never attempt to operate this transceiver without an antenna connected. If you have a Speaker/Microphone, we recommend that it not be connected until you are familiar with the basic operation of the VX-820. Operation Quick Start Turn the top panel’s VOL/PWR knob clockwise to turn the radio on.
OPERATION Rotate the VOL/PWR knob to set the volume level. If no signal is present, press and hold in the MONITOR button (under the PTT switch) more than 2 seconds; background noise will now be heard, and you may use this to set the VOL/PWR knob for the desired audio level. Press and hold the MONITOR button more than 2 seconds (or press the MONITOR button twice) to quiet the noise and resume normal (quiet) monitoring. To transmit, monitor the channel and make sure it is clear.
OPERATION If the Busy Channel Lockout feature has been programmed on a channel, the radio will not transmit when a carrier is present. Instead, the radio will generate short beep three times and indicate “* ERROR *” on the display. Release the PTT switch and wait for the channel to be clear of activity.
ADVANCED OPERATION Programmable Key Functions For future reference, check the box next to each function that has been assigned to the Programmable key on your particular radio, and keep it handy. The VX-820 includes the TOP SEL, MONITOR, and LAMP keys, the [A], [B], [C], [D], [½], [#] function keys. The Programmable key functions can be customized, via programming by your VERTEX STANDARD dealer, to meet your communications/ network requirements.
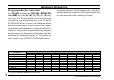
ADVANCED OPERATION FUNCTION TOP SEL MONITOR Follow-Me Dual Watch Group Up Group Down Channel Up Channel Down Set Call/Reset Call 1 Call 2 Call 3 Call 4 Call 5 Code Up Code Down Code Set Speed Dial Option SW 1 Option SW 2 Emergency Home Selectable Tone Direct Channel #1 Direct Channel #2 Direct Channel #3 Direct Channel #4 REC/PLAYÚ SQL AF Min Volume Status Set Status Up Status Down Status Check Audio PC (PIT) Lone Worker DTMF Code Set TA Scan Ú: Requires DVS-5 Voice Storage Unit VX-820 OPERATING MANUAL
ADVANCED OPERATION Description of Operating Functions MONITOR Press the assigned programmable key to cancel CTCSS- and DCS-controlled squelch; the BUSY/ TX indicator will blink green. Press and hold this button for 1.5 seconds to hear background noise (unmute the audio); the BUSY/TX indicator will glow green. LAMP Press the assigned programmable key to illuminate the LCD for five seconds. SCAN The Scanning feature is used to monitor multiple signals programmed into the transceiver.
ADVANCED OPERATION DUAL WATCH TALK AROUND (TA) The Dual Watch feature is similar to the SCAN feature, except that only two channels are monitored: The current operating channel; and The Priority channel. Press the assigned programmable key to activate the Talk Around feature when you are operating on duplex channel systems (separate receive and transmit frequencies, utilizing a “repeater” station).
ADVANCED OPERATION TX SAVE DISABLE FOLLOW-ME SCAN Press the assigned programmable key to disable the Transmit Battery Saver, if you are operating in a location where high power is almost always needed. The “Follow-Me” Scan feature checks a User-assigned Priority Channel regularly as you scan other channels.
ADVANCED OPERATION FOLLOW-ME DUAL WATCH GROUP UP/DOWN To set up a “Dual Watch” frequency pair using the “Follow-Me” feature, select a channel using the CH Selector knob. Now press the assigned programmable key; pressing the assigned programmable key locks the current channel as the User-assigned Priority Channel. Now rotate the CH Selector knob to select another channel (not the “Scanning Start” channel).
ADVANCED OPERATION “-SCAN Stop-” will appear on the LCD for one second after pressing the assigned programmable key. CHANNEL UP/DOWN Press the assigned programmable key to select a different channel within the current group. SET Press the assigned programmable key to activate the “User Set” (Menu) Mode. See page 20 for details CALL/RESET While the DTMF Paging System This feature, if enabled, allows the user to change the 3-digit Page Call code, used to call other similarly-equipped stations.
ADVANCED OPERATION OPTION SW1 SELECTABLE TONE OPTION SW2 Press the assigned programmable key to select a subaudible tone (CTCSS/DCS) from the pre-defined tone table. You can operate using the indicated subaudible tone in the Selectable Tone mode. Press the assigned programmable key to toggle the optional accessory “2” “On” and “Off.” DIRECT CH#1 TO #4 Press the assigned programmable key to toggle the optional accessory “1” “On” and “Off.
ADVANCED OPERATION To stop the play-back, press this key again. While playback is proceeding, you may press the [D] key to clear the all messages and stop the play-back. If your radio is 16-key version, press the [½] key to jump to the previous message, or press the [#] key to jump to the next message while playback is proceeding. SQL You can manually adjust the squelch level using this function: Press the assigned programmable key.
ADVANCED OPERATION DTMF CODE SET (16-KEY VERSION ONLY) TA SCAN You may send the desired telephone number manually. Press the assigned programmable key to toggle the TA (Talk Around) scan feature “On” and “Off.” To dial a number manually, press the assigned programmable key, then press the desired numbers on the front panel’s numeric key. Now, press the PTT switch to send the telephone number. The DTMF tones sent during the dialing sequence will be heard in the speaker.
ARTS (AUTO RANGE TRANSPOND SYSTEM) DTMF PAGING SYSTEM This system is designed to inform you when you and another ARTS-equipped station are within communication range. This system allows paging and selective calling, using DTMF tone sequences. During ARTS operation, when the radio receives the correct ARTS signal, a short beep will sound and the “In” (meaning “In Service” notation will be displayed on the sub-LCD.
USER SET MODE The VX-820 Series includes a “User Set (Menu)” Mode which allows the user to define or configure various settings, such as Beep On/Off, Squelch, LCD contrast, etc. To activate the “User Set (Menu)” Mode: Press the assigned programmable key for the “SET” function to enter the “User Set Mode.” Select the User Set Mode Item you want change using the CH selector knob. Press the MONITOR/LAMP button to select the status of the selected item. Press PTT switch to exit to normal operation.
OPTIONAL ACCESSORIES FNB-V86LI FNB-V87LI FBA-34 VAC-920 PA-39 VT60F VT60FS FVP-25 FVP-35 DVS-5 MDC1200 VME-100 VMDE-200 MH-65A7A 7.4V, 1150 mAh Lithium-Ion Battery 7.
This device complies with Part 15 of the FCC rules. Operation is subject to the condition that this device does not cause harmful interference.
Copyright 2005 VERTEX STANDARD CO., LTD. All rights reserved. No portion of this manual may be reproduced without the permission of VERTEX STANDARD CO., LTD.