
Instructions / Assembly

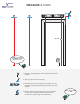

9. Lift the barn door up, and align the grooves in the wheels with the track,
then slide the barn door into the closed position.
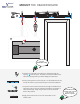
10. Align the floor guide with the bottom corner of the barn door on the side in which
the door slides, then slide the floor guide’s bolt towards the door leaving a little
breathing room.
11. Now that you have aligned the floor guide, mark the bolt position so you know
where to tighten, and mark the position of the floor guide on the wall so you
know exactly where to mount it.
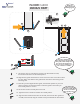
12. Lift the door off the track and place to the side.
13. Tighten the bolt on the Floor Guide at the marked position.
14. Align the Floor Guide with the marks on the wall, and screw the floor guide into
the wall (or floor board) using the 2 wood screws provided with the Floor Guide.
9
129
11
11
10
13
10
14
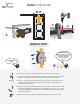
FLOOR GUIDE
BONUS PART
Your floor guide is
now secured! Re-hang
the door to check the
floor guide position.
Let’s have a little chat.
Your kit provides an optional
floor guide, which will prevent
the door from swinging into
the room. If you want to use it,
now is the time to install it.
Heads up!
This is the most
challenging part.