
Use and Care Manual
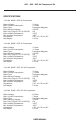

90C - 92C - 95C Air Compressor Kit
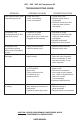
MOUNTING AND WIRING
1. Disconnectgroundcablefromvehicle’sbattery.
2. Temporarily position the air compressor in the location where it will be mounted.
3. Routegroundwiretothenegativepostofthebatteryortoanappropriategroundingpoint
and cut ground wire to length as needed.
4. Mountaircompressorwiththefoursetsof13/64”(5mm)bolts,nuts,washers,andlocking
washersprovided.Useofthreadsealantrecommended.
5. IMPORTANT:Pleasenote,yourcompressormayhaveacheckvalve.DONOTremove
checkvalvefromtheunit.
6. Connectcompressor’spositiveleadwiretooneoftheleadsofyourpressureswitch.
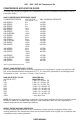
7. Makesurethatyourcompressorsetupisproperlyfused.Forappropriatefusesize,
refertoampdrawofcompressorinthespecicationssectionofthismanual.
Roundupwhenchoosingafuse.
8. Alwayslocatefuseascloseaspossibletopowersource.
9. Beforeconnectingtopowersource,re-checktomakesurethatallconnections
are properly connected.
10. Connect and test compressor system by running the compressor for a short time to build up
pressure in your air tank.
11.Onceairpressurereachespresetcutoutpressureofyourpressureswitch,thecompressor
will shut off. Inspect all air line connections for leaks with soap and water solution.
Ifaleakisdetected,theairlinemaynotbecutsquarelyorpushedallthewayin.
Tighten connections if needed.
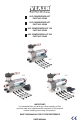
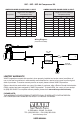
(Fig. 1) 90C - 92C - 95C Air Compressor Kit Installation Parts List:
A.MountingBolts(4pcs)
B.FlatWashers(8pcs)
C.LockingWashers(4pcs)
D.Nuts(4pcs)
E.InletAirFilterwithFilterElement(1pc)(P/N 00092 only)
F1.VibrationIsolator(4pcs) (P/N 00090 & P/N 00092 only)
F2.VibrationIsolator(4pcs) (P/N 00095 & P/N 02495 only)
G.RingTerminal(1pc) (P/N 00095 & P/N 02495 only)
(Fig. 2) Compressor
Mounting Hardware
*RefertoFig.1PartsList.
USER MANUAL
A B C D E
A
B
B
C
D
F1
GF1 F2