
DLPTM Projector Manual 100

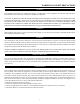
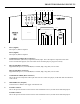
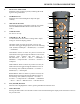

REMOTE CONTROL DESCRIPTION
9
1. IR OUTPUT INDICATOR
Illuminates when a button in pressed, indicating that an IR
signal is being transmitted.
2. LIGHT BUTTON
Illuminates the remote backlight for improved night
visibility.
3. OFF and ON BUTTON
Switches the projector ON and OFF. (These do not operate
when POWER/STANDBY indicator of the main unit
is off.)
4. CODE BUTTON
For Service use only.
5. CURSOR (▲ / ▼ / ◄ / ►)
Use these buttons to select items or settings and to adjust
settings or switch the display patterns.
UP Button: When no menus are present on-screen, the
UP button will toggle through aspect ratios in the following
order: (RATIO) Anamorphic → Standard (4:3) → Letterbox
→ IntelliWide
LEFT Button: When no menus are present on-screen, the
LEFT button will toggle through the different sources in the
following order: (INPUT) HD Pass Thru 2 →
HD Pass Thru1 → DVI 2 → DVI 1 → HD/RGB2 →
HD/RGB 1 → Component SD → S-Video 2 → S-Video 1 →
Composite
DOWN Button: When no menus are present on-screen, the
DOWN button will toggle through the different sources in
the following order: (RATIO) IntelliWide → Letterbox →
Standard (4:3) → Anamorphic
RIGHT Button: When no menus are present on-screen, the
RIGHT button will toggle through the different sources in
the following order: (INPUT) Composite → S-Video 1 →
S-Video 2 → Component SD → HD/RGB 1 → HD/RGB 2
→ DVI 1 → DVI 2 → HD Pass Thru 1 → HD Pass Thru 2
1
3
4
5
2
7
10
11
14
16
19
22
21
20
18
17
12
13
15
6
8
9
6. ENT (ENTER) BUTTON
When an item is highlighted on a menu, pressing ENTER will select that item.
7. MENU BUTTON
Pressing this button will access the OSD controls. Press this button during the display of the sub-menu to return to
the previous menu.