PJ853-.
PJ853-.book Page i Wednesday, August 16, 2000 11:41 AM Contents For Your Records ............................................................................1 Getting Started E N G L I S H Package Contents ...........................................................................2 Important Safety Warnings ..............................................................2 Connect Input and Output Devices..................................................3 Installation Steps .................................
PJ853-.book Page 1 Wednesday, August 16, 2000 11:41 AM Copyright © ViewSonic Corporation, 2000. All right reserved. Macintosh, Mac and Power Macintosh are registered trademarks of Apple Computer, Inc. Microsoft, Windows, Windows NT, and the Windows logo are registered trademarks of Microsoft Corporation in the United States and other countries. E N G L I S H ViewSonic, the three birds logo and OnView are registered trademarks of ViewSonic Corporation.
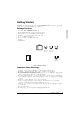
Getting Started Congratulations on purchasing a ViewSonic PJ853 LITEBIRD™ LCD projector. Save the original box and all packing material for future shipping needs. Package Contents • • • • • • • • E N G L I S H ViewSonic PJ853 LITEBIRD LCD Projector Remote Control Unit including 3V micro-lithium battery Three (3) AC power cords (U.S.
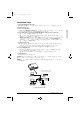
PJ853-.book Page 3 Wednesday, August 16, 2000 11:41 AM Projector control panel STA NDB Y/O N INPU T MUT E RES ET MENU POW TEM LAM ER P P Remote Control Sensor Power Switch E N G L I S H AC Inlet (to the power cord) Lens Air Vent (Intake) Foot Adjuster Figure 2: ViewSonic PJ853 Projector Connect Input and Output Devices The figure below shows the ports and configurations for connecting external devices to the ViewSonic PJ853. See “Installation Steps” on page 4.
PJ853-.book Page 4 Wednesday, August 16, 2000 11:41 AM Installation Steps 1 Verify Input/Output Connections 2 3 4 5 Make sure that you have properly connected all input cables before powering on the projector. Remove the lens cap. Power on the Projector. • Turn on the Main Power Switch located on the side of the projector. The power indicator will remain a steady orange. See “Using The Projector” on page 6. Press (and hold for 1 second) the Standby/ON button on the projector control pad.
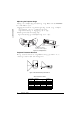
Adjusting the Projector Angle Adjust the projection angle using the foot adjusters shown in the illustration. See also KEYSTONE under "Input Menu on page" 9. 1 Press the release button to lower the front foot, then tilt the projector up as shown in Figure 5 below. E N G L I S H • The front foot locks into place when you release the button. • The front foot adjusts the vertical height of the projected image. 2 Rotate the rear foot adjuster to align the image.
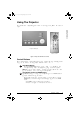
PJ853-.book Page 6 Wednesday, August 16, 2000 11:41 AM Using The Projector The control buttons display menus that are explained in detail in the section: “OnView Indicators” on page 8. E N G L I S H Projector control pad Remote control Figure 7: Projector and Remote Controls Control Buttons Press a control button to display a menu then use the arrow buttons to adjust the control.
PJ853-.book Page 7 Wednesday, August 16, 2000 11:41 AM Menu Button The MENU button is a small button on the remote control and the large button on the projector control pad. Press the Menu button and then use the up, down, right or left arrow indicators (▲▼) to display OnView® menus and adjust or select a menu item. E N G L I S H Position Button The POSITION button is on the remote control only. Press this button to adjust the position of the screen image.
PJ853-.book Page 8 Wednesday, August 16, 2000 11:41 AM Timer Button The TIMER button is on the remote control. You can set the timer from the OPTIONS menu explained in the next section. Use the Timer button to activate the on-screen timer. - Press once to display the time on the lower left part of the screen. - Press again to turn off the display. E N G L I S H Auto Button Use the Auto button to automatically adjust the vertical position and horizontal position, phase, and size.
Bright adjusts the brightness of the projected image. Contrast adjusts the contrast of the projected image. Sharpness (Video only) makes the edges of the image softer or sharper. Color (Video only) increases or decreases the saturation of the color. E N G L I S H Tint (Video only) adjusts the hue of the projected image from red to green. Vertical Position (RGB only) moves the projected image up or down. Horizontal Position (RGB only) moves the projected image to the right or left.
Blank selects the background color of a blank screen. You may select a blank screen, or a blank screen will be projected when no input source is detected. Mirror Select Normal for a table top projection. Select H: Invert for rear projection. Select V: Invert for a front projection ceiling mount. Select H&V: Invert for a rear projection ceiling mount. E N G L I S H Start up selects a start-up menu. You may select or deselect the ViewSonic Welcome menu to display automatically at start-up.
PJ853-.book Page 11 Wednesday, August 16, 2000 11:41 AM Other Information Specifications E N G L I S H LCD Type Pixels Colors Three 0.7” 800 x 600 polysilicon, active matrix TFT LCD 1,440,000 (800 dots x 600 lines x 3 colors) 16.7 million Lens Type Focal length Keystone correction Manual zoom (1.2x), manual focus F2.0 ~ 2.3 (f = 17.7 - 21.2 mm) Fixed 6:1 upward shift, normal at 10° ~ 12° projection angle Display Image size Focus distance Aspect ratio Orientation 76.
PJ853-.book Page 12 Wednesday, August 16, 2000 11:41 AM Timing Chart The following table lists the maximum refresh rates for standard resolutions (timing presets). Not all video cards can operate at these rates. See your graphics card user guide to ensure compatibility. Table 2: Computer Signal Rates and Resolution Resolution fH (kHz) fV (Hz) Rating Signal mode 640 x 350 37.9 85.1 VESA VGA-1 640 x 400 37.9 85.1 VESA VGA-2 720 x 400 37.9 85.0 VESA TEXT 640 x 480 31.5 59.
PJ853-.book Page 13 Wednesday, August 16, 2000 11:41 AM Troubleshooting No power • • • E N G L I S H Make sure power button (or switch) is ON. Make sure A/C power cord is securely connected to a power outlet. Plug another electrical device (like a radio) into the power outlet to verify that the outlet is supplying proper voltage. Power is on but projector is only displaying the logo • Make sure the input source is connected.
Power Indicator Lights If the Lamp or Temperature indicator is red or flashing red when the ViewSonic PJ853 is poweredon, there is a problem and you should not proceed. Power-off the the projector and let it cool down. Table 3: Power Indicator Lights Power Indicator Lamp Indicator Temperature Indicator Condition E N G L I S H Screen Messages Most screen messages disappear after 3 minutes and reappear when the unit is powered-on.
PJ853-.book Page 15 Wednesday, August 16, 2000 11:41 AM Maintenance Lamp Replacement Lamp Unit Lamp Unit • E N G L I S H Lamp Bulb To order a new lamp unit (part number RLC-130-03A) contact ViewSonic Customer Support: “Customer Support” on page 18. • Estimated lamp life is 2000 hours. WARNING: Make sure the power cord is disconnected. WARNING: Make sure the unit is cool. Wait 45 minutes for the lamp to cool down.
PJ853-.book Page 16 Wednesday, August 16, 2000 11:41 AM Installing Battery (for remote control) • Use a 3V micro lithium battery as shown in the illustration. • The battery is not rechargeable. E N G L I S H “+” side Pull out Battery Holder Figure 9: Installing the Battery 1 Pull the plastic tab from the battery access door when using the new projector for the first time. 2 Pinch the battery holder at the bottom of the remote control and gently pull out the holder with the battery.
PJ853-.book Page 17 Wednesday, August 16, 2000 11:41 AM Air-Filter Clean or replace the air-filter after about every 100 hours of use to prevent overheating which could damage the projector. WARNING: Never operate the projector without the air-filter; doing so will damage the projector. E N G L I S H Air Filter Cover Filter Figure 10: Cleaning the air-filter Make sure the projector is cool and the power cord is unplugged before beginning. Flip open the air-filter cover. Gently remove the air filter.
PJ853-.book Page 18 Wednesday, August 16, 2000 11:41 AM Customer Support For the most expedient answer to your question, do the following: 1 Check Troubleshooting (on the previous page). 2 For assistance contact your reseller. 3 For further assistance see the contact information listed below. Ask your reseller to refer you to a service center if contact information for your country or region is not listed below: NOTE: You will need to provide the serial number (on the back of the product).
PJ853-.book Page 19 Wednesday, August 16, 2000 11:41 AM LIMITED WARRANTY VIEWSONIC Projector What the warranty covers: E N G L I S H ViewSonic® warrants its products to be free from defects in material and workmanship during the warranty period. If a product proves to be defective in material or workmanship during the warranty period, ViewSonic will at its sole option repair or replace the product with a like product.
Appendix Power Cord Safety Guidelines Caution: Use a power cable that is properly grounded. Always use an AC power cord that meets your country’s safety standard. USA .............................. UL Canada......................... CSA Germany ...................... VDE Switzerland ...................SEV Britain............................BASE/BS Japan ............................
PJ853-.book Page 21 Wednesday, August 16, 2000 11:41 AM FCC Information E N G L I S H This equipment has been tested and found to comply with the limits for a Class B digital device, pursuant to part 15 of the FCC Rules. These limits are designed to provide reasonable protection against harmful interference in a residential installation.
PJ853-.