
User guide
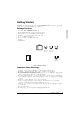

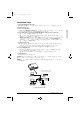
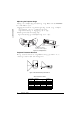
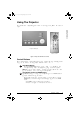
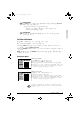
Table Of Contents
- For Your Records
- Getting Started
- Package Contents
- Important Safety Warnings
- Connect Input and Output Devices
- Installation Steps
- Adjusting the Projector Angle
- Projector Placement Distance
- Using The Projector
- Control Buttons
- OnView Indicators
- Setup Main Menu
- Input Menu
- Image Menu
- Options Menu
- Other Information
- Specifications
- Timing Chart
- Troubleshooting
- Power Indicator Lights
- Screen Messages
- Maintenance
- Lamp Replacement
- Installing Battery (for remote control)
- Cleaning Instructions
- Air-Filter
- Customer Support
- LIMITED WARRANTY
- VIEWSONIC Projector
- Appendix
- Power Cord Safety Guidelines
- FCC Information

3 ViewSonic PJ853
E
N
G
L
I
S
H
Connect Input and Output Devices
The figure below shows the ports and configurations for connecting external devices to the
ViewSonic PJ853. See “Installation Steps” on page 4.
Figure 2: ViewSonic PJ853 Projector
Figure 3: Connections and Projector Control Buttons
M
E
N
U
S
T
A
N
D
B
Y
/
O
N
I
N
P
U
T
M
U
T
E
R
E
S
E
T
L
A
M
P
T
E
M
P
P
O
W
E
R
Power Switch
AC Inlet
(to the power cord)
Air Vent
(Intake)
Foot Adjuster
Lens
Remote Control Sensor
Projector control
panel
V
ie
w
S
on
ic
PJ853
Video IN port Audio IN port
S-video IN port
RGB IN port
Control port
Remote control sensor
Standby/ON
Input
Mute
Reset Lamp indicator
Temperature indicator
Power indicator
Menu button
Air vent
(exhaust)
Speaker
Power Outlet
Power
ON/OFF
Power Cord
M
E
N
U
S
T
A
N
D
B
Y
/
O
N
I
N
P
U
T
M
U
T
E
R
E
S
E
T
L
A
M
P
T
E
M
P
P
O
W
E
R
PJ853-.book Page 3 Wednesday, August 16, 2000 11:41 AM