ViewSonic ® N2630w/N3230w/N3730w LCD TV - User Guide - Guide de l’utilisateur - Guía del usuario Model No.
Contents Important Safety Instructions.....................................................................................................2 Declaration of RoHS Compliance..............................................................................................3 Copyright Information................................................................................................................4 Product Registration..........................................................................................
ENGLISH Compliance Information FCC Statement This device complies with part 15 of FCC Rules. Operation is subject to the following two conditions: (1) this device may not cause harmful interference, and (2) this device must accept any interference received, including interference that may cause undesired operation. This equipment has been tested and found to comply with the limits for a Class B digital device, pursuant to part 15 of the FCC Rules.
Important Safety Instructions Read these instructions completely before using the equipment. 2. Keep these instructions in a safe place. 3. Heed all warnings. 4. Follow all instructions. ENGLISH 1. 5. Do not use this equipment near water. Warning: To reduce the risk of fire or electric shock, do not expose this apparatus to rain or moisture. 6. Clean with a soft, dry cloth. If further cleaning is required, see “Cleaning the LCD TV” in this guide for further instructions. 7.
ENGLISH Declaration of RoHS Compliance This product has been designed and manufactured in compliance with Directive 2002/95/EC of the European Parliament and the Council on restriction of the use of certain hazardous substances in electrical and electronic equipment (RoHS Directive) and is deemed to comply with the maximum concentration values issued by the European Technical Adaptation Committee (TAC) as shown below: Proposed Maximum Concentration Actual Concentration Lead (Pb) 0.1% < 0.
Copyright Information ® ViewSonic, the three birds logo, OnView, ViewMatch, and ViewMeter are registered trademarks of ViewSonic Corporation. Disclaimer:ViewSonic Corporation shall not be liable for technical or editorial errors or omissions contained herein; nor for incidental or consequential damages resulting from furnishing this material, or the performance or use of this product.
ENGLISH Antenna Installation Instructions 1.
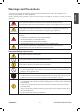
To prevent any injuries, the following safety precautions should be observed in the installation, use, servicing and maintenance of this equipment. Before operating this equipment, please read this manual completely, and keep it nearby for future reference. WARNING CAUTION This symbol is intended to alert the user to avoid the risk of electric shock. This equipment must not be disassembled by anyone except qualified service personnel.
ENGLISH • Use and handle the power cord with care. Do not place any heavy objects on the AC power cord. • Do not pull the AC power cord. Do not handle the AC power cord with a wet hand. • Do not touch the power cord and antenna cable during lightning. • Remove the plug from the wall outlet. If the equipment will not be used for a long period of time. • Do not place, use or handle this equipment near water. • Never expose the equipment to liquid, rain, or moisture.
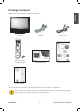
Package Contents ENGLISH Make sure all of the following contents are included. LCD TV AV Cable Power Cord Remote Control/ AAA Batteries X2 Quick setup guide Quick Start Guide Users Manual These items are all you need to set up and operate the LCD TV in its basic configuration. Make sure all of the above contents are included in the package. If you are missing anyitems, please contact the ViewSonic customer service department.
Installing the LCD TV ENGLISH Remove the Stand If you prefer to mount your new ViewSonic TV on a wall instead of attaching it to the stand. Please referencethe instructions included in the wall mounting kit (not included). IMPORTANT: Disconnect the Stand from the TV with the bottom foam packaging material still attached. Read all instructions before dismantling the stand. A) Lift foam packaging material from the TV box. B) Remove the top foam and bottom foam of the TV set.
Connecting TV Cable or Antennas Antenna Connection The antenna requirements for good color TV reception are more important than those for a black & white TV reception. For this reason, a good quality outdoor antenna is strongly recommended. The following is a brief explanation of the type of connection that is provided with the various antenna systems. A 75-ohm system is generally a round cable (not included) with Ftypeconnector that can easily be attached to a terminal withouttools.
Use one of the following two diagrams when connecting an outdoor antenna. ENGLISH A: Shows how to use a VHF/UHF combination outdoor antenna. B: Shows how to use a separate VHF and/or UHF outdoor antenna. A.
This reminder is provided to call the CATV system installers attention to Article 820-40 of the National Electrical Code (NEC) that provides guidelines for proper grounding and, in particular, specifies that the cable ground shall be connected to the grounding system of the building accurately, or as close to the point of cable entry as possible.
ENGLISH 1. Use a supplied antenna cable to connect the NTSC or/and ATSC signal to the LCD TVs TV CABLE terminal. N VGA AUDI O N R R L R L AUDI O L N Y P bP Y VG A IN N Y Y P bP AUDI OUT Pb Pr R Pb Pr R N L AUDI O L COXIA L REAR A OPTICA L R N VIDEO 2 IN S-VIDEO2 N R N 2. Connect the AC power cord to the back of the TV and connect the power cord to wall outlet.
Insert the 2 supplied batteries in remote control. Slide the back cover up to open thebattery compartment of the remotecontrol. ENGLISH Step1 Step2 Insert two AAA sizebatteries.Make sure to match the(+)and(-)ends of the batterieswiththe(+)and(-) ends indicated inthebattery compartment. Slide thecover back intoplace. Do not use causticcleaners(porcelain,stainless steel,toilet, or oven cleaneretc.)on the remote, as itmay become damaged.
TV Controls ENGLISH Front View of LCD Set TV Inputs(Side) 1. LED indicator lamp 3 2. Remote Sensor 4 3. VOLUME+/VOLUME 5 4. CHANNEL+/CHANNEL 6 5. MENU 7 6. Source 7. Power 2 1 To turn the TV power ON Put the TV where it can be easily viewed, connect the power plug of AC voltage at the back of the TV set, the LED indicator lamp turns red, then press the Power key. When the LED indicator lamp turns to blue, the TV set power is on. It takes a few seconds before the picture appears.
ENGLISH TV Inputs(Rear) 1. AC IN 7. VGA & VGA AUDIO IN 2. RF IN(NTSC/ATSC) 8. YPbPr1 IN 3. S-VIDEO2 IN 9. HDMI 2 IN 4. VIDEO2 IN 10. HDMI 1 IN 5. VIDEO2/S-VIDEO2 11. R/L OUT AUDIO IN 12. COXIAL OUT 6. YPbPr2 IN 13. OPTICAL OUT NOTE Caution when connecting to other equipment When using external equipment with this TV set, please read the instruction manual of the external equipment. Switch off all power supplies between other equipment and TV set before connecting.
ENGLISH TV Controls /MENU and OSD Lock Function TV Inputs(Side) 1.S-VIDEO1 IN 2.VIDEO1 IN 3.VIDEO1/S-VIDEO1 AUDIO IN 4.HEADPHONE OUT NOTE The TV set will mute automatically when the user plug is in the headphone. OSD Lock Function If TV is power on mode and press the MENU key on the keyboard for about 5 continuous seconds, the OSD will show”Menu Lock on”. Menu key on TV set will be invalid. Then you can release the OSD lock state by pressing the MENU key on the keyboard for about 5 continuous seconds.
1 2 3 6 7 4 5 9 8 1. Power key. 2. Wide Cycle through Wide mode settings: Full/4:3. 3. FREEZE Freeze the active window image. 4. SLEEP Cycle through the LCD TV sleep time: OFF/15/30/60/90/120 mins. 11 10 5. MUTE Pressing once mutes audio. Pressing again restores audio. 12 6. POP Turn PIP/POP on and off. 7. SOUR Select the active window in the PIP/POP mode. 14 13 16 17 18 15 19 20 21 22 ViewSonic 23 8. SWAP Swap the main source and sub source in the PIP POP mode. 9.
13. VIDEO MODE Cycle select the video mode. ENGLISH 1 2 3 6 7 4 5 9 8 14. VOL+/VOL− Increase or decrease volume. 15. CH+/CH− Change channel up or down. 16. CC Cycle through the Closed Caption: OFF/ CC1/CC2/CC3/CC4/T1/T2/T3/T4. 17. MTS/SAP 10 11 12 14 13 16 17 18 15 19 20 21 22 23 18. DISPLAY Pressing once displays a variety of information such as the current channel and the input source. 19. GUIDE In HDTV mode,pressing GUIDE displays the Program Guide on the screen. 20.
The PIP/POP feature allows simultaneous viewing of video from two sources(TV,VCR,DVD etc).Only one source’s audio is played at a time; the user may select which source’s audio is heard. 1. Press the POP button once to enter picture in picture mode. Main Sub 1.1 Press the SOUR button to toggle the audio source between the main window and the sub window. 1.2 Press the Swap button to swap the picture between the main and the sub window. Main Sub 1.
2. Press the POP button again to view images side by side. Sub ENGLISH Main 2.1 Press the SOUR button to toggle the audio source between the main window and the sub window. 2.2 Press the Swap button to swap the picture between the main and the sub window. 2.3 Press the SOURCE button to activate either the main and sub window, then press the Source to display the input list of the active window. 2.4 Press the ▲▼ button to change input source and press the Enter button. 3.
Wide Screen function allows viewing of 4:3/16:9 images in wide screen mode, cycling through the following wide screen setting. Press the WIDE button repeatedly to select the screen format you want. 1. NORMAL Mode : Display at 4:3 aspect ratio. 2. FULL Mode: Stretches the image vertically and horizontally to keeps the image size consistent in the center of the screen and stretches the sides. Note: This function is not effect when the input source is HDTV.
On-Screen Display MENU ENGLISH 1. Press the button to turn on the LCD TV 2. Press the MENU button on the remote control,the on-screen menu will appear on the screen. Use the ◄ ►buttons to select your main menu option. 2.1 VIDEO MENU: Allows you to make adjustments to your picture settings.
2.2 AUDIO MENU: ● If the signal source is HDTV/VIDEO / SVIDEO / YPbPr / HDMI/VGA, the AUDIO MENU appears as: ● If the signal source is TV and the signal is stable, the AUDIO MENU appears as: 2.3 SETUP MENU: Allows you to set up a variety of features: Language,Closed Caption,factory reset ,V-Chip,sleep timer.
2.5 HDTV MENU Allows you to edit and label channels. Allows you to set up the HDTV program function ENGLISH 2.4 TV MENU: 3. Press the ▲▼ buttons to select an option of the sub-menu,and press the Enter button. While in adjustment mode, and use the ◄► buttons to chang the value of the item. 4.Press the Menu button to exit the menu.
1. With the LCD TV connected to a television programming source ,press the Source button to switch the input source to HDTV. 2. Press the MENU button on the remote control to display the main menu, and use the ◄► buttons to select the HDTV. 3. Press the ▼ button to select Auto Scan, and press the Enter button. The Auto Scan automatically starts and creates list of receivable channels. Press the MENU button at any time to interrupt the memorization process. (The list cannot be created if interrupted) 4.
5.
The Program Guide feature brings all sorts of information provided by the cable TV broadcasting company to your screen, Such as program title, Program duration, time remaining, rating information, closed caption, availability,etc. 1.With the LCD TV connected to a television programming source, switch the input source to HDTV. 2.Press the GUIDE button on the remote control , the progam Guide will appear on the screen: 3.
Customizing the VIDEO Settings ENGLISH 1. Press the button to turn the LCD TV on. 2. Press the Menu button on the remote control to display the Main Menu, and use the ◄► buttons to select the Video. 3. Use the ▲▼ buttons to highlight an individual Video option, use the ◄► buttons to change the setting, and press the Menu to exit the menu 4.
Customizing the AUDIO Settings button to turn the LCD TV on. 2. Press the Menu button on the remote control to display the main menu,and use the ◄► buttons to select the Audio. 3. Use the ▲▼ buttons to highlight an individual AUDIO option, use the ◄► buttons to change the setting, and press the Menu to exit the menu. 4.
Customizing the Setup Settings ENGLISH 1. Press the button to turn the LCD TV on. 2. Press the MENU button on the remote control to display the main menu, and use the ◄► buttons to select the SETUP. 3. Use the ▲▼ buttons to highlight an individual SETUP option, use the ◄► buttons to change the setting, and press the MENU to exit the menu. 4.
The US has 2 rating systems for viewing content: Movie blocking(MPAA) and TV Blocking. The TV Blocking works with the V-CHIP to help parents block inappropriate programs from their children. The Movie blocking(MPAA) is used for original movies rated by the Motion Picture Association of American (MPAA) as broadcasted on cable TV and not edited for television.The V-CHIP can also be set to block MPAA-Rated Movies. 1. Use the ▼ button to select the V-CHIP, and press the OK to display the V-CHIP menu. 2.
Using the V-CHIP Setting ENGLISH 4.The TV GUIDELINE has 2 rating methods: Content-Based Rating and Age-Based Rating.
Customizing the TV Setting button to turn the LCD TV on. 2. Press the MENU button on the remote control to display the main menu and use the ◄► buttons to select the TV. 3. Use the ▲▼ buttons to highlight an individual TV option, use the ◄► buttons changes the setting, and press the Menu exits the Menu. 4.
Troubleshooting Tips ENGLISH Before calling for service, you can check the following items on symptoms and solutions. No picture: Check another channel, maybe station problem. Adjust the tuning control. Ensure that the input setting is in TV state. Ensure that the LCD is on. Ensure that the equipment is connected properly. No sound and distorted sound: Ensure that the input settings for the TV and sound are proper. Adjust the tuning control. Probably local interference, such as an appliance.
Incorporated in your TV receiver are the most up-to-date devices to eliminate interference.Local radiation however, can create disturbances which visibly affect your picture. Proper installation, a good antenna are your best safe-guards against these disturbances. RF INTERFERENCE Moving ripples across the screen are caused by nearby transmitting or receiving short-wave radio equipment.
ENGLISH Specifications N2630w Panel Type Color Viewing angles Input signal Video Audio Compatibility Resolution PC Supported Speaker output Power Operating Conditions Storage Conditions Dimension Voltage Temperature Humidity Temperature Humidity Physical Package Weight Regulation Power saving Modes ViewSonic Net Gross On Active off 26” TFT-LCD Active Matrix wide-XGA, 1366X768 Anti-Glare: 3H 170°H/170°V Fh:15k-80KHz, Fv:47-85Hz VGA input*1 TV system NTSC/ATSC Composite Video input*2 S-Video*2 Co
Panel Type Color Viewing angles Input signal Video Audio Compatibility Resolution PC Supported Speaker output Power Operating Conditions Storage Conditions Dimension Voltage Temperature Humidity Temperature Humidity Physical Package Weight Regulation Power saving Modes ViewSonic Net Gross On Active off 32” TFT-LCD Active Matrix wide-XGA, 1366X768 Hard coating: 3H 170°H/170°V Fh:15k-80KHz, Fv:47-85Hz VGA input*1 TV system NTSC/ATSC Composite Video input*2 S-Video*2 Component Video input*2(YPbPr/Y
N3730w ENGLISH Panel Type Color Viewing angles Input signal Video Audio Compatibility Resolution PC Supported Speaker output Power Operating Conditions Storage Conditions Dimension Voltage Temperature Humidity Temperature Humidity Physical Package Weight Regulation Power saving Modes ViewSonic Net Gross On Active off 37” TFT-LCD Active Matrix wide-XGA, 1366X768 Hard coating: 3H 170°H/170°V Fh:15k-80KHz, Fv:47-85Hz VGA input*1 TV system NTSC/ATSC Composite Video input*2 S-Video*2 Component Vide
Customer Support Note: You will need the product serial number. Country/Region Web Site Telephone United States www.viewsonic.com/support/ (800) 688 6688 Canada www.viewsonic.com/support/ (866) 463 4775 ViewSonic 40 N2630w/N3230w/N3730w ENGLISH For technical support or product service, see the table below or contact your reseller.
Limited Warranty ® What the warranty covers: ViewSonic warrants its products to be free from defects in material and workmanship, under normal use, during the warranty period. If a product proves to be defective in material or workmanship during the warranty period, ViewSonic will, at its sole option, repair or replace the product with a like product. Replacement product or parts may include remanufactured or refurbished parts or components.