
User manual


6
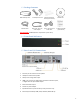
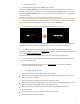
b. To identify the assigned IP address, highlight “Device information” from the “Main Menu” and
press “Enter to select. The following “Device information” dialog box will be displayed:
The “Device information” dialog box lets you confirm the firmware version, IP address, and
current time on the device’s clock.
2) Static – Manually assign network IP address
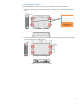
a. Highlight “Networking setting” from the “Main Menu” and press “Enter” on the keyboard to select.
The following menu will be displayed:
b. The following Static IP dialog box will be displayed:
2.3. Video Output Settings
For best quality, set the output resolution to match your display’s native resolution to avoid image
scaling and blur.
If you are connecting to an LCD TV, the resolution setting is most likely 1366x768, 1280x720, or
1920x1080. If you are connecting a LCD computer monitor, projector, or plasma display, refer to the
device specifications for the best matching setting.
Highlight “Video Setting” from the “Main Menu” and press “Enter” on the keyboard to select. The
following list of output resolution will be displayed:
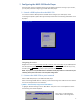
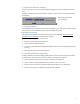
Using the arrow keys, move down to
“Static IP” below “DHCP”, press “Space
bar” on the keyboard to fill in the star (*)
at the Static IP brackets. Then move
down to <OK> and press “Enter” on the
keyboard to select.
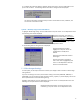
Using the keyboard arrow keys,
highlight “IP” and press “Enter” on
the keyboard to modify the IP
address.
Repeat for each field which needs to
be changed
Use the arrow keys to navigate to
<OK>. Once <OK> is highlighted, press
“Enter” on the keyboard to save and
apply your settings.hanged.
Highlight the desired resolution, press the space bar to fill
in the star (*), and press “Enter” on the keyboard to select