VSD243 Smart Display User Guide Model No.
Thank you for choosing ViewSonic With over 30 years as a world leading provider of visual solutions, ViewSonic is dedicated to exceeding the world’s expectations for technological evolution, innovation, and simplicity. At ViewSonic, we believe that our products have the potential to make a positive impact in the world, and we are confident that the ViewSonic product you have chosen will serve you well.
Compliance Information Please read before proceeding • Use only the batteries and power adapter provided by the manufacturer. The use of unauthorized accessories may void your warranty. • Do not store your device in temperatures higher than 50°C (122°F). • The operating temperature for this device is from 0°C (32°F) to 35°C (95°F).
Declaration of RoHS2 Compliance This product has been designed and manufactured in compliance with Directive 2011/65/ EU of the European Parliament and the Council on restriction of the use of certain hazardous substances in electrical and electronic equipment (RoHS2 Directive) and is deemed to comply with the maximum concentration values issued by the European Technical Adaptation Committee (TAC) as shown below: Substance Lead (Pb) Mercury (Hg) Cadmium (Cd) Hexavalent Chromium (Cr6+) Polybrominated bipheny
Important Safety Instructions 1. DO NOT place objects on top of the device, as objects may scratch the screen. 2. DO NOT expose the device to dirty or dusty environments. 3. DO NOT place the device on an uneven or unstable surface. 4. DO NOT insert any foreign objects into the device. 5. DO NOT expose the device to strong magnetic or electrical field. 6. DO NOT expose the device to direct sunlight as it can damage the LCD Screen. Keep it away from heat sources. 7.
Copyright Information Copyright © ViewSonic Corporation, 2018. All rights reserved. Android, Google, Google Play, the Google Play logo and other marks are trademarks of Google Inc. This product has an AndroidTM platform based on Linux, which can be expanded by a variety of JME-based application SW. All products used in this device and trademarks mentioned herein are trademarks or registered trademarks of their respective owners.
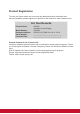
Product Registration To meet your future needs, and to receive any additional product information as it becomes available, please register your product on the Internet at: www.viewsonic.com. For Your Records Product Name: Model Number: Document Number: Serial Number: Purchase Date: VSD243 ViewSonic Smart Display VS16340 VSD243_UG_ENG Rev.
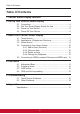
Table of Contents Table of Contents 1 VSD243 Smart Display Features 2 Set Up Your VSD243 Smart Display 2.1 2.2 2.3 2.4 Connection.......................................................................... 4 Get Your Smart Display Ready for Use............................... 4 Power on Your Device......................................................... 5 Power Off Your Device........................................................ 6 3 About Your VSD243 Smart Display 3.1 3.2 3.3 3.4 Touch Screen..........
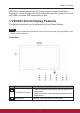
Table of Contents VSD243 is a Smart Display with 23.6-inch quad-core display running on Android 8.1 (Oreo) Comes with 1920x1080p HD resolution, allow you to work with HDMI, full-sized USB connectivity as well. 1 VSD243 Smart Display Features This section introduces you to the features of your Smart Display. NOTE • The features or applications described in this User’s manual may vary depended on the device model purchased. Front View No.
Table of Contents No. Components 3 Touch screen 4 Power button 5 LED indicator 6 OSD Menu / Exit 7 Arrow Button (Up / Right) Arrow Button (Down / Left) 8 9 Input Signal Switch OSD Menu Select Descriptions - Touch the screen to control the on-screen configurations including menu items,applications, buttons,keyboard and so on. Press to power on / lock the smart display. - Press about 0.5 seconds to power on the power. - Lock the smart display when the display is on.
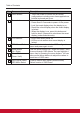
VSD243 Smart Display Features Back View LEFT SIDE RIGHT SIDE 1 2 3 1 4 5 6 2 7 8 LEFT SIDE No. Components Descriptions 1 RJ45 Connector Connect with a RJ45 cable for network connection. 2 HDMI OUT 3 HDMI IN Connect to digital high quality device for video and audio configurations (e.g. PC Monitor, BD Player, Computer, Game Console ) 4 Headset Jack Connect to earphone or headset. 5 Microphone IN Plug a compatible microphone into the device.
Set Up Your VSD243 Smart Display 2 Set Up Your VSD243 Smart Display 2.1 Connection LAN USB Type-A Printer HDMI OUT PC Monitor USB Storage USB Type-A Notebook HDMI IN Headset Microphone External Computer DVD Player Earphone Keyboard USB Type-A Mouse USB Type-A Microphone USB Type-B SD SD Card USB Power Wi-Fi Devices Phone U Disk Outlet 2.2 Get Your Smart Display Ready for Use Insert the SD card 1 Insert a SD card if desired on the back of your smart display.
Set Up Your VSD243 Smart Display Connect the Power Cord 1 Connect the included power cord to the power jack. 2 Connect the other end of the power cord to a power outlet. 2.3 Power on Your Device 1 2 3 4 5 After connecting the power cord, you can press the power button about 0.5 seconds to power on your device. Once powered-up, the LED indicator will show solid Blue. The unlock display will appear after a short boot-up period. (If the lock screen function is enabled).
Set Up Your VSD243 Smart Display 2.4 Power Off Your Device 1 2 Press and hold the power button for about 3 seconds. When the power off menu appears, touch OK.
About Your VSD243 Smart Display 3 About Your VSD243 Smart Display 3.1 Touch Screen To navigate and interact on the display, use your finger to touch the sensitive surface of the screen directly. You can manipulate icons, buttons, menu items, on-screen keyboard and other items on the touch screen with the following methods : Methods Touch Touch and Hold Drag Swipe or Slide Zoom Out Zoom In Descriptions Simply touch the items with you finger.
About Your VSD243 Smart Display 3.2 Applications, Widgets and Shortcuts The soft buttons or icons offer a variety of functions and shortcuts. On the Home screen, it is your starting point to access all the features on your device. It displays application icons, widgets, shortcuts and so on. Applications: Software allows you to perform a specific task. Power on your device, and it is preloaded with a variety of applications already. You can also download additional applications from the Aptoide store.
About Your VSD243 Smart Display 1 4 3 2 9 5 6 No. 1 3:11 Items Descriptions Date & Time Display the current date and time. 2 Shortcuts 3 Apps 4 Ethernet/Wi-Fi 5 Back 6 Home 7 Recent Applications 8 Screehshot 9 10 7 10 8 Decrease Volume button Increase Volume button You can add an application shortcut to the Home screen and move it freely by touching and holding the App icon. This icon allows you to open a shortcut item quickly.
About Your VSD243 Smart Display 3.4 Customizing Your Home Screen 3.4.1 Add an Item (Shortcut) • On the Apps screen, touch APPS or WIDGETS tab to enter APPS or WIDGETS configuration screen. • Select one of the APPS or WIDGETS item that you want to add. • Touch and hold the item to add it onto the selected Home screen. 3.4.2 Move an Item • On the Home screen, touch and hold the item that you want to move. • Move the item to the new position. • Then release your finger to add the item to the new position.
About Your VSD243 Smart Display • You can touch the Back button to return to the previous screen without making any change. NOTE • All Home Screens share the same background. You cannot set different wallpapers to individual Home Screen panel.
About Your VSD243 Smart Display 3.5 Connecting to HDMI-compliant Devices via HDMI Input HDMI (High-Definition Multimedia Interface) is a compact audio/video interface for transferring uncompressed digital audio/video data. You can obtain the best user experience for video playback and gaming via HDMI. VSD243 is equipped with an HDMI input for connecting to an external HDMI-compliant device.
OSD Menu 4 OSD Menu CONTRAST/BRIGHTNESS CONTRAST 70 BRIGHTNESS 80 Press the Menu/Exit button on bottom right of your VSD243 to launch the OSD configuration screen. The OSD configuration screen can be used to configure the Contrast/Brightness, Input Select, Audio Adjust, Color Adjust, Information, Manual Image Adjust, Setup Menu and Memory Recall. 4.1 Adjustment Bars Contrast/Brightness: Contrast: Select and drag the slider on the Contrast bar to adjust the contrast of the display.
OSD Menu 4.2 Functions items Input Select: Select the input source from either HDMI or Android. Connect the HDMI cable to other HDMI source first before selecting the HDMI input. Color Adjust: Available seletions are sRGB, Bluish, Cool, Native, Warm and user color. Information: Select this item to show the information about your VSD243 such as the Resolution, H.Frequency, V.Frequency, Pixel Clock, Model Number and Website.
OSD Menu 4.3 OSD Notice idling: The OSD menu will close and return to the original processed OSD menu after the OSD time out value expired. No signal: • There is no HDMI connection. • The connected HDMI source and your smart display is not active. Make sure the HDMI source is not in Off, Standby, Hibernate or Sleep mode. 4.4 OSD and Hot keys setting OSD Lock: Press and hold the OSD menu [ ] and the up arrow [▲] for 10 seconds to set.
Troubleshooting 5 Troubleshooting 5.1 Touch Screen Problems Problems Touch screen does not respond to hand gestures or render them properly. The touch function on the VSD243 HDMI Mode does not work properly when the USB cable is connected to the USB Type-B connector Causes power noise during device turn on process Solutions Reconnect the USB cable. Water drop or spot above Clean and remove the the glass surface. water drop then reconnect the USB cable.
Appendix 6 Appendix Specifications LCD Spec. Size 60cm (23.
Appendix Weight 5.62Kg (12.39 lbs.) (Net) 8.12Kg (17.90 lbs.) (Gross) SW OS Android 8.1 (Oreo) System CPU/SoC Rockchip RK3288W Speed 1.8GHz Cores Quad-core Graphic Embedded Memory DDR3 2GB, Speed to 800Mbps Storage eMMC (NAND), 16GB WLAN 802.11 b/g/n Environment Temperature & Humidity Operation: 20%~90% @ 35oC Non-condensing Altitude 0~2,000m (6,562 ft) Storage: 90% R.H.
Customer Support For technical support or product service, see the table below or contact your reseller. NOTE: You will need the product serial number. Country/Region Website T= Telephone C = CHAT ONLINE Email Australia/New Zealand www.viewsonic.com.au AUS= 1800-880-818 NZ= 0800-008-822 service@au.viewsonic.com Canada www.viewsonic.com T= 1-866-463-4775 service.ca@viewsonic.com Europe www.viewsoniceurope.com www.viewsoniceurope.com/eu/support/call-desk/ Hong Kong www.hk.viewsonic.
Limited Warranty ViewSonic® Smart Display What the warranty covers: ViewSonic warrants its products to be free from defects in material and workmanship, under normal use, during the warranty period. If a product proves to be defective in material or workmanship during the warranty period, ViewSonic will, at its sole option, repair or replace the product with a like product. Replacement product or parts may include remanufactured or refurbished parts or components.
Limitation of implied warranties: There are no warranties, express or implied, which extend beyond the description contained herein including the implied warranty of merchantability and fitness for a particular purpose. Exclusion of damages: ViewSonic’s liability is limited to the cost of repair or replacement of the product. ViewSonic shall not be liable for: 1.