
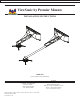
Specifications
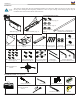
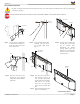
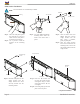

Page 4 Installation Instructions
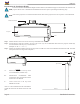
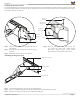
Determining the Installation Height
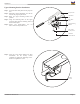
Step 1. Measure distance from center of lens to the top of the PDS-PLUS bracket.
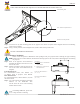
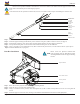
Step 2. Add the distance from the ground to the top of the screen (A), the recommended offset from the projector manual (B),
the measurement from Step 1 (C), and then add 1.5”.
(Example: A + B + C + 1.5” = ?)
Step 3. Measure the calculated distance from the top edge of the viewable area of the screen/whiteboard and mark the wall. This mark
will represent the lower edge of the wall plate.
Refer to the projectors User’s Manual to determine the offset of the projector lens to the top of the screen/whiteboard.
Lens
PDS-PLUS Bracket
Projector
In order to determine the installation height and throw distance, the PDS-PLUS projector bracket must be mounted to the
projector. Please refer to the PDS-PLUS Installation Instructions prior to performing the following steps.
Top of Screen
Mark
Legend
A - Distance from ground to the top of the
screen/whiteboard (viewable area).
B - Manufacturers recommended offset
measurement. This measurement will be
listed in the Users Manual.
C - Center of the lens to the top of the
PDS-PLUS bracket.
Add 1.5” to the calculated total. This total distance
will be the location for the bottom rail on the wall
plate.
Ground
WMK-027