
Specifications


(6)
P
P
r
r
o
o
g
g
r
r
a
a
m
m
m
m
i
i
n
n
g
g
A. Accessing the Programming Mode
1. Accessing the Programming Mode Locally (Security Code Bypass Mode)
B. Quick Programming Features
Memory
Location
Enter Digits
- then -
Enter
03 #01
11 #03
12 #03
✱2
To Program the C-1000B...
1. ...to set door strike 1 to activate for 3 seconds
2. ...to set the auxiliary contacts to activate a camera while either doorbox is activated
3. ...to set the auxiliary contacts to activate an external ringer or strobe light in a custom ring cadence
while either doorbox is ringing
4. ...to have doorboxes ring phones in a custom ring pattern
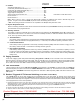
C. Programming Examples
D. Security Code
This six digit number can be used to access the programming mode. The security code has been factory set to 845464 (V-I-K-I-N-G). It is recom-
mended that you change the security code to a personal 6 digit number. To change the security code, access programming (see Programming sec-
tion A). Enter six digits 0-9 followed by #47. If you have forgotten your security code, follow the steps in Programming section A, 1. Accessing
the Programming Mode Locally. Note: The security code must be six digits in length and can NOT contain a
✱
or #.
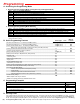
Door strike 1 activation time .5 - 10 seconds (see “Note 1” below) ................................................................
Door strike 2 activation time .5 - 10 seconds (see “Note 1” below) ................................................................
Auxiliary contact activation time .5 - 10 seconds (see “Note 1” below) ..........................................................
Note 1: 00 = .5 seconds, 01-10 = 1-10 seconds, factory set to 00 (.5 seconds).
Auxiliary contact latched while either doorbox is activated ............................................................................
** Auxiliary contact activated in custom ring cadence ....................................................................................
Security Code (factory set to 845464) ...........................................................................................................
Disable special modes (
✱1 - ✱6) listed below (factory default) .....................................................................
* Doorbell mode ............................................................................................................................................
* Custom ring mode .......................................................................................................................................
* Multiple relay activation mode .....................................................................................................................
* Paging mode ...............................................................................................................................................
* Analog PABX/KSU station mode .................................................................................................................
* Inhibit latching commands mode .................................................................................................................
Auxiliary contact mode (disables CCTV video control mode, factory default) ................................................
CCTV video control mode (disables auxiliary contact mode) ........................................................................
CCTV Inactive (Idle State) Modes:
Camera 1 and 2 output disconntected (factory default) .................................................................
Output camera 1 ...........................................................................................................................
Continue to output video from last camera activated .....................................................................
Sequenced video from camera 1 and 2 (rotates every 4 seconds) ................................................
To reset to factory settings .............................................................................................................................
* Note: Multiple modes may be selected.
** Note: Not compatible with Analog PABX/KSU Station mode.
+
+
+
+
+
+
+
+
+
+
#01
#02
#03
#03
#03
#47
#04
#04
#04
#04
2 digits (00-10)
2 digits (00-10)
2 digits (00-10)
11
12
6 digits (0-9)
✱0
✱1
✱2
✱3
✱4
✱5
✱6
✱7
✱8
01
02
03
04
###
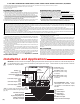
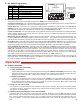
Step 1. Disconnect the PHONE LINE INPUT.
Step 2. Slide the TALK BATTERY switch to the ON position.
Step 3. Move DIP switch 2 from OFF to ON (see Programming section E).
Step 4. Come off-hook with a phone connected to terminals 4 & 5, LINE OUT TO PHONES.
Step 5. A double beep will indicate that you have accessed the programming mode.
Step 6. You can now Touch Tone program the features listed in section B below.
Step 7. When finished programming, hang up and move DIP switch 2 to the OFF position.
Step 8. Slide the TALK BATTERY switch back to the OFF position.
Step 9. Reconnect line to PHONE LINE INPUT.
Note: Programming from a cell-phone may not be suitable in areas with weak coverage.
2. Accessing the Programming Mode Remotely
Step 1. Call into the C-1000B from a Touch Tone phone. Note: Call in from another line to avoid C.O. busy signals,etc.
Step 2. Answer the call using the phone (device) connected to terminals 4 & 5, LINE OUT TO PHONES.
Step 3. From either phone enter ✱ followed by the six digit security code (factory set to 845464, see Programming section D).
Step 4. A double beep will indicate that you have accessed the programming mode.
Step 5. You can now Touch Tone program the features listed in section B below.
Note: Programming from a cell-phone may not be suitable in areas with weak coverage. Analog PABX/KSU station mode must be programmed
locally, see section 1 above.