Use & Care Manual Viking Range, LLC 111 Front Street Greenwood, Mississippi 38930 USA (662) 455-1200 For product information call 1-888-(845-4641), or visit the Viking Web site at vikingrange.
Congratulations Congratulations and welcome to the elite world of Viking ownership. We hope you will enjoy and appreciate the care and attention we have put into every detail of your new, state-of-the-art appliance. Your unit is designed to offer years of reliable service. This Use and Care Guide will provide you with the information you need to become familiar with your appliance’s care and operation. Your complete satisfaction is our ultimate goal.
Table of Contents Warnings WARNING To avoid electrical shock which can cause severe personal injury or death, turn power disconnect switch to OFF before cleaning. After cleaning, return power disconnect switch to ON position. WARNING ELECTRICAL SHOCK HAZARD Disconnect power or turn power disconnect switch to OFF position before removing top grille. Failure to do so can result in death or electrical shock.
Getting Started General Features • Install and level your applianceon a floor that will hold its weight, plus food weight (approximately 1200 pounds [540kg]) and in an area suitable for its size and use. • Do not install a near a heat source, nor in a location where the surrounding temperature will fall below 60° F (16° C). • Do not allow your appliance to be exposed to the weather or outdoor elements.
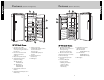
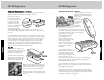
Getting Started Features (built-in all refrigerator) 1 (built-in all freezer) 1 2 9 2 7 3 6 3 8 4 4 7 5 6 5 30” W. Model Shown 30” W. Model Shown 1. Variable Speed DC Overdrive™ Compressor and Super Clog-Resistant™ Condenser 2. Electronic Controls with digital temperature readouts 3. Dairy Compartments (2) 4. Adjustable Door Bins (Patent Pending) 30” W. Models– Full-Width (4) 36” W. Models– Half-Width (2) Full-Width (3) 5. Adjustable Cold Zone™ Drawer 6.
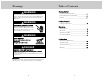
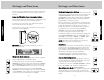
Settings and Functions In order for your new appliance to work properly, it is important that you understand its various features, controls, and how to use them. Power On/Off Switch (Power Interruption Switch) The power on/off switch is located behind the top grille. It is used to turn the power off when cleaning. Your appliance arrives from the factory with the power interruption switch on. Product Controls To turn power on, press power on/off switch to the on position. Replace the center grille blade.
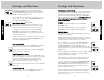
Settings and Functions To activate the max refrigerator mode, simply press the ”ACTIVATE CONTROLS” pad, followed by the “MAX REF” pad. The “MAX REF” light will glow to let you know you've turned on the max refrigerator mode. To deactivate the max refrigerator mode before the end of the four hour cycle, press the ”ACTIVATE CONTROLS” pad, followed by the “MAX REF” pad.
All Refrigerator Spillproof Plus Shelves with Nano Technology Some refrigerator models include Spillproof Plus shelves. These spillproof shelves contain liquids with no raised edges in order to provide extra shelf capacity. Standard Spillproof Shelves Standard spillproof shelves are constructed of polypropylene molded around the glass and metal rail. This design means that the shelves are completely enclosed and liquids can't seep under the glass. This localizes spills and makes clean-up easier.
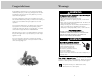
All Refrigerator All Refrigerator Adjustable Humidity Zone™ Drawers Adjustable Cold Zone™ Drawer The moisture control on your produce drawers gives you the ability to change the amount of moisture or humidity in a drawer. The moisture control is located underneath the front trim. Slide the control to a higher setting for ROL HIGH CONT TURE MOIS storing produce with LOW leaves, such as lettuce, spinach, or cabbage.
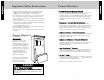
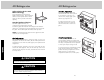
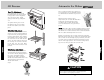
All Freezer Automatic Ice Maker Door Bin Adjustment The ice maker and slide-out ice drawer on your refrigerator are not adjustable, but the ice drawer slides forward for easy access to ice. Your appliance’s door bins hold two-liter bottles and can be placed in any position on the refrigerator door. To remove a bin, simply grasp it, lift the bin up, and pull it out. 2 1 To replace the bin, place it over the glides in the door, and push the door bin down to lock it into place.
Automatic Ice Maker (All Freezer) Food Storage Guide Storing Fresh Food (All Refrigerator) Ice Bin Adjustment Ice bins can be adjusted to match the way you use your freezer. The ice bin on the left-hand side is used for collecting ice from the ice maker. Once the left-hand ice bin is full, the bins can be reversed so additional ice is made. If the ice maker is not operating, the ice bin can be used for cold storage. Wrap or store food in the refrigerator in airtight and moistureproof material.
Food Storage Guide Cleaning and Maintenance Packaging Food for Freezing (All Freezer) The secret of successful freezing is in the packaging; the way you close and seal a package of food must not allow air or moisture in or out, or the quality of the food will deteriorate while frozen.
Cleaning and Maintenance Cleaning Chart Glass Shelves (All Refrigerator) Part What to Use How to Clean Removable parts (shelves, drawers) Sponge or cloth with mild detergent and warm water Hand wash, rinse, and dry thoroughly. Front door panels • Stainless steel Stainless steel cleaner Wipe with soft cloth. • Painted Sponge or cloth with mild detergent and warm water Hand wash, rinse, and dry thoroughly.
Cleaning and Maintenance Door Stop Adjustment Your appliance is factory set at the 110° door stop position. To change to either the 90° or 120° position, remove the door stop pin using a 3/16” allen wrench. 1 1 Cleaning and Maintenance Saving Energy You can help your appliance use less electricity with these simple tips: • Open the door as few times as possible. Think about what you need before you open the door. Get everything out at one time.
Troubleshooting Troubleshooting Understanding Sounds You May Hear Most performance problems you might encounter with your appliance will be minor and you should be able to fix them yourself without tools. Your new appliance may make different sounds than your old one. Hard surfaces, such as the ceilings, walls, and cabinets around the unit can make these sounds seem louder. However, these sounds are normal and will soon become familiar; they indicate that your appliance is working properly.
Service Information Troubleshooting Common Ice Maker Problems (All Freezer) PROBLEM Ice crescents attached at corners POSSIBLE CAUSE AND/OR REMEDY This is normal. They break apart easily. Shake bin occasionally to keep cubes seperated. Ice maker will not operate • On/off lever is in the off (up) position. Lower or ice is not made fast lever to on (down) position. enough • Freezer is not cold enough. Adjust temperature controls and wait 24 hours.
Warranty Warranty BUILT-IN ALL REFRIGERATORS AND ALL FREEZERS WARRANTY THREE YEAR FULL WARRANTY Built-in all refrigerator and all freezers and all of their component parts, except as detailed below*†, are warranted to be free from defective materials or workmanship in normal residential use for a period of three (3) years from the date of original retail purchase or closing date for new construction, whichever period is longer.
34 35