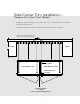
Installation Guide Built-In Refrigeration Top Grille / Center Trim Installation (Dual Installation)
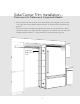
Side/Center Trim Installation Professional & Professional Integrated Models • Remove cabinet side trim mounted on the left hand side of the refrigerator to be installed on the right side of the installation. Replace with the “Z” shaped side trim provided in the grille kit. • For Professional (not including the Integrated line), skip to the next step. Remove cabinet side trim mounted on the right side of the refrigerator to be installed on the left side of the installation.
Side/Center Trim Installation Professional & Professional Integrated Models • Engage the right hand refrigerator’s left side trim into the “J” shaped portion of the left side refrigerator’s right side trim. • Finish unit installation according to installation instructions provided in each unit.
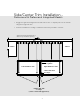
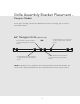
Grille Assembly Bracket Placement Professional & Professional Integrated Models For 66” grille, excluding Custom Panel, Add/Remove brackets to full length grille as required. See illustration below. 66” Professional/Integrated Grille Use this bracket if 36” W. product is on right side (facing unit), otherwise remove. TOP (back view) Use this bracket if 30” W. product is on left side (facing unit), otherwise remove. Use this bracket if 36” W. product is on left side (facing unit), otherwise remove.
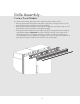
Grille Assembly Install Professional & Professional Integrated Models • Remove center grille blade by lifting up and pulling forward. • Insert grille into refrigerators. Screw grille assembly into units with (4) screws removed in Step 3 (See Grille Removal Section).
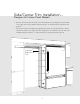
Side/Center Trim Installation Designer & Custom Panel Models • Remove cabinet side trim mounted on the left hand side of the refrigerator to be installed on the right side of the installation. Replace with the “Z” shaped side trim provided in the grille kit. • For Professional (not including the Integrated line), skip to the next step. Remove cabinet side trim mounted on the right side of the refrigerator to be installed on the left side of the installation.
Side/Center Trim Installation Designer & Custom Panel Models • Engage the right hand refrigerator’s left side trim into the “J” shaped portion of the left side refrigerator’s right side trim. • Finish unit installation according to installation instructions provided in each unit.
Grille Assembly Bracket Placement Designer Models For 66” grille, excluding Custom Panel, Add/Remove brackets to full length grille as required. See illustration below. 66” Designer Grille Use this bracket if 36” W. product is on right side (facing unit), otherwise remove. (back view) TOP Use this bracket if 30” W. product is on left side (facing unit), otherwise remove. Use this bracket if 36” W. product is on left side (facing unit), otherwise remove. Use this bracket if 30” W.
Grille Assembly Install Designer Models • Remove center grille blade by lifting up and pulling forward. • Insert grille into refrigerators. Screw grille assembly into units with (4) screws removed in Step 3 (See Grille Removal Section).
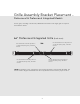
Grille Assembly Custom Panel Models On Custom Panel models, grill spacers from original unit grilles must be reused: • Remove grille brackets from grille included in the grille kit by removing 4 screws on each grille bracket located on the back of the grille assembly. • Remove grille brackets and spacers from original unit grilles by removing 4 screws on each grille bracket located on the back of each grille assembly.
Grille Assembly Bracket Placement Custom Panel Models For 66” grille, excluding Custom Panel, Add/Remove brackets to full length grille as required. See illustration below. 66” Custom Grille Use this bracket if 36” W. product is on right side (facing unit), otherwise remove. (back view) TOP Use this bracket if 30” W. product is on left side (facing unit), otherwise remove. Use this bracket if 36” W. product is on left side (facing unit), otherwise remove. Use this bracket if 30” W.
Grille Assembly Install Custom Panel Models • Remove center grille blade by lifting up and pulling forward. • Insert grille into refrigerators. Screw grille assembly into units with (4) screws removed in Step 3 (See Grille Removal Section).
Viking Range, LLC 111 Front Street Greenwood, Mississippi 38930 USA (662) 455-1200 For product information, call 1-888-845-4641.